Update #3 - DIY Custom Dressing Room + Video Tutorial

Well, the Mr. was at it again this past week...  No, not another hiatus!  The positive feedback on Instagram of our previous update was the fuel he needed to keep going.  We thank you for that!  He turned on his turbo DIY engine and completed the remaining 6 doors and installed them.

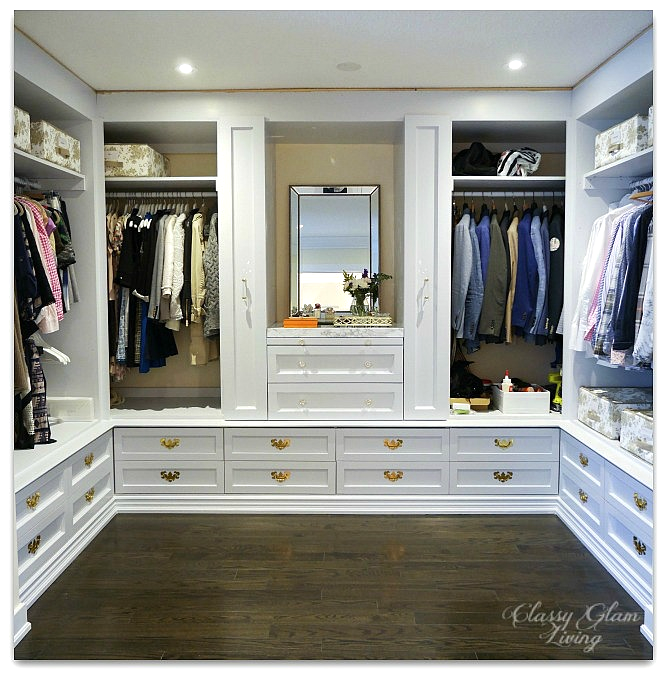
This is the view as you come into our master suite.  This is the hallway that separates the closet/ dressing nook to the right, and the master ensuite to the left.  Our sleeping quarter is at the end where the chandelier is.  

DIY Custom Dressing Room Walk-in Closet | Closet doors installed | Youtube Tutorial | Classy Glam Living

If we hadn't made this change to the original floor plan to replace the his and her closets, then this hallway would look very enclosed.  Deleting that separation and widening the entrance of the closet gave the bedroom a much larger impression.

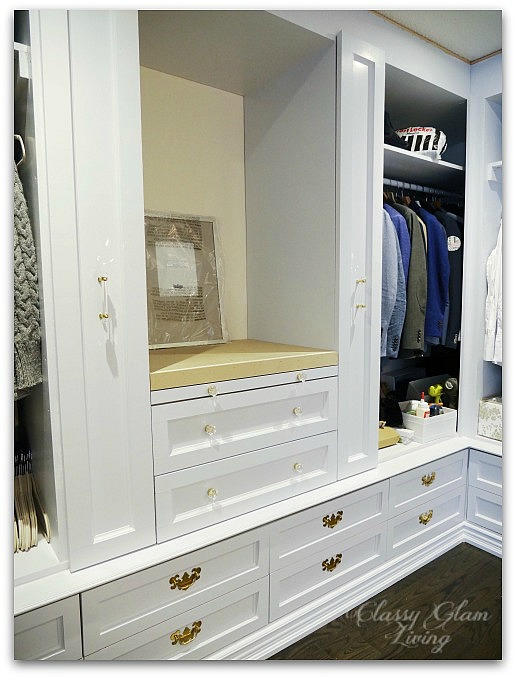
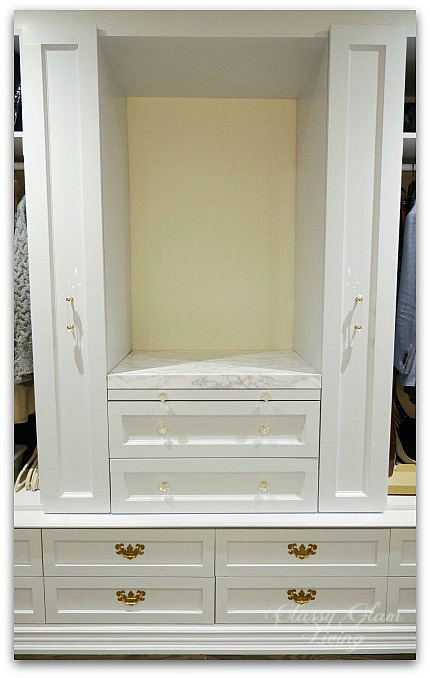
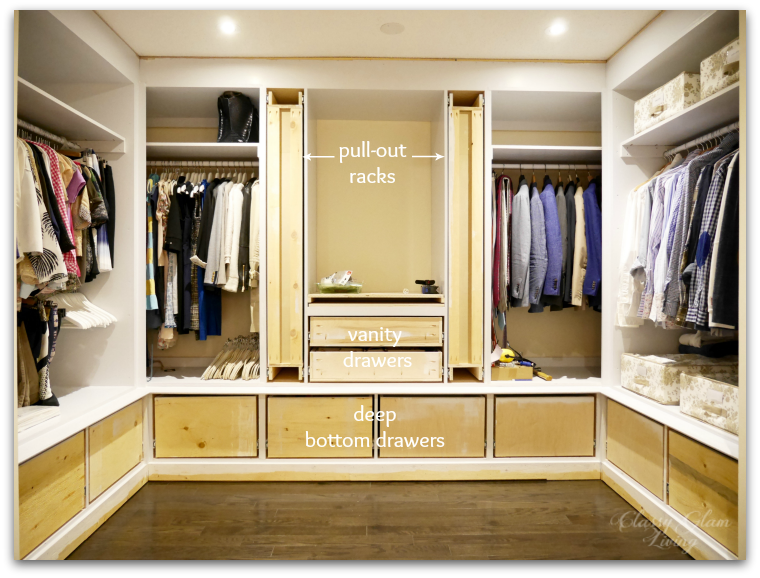
And these are the 6 doors that the Mr. worked on this past week.  I'm so glad I can now hide my mess behind them!!

DIY Custom Dressing Room Walk-in Closet | Closet doors installed | Youtube Tutorial | Classy Glam Living

Instead of posting just another regular update, the Mr. had another idea.  While he was researching on how to install cabinet doors, it was hard to find a video that demonstrated the process from start to finish.  He had to piece together different videos together to grasp the concept.  

To ease the research process of other DIYer's, we've put together a short easy guide to install cabinet doors.  It goes from start to finish; from drilling of the cup hinges, to installing the door on the cabinet frame, to adjusting the door to fit against each other.

Without further ado, here's our video tutorial!  So grab a coffee and take a look!  It's only 5 minutes!

This is our very first video tutorial, and we would be grateful to receive any constructive feedback and comments.  Please feel free to do so in the comment section below.

Next step is, you know it, to sand and paint the doors...  but only the door frames, as we're installing mirrors on them.  Then comes the finishing touches of installing crown moulding and lighting.  I threw in another last minute wifey request on the doors (oops I did it again?).  It'll just make the doors nicer, and I'm glad the Mr. agrees.  =)

Stay tuned for more updates!  I have a feeling the dressing room/ walk-in closet will be completed VERY soon!!  

In the meantime, you can connect with us on our Instagram account to get the latest updates around our house!

Here are the previous updates of our DIY custom walk-in closet/ dressing room:

Update #1

DIY Custom Walk-in Closet Dressing Room | Progress Shot bottom drawers pull out racks | Classy Glam Living

DIY Custom Dressing Room - Progress Update #2

DIY Custom Dressing Room Progress Update #2 | Walk-in Closet | Classy Glam Living

After some much needed R&R over the last month, the Mr. got straight back to some heavy duty catch-up on our DIY custom closet/ dressing room.  

Since my previous closet update, he had completed the pull-out racks:

DIY Custom Dressing Room | Pull-out Racks | Classy Glam Living

... and the fronts of the bottom drawers last month (please excuse the mess in the closet...  that's why we need doors!!):

DIY Custom Dressing Room | Custom Drawer Fronts | Classy Glam Living

It didn't look very pretty then, but read on...

It's a lengthy DIY project, so understandably the Mr. took a brief hiatus from the closet.  He went back to work on it last week and installed the baseboards and quarter-rounds on the closet:

DIY Custom Dressing Room | Baseboards | Classy Glam Living

He also painted and installed the fronts of the bottom drawers.  It's getting better now...

DIY Custom Dressing Room | Installed drawer fronts | Classy Glam Living
DIY Custom Dressing Room | Installed drawers details | Classy Glam Living

This past weekend, he swore up and down that he would get the fronts of the vanity drawers and pull-out racks done.  He showed me the raw product:

DIY Custom Dressing Room | Vanity drawer fronts | Classy Glam Living

The fronts for the pull-out racks:

DIY Custom Dressing Room | Pull-out Racks | Classy Glam Living

He painted the fronts...

DIY Custom Dressing Room | Benjamin Moore Sidewalk Gray | Classy Glam Living

... and installed them:  

DIY Custom Dressing Room | Installed vanity drawer fronts | Classy Glam Living

Words simply cannot express how much I appreciate his dedication and hard work.

DIY Custom Dressing Room | Installed vanity drawer fronts | Classy Glam Living

Having done all that, the Mr. couldn't just leave that vanity counter unfinished.  He painstakingly applied the self-adhesive marble paper* onto the wooden counter.  Here's our "marble" vanity countertop:

DIY Custom Dressing Room | Installed vanity drawer fronts with marble top | Classy Glam Living

With the vanity top completed, we now have a spot where our trinkets can reside.  

DIY Custom Dressing Room | Marble vanity top | Classy Glam Living
DIY Custom Dressing Room | Marble vanity counter top styling flowers Hermes perfume jewelery | Classy Glam Living

We each get a drawer of the vanity for our stuff.  I left off of my last dressing room update with another wify request.  Can you guess what I added to my wish list when the Mr. was about to install the counter?

It was this...  a folding station:

DIY Custom Dressing Room | Vanity with folding station top | Classy Glam Living

Since we're folding much of our clothing in the drawers, the folding station would really come in handy.

DIY Custom Dressing Room | Vanity with folding station top | Classy Glam Living

I really love how the knobs and pulls add sparkles to the closet fronts.  Here's a close-up of the glass handle with hexagon tips.  It looks and glistens like a diamond!

DIY Custom Dressing Room | House of Antique Hardware | Classy Glam Living

I'm so in love with the glass knobs; they add the perfect touch of elegance to the vanity.  

DIY Custom Dressing Room | Glass knobs on vanity drawers | Classy Glam Living

That mirror was stolen from our bathroom as temporary vignette background, as I'm still shopping for an art piece for the vanity.  

Here is how we left off with our previous closet update:

DIY Custom Dressing Room | Framed closet | Classy Glam Living

And this is where we are now, with the drawer fronts in place (again, please excuse our mess inside the closet ;-) 

DIY Custom Dressing Room | Progress shot pull-out racks and vanity | Classy Glam Living

It's getting closer to our source of inspiration - Carrie's closet in Sex & the City 2:

CARRIE'S CLOSET IN SEX AND THE CITY 2, IMAGE VIA MARKS & FRANTZ

CARRIE'S CLOSET IN SEX AND THE CITY 2, IMAGE VIA MARKS & FRANTZ

This is the view from the entrance of the master suite.  When the closet doors are in place, this view would look much neater.

DIY Custom Dressing Room | View from master suite entrance | Classy Glam Living

Stay tuned for our blog updates!  You never know, the Mr. may be on a mission to complete the closet doors.  My next update could be the big reveal!  (I hope so!)

DIY Custom Dressing Room | Vanity marble counter top styling Hermes perfume jewelry tray | Classy Glam Living
*Affiliated link

DIY Custom Dressing Room - Progress Update

Time flies when you're having fun!  I just realized the other day that we've moved in for just over 4 months!  It's so nice to be in our own house again, and be able to just play house.  

The Mr. has been building our closet with the little spare time that he has in a day, some nights right after dinner or playing floor hockey with the little man.  Though I never rushed him (never did!), I'm sure he just wants to put this behind him.  It's a huge undertaking, and I don't blame him one bit.  

During this time while he was building the closet, I had my clothes at the seating area of our bedroom, while his were at the playroom's closet.  All of a sudden our seating area looks so spacious =)

That's because the Mr. has completed our closet to a point where we can move in our clothes.  Woo hoo!!  

DIY Custom Closet Dressing Room Update | Glass Knobs | Classy Glam Living | Custom Closet with Drawers

Excuse the building material in the pic, they're just more handy for the Mr. while he was working in the closet.  The Mr. was afraid that I won't have enough hanging space for my side of the closet.  But after I've "KonMari"'d my clothes, I've purged bags of clothes and folded whatever I can KonMari-style.  All those bottom drawers sure came in handy with the folded pieces of clothing.  The vanity drawers are like our mini dresser for our intimates.  Last but not least are my dream-come-true pull-out racks!  The Mr. would use his side for ties and belts, and mine would be for scarves and belts.  It's great to have a spot for everything.

The Mr. has primed and painted the exterior frames and the closet interiors.  My colour inspiration was from this photo:

Natty by Design

Natty by Design

I love this bluish grey, not too dark nor too light.   Our dressing room doesn't get much natural light, so a dark colour would make the area a dark hole.  This shade will highlight  the cabinet's detailing just right.  A close match to this greyish blue is Benjamin Moore's Sidewalk Gray, which we chose in a glossy finish and tinted down to 50%.

Benjamin Moore Sidewalk Gray

Benjamin Moore Sidewalk Gray

This colour is a gentle backdrop for the gold hardware we chose for the closet.  I stuck with one out of my choices of gold hardware mentioned here -  a crystal knob for the vanity drawers that we'll also be using for our kitchen cabinets.  

This time around, we opted to have doors for our closet, so that our clothes aren't collecting dust while they're just sitting around.  (See the dressing room at our old house with open hanging space).  While I was shopping for gold-toned handles for the doors, I noticed the Bar Series handles from Lew's Hardware are a very popular choice amongst decorators:

They would've been an easy choice, but I think that something dressier and less contemporary would be more appropriate for the dressing nook.  The boxy bar seems to make everything else boxy in this boxy closet.  So I continued to search for something more rounded.  Rounded, I did not find, but looking around paid off...  I found this gem:

The beveled hexagon ends really give this glass handle a gem-like resemblance.  It has a good weight and it sparkles elegantly in person!  

With this splurge for the glass handles, I sure was glad when we found plate handles at just $3 a piece at Ginger's clearance section!  They would go on the bottom drawers, giving a balanced contrast to the sparkling hardware above them.

The 3 cabinet hardware look lovely together:

DIY Custom dressing room closet | Classy Glam Living | Cabinet hardware

Here is a hardware map for our dressing nook:

DIY Custom Closet Dressing Room Update | Classy Glam Living | Cabinet hardware

The Mr. is now working on the cosmetic fronts for the closet - trims, moldings, drawer fronts, and doors.  Over the weekend, he has put in the first trim around the top of the drawers.  I wanted a "lip" that extends just beyond the drawers to give the unit some details.  Similar to my original closet inspiration from Carrie's closet in Sex and the City 2:

CARRIE'S CLOSET IN SEX AND THE CITY 2, IMAGE VIA MARKS & FRANTZ

CARRIE'S CLOSET IN SEX AND THE CITY 2, IMAGE VIA MARKS & FRANTZ

DIY Custom Dressing Room Closet | Progress update | rope trim detail | Classy Glam Living

I thought the hardest part of building this closet was framing the structure and building the drawers, but he said the trim work and doors are just as much.  I guess my point was, if he could build this closet from scratch, the trimwork and doors must be easy peasy to him.  

And that's our little update on the Mr.'s DIY custom dressing room/ dressing nook/ closet.  No matter what we call it, it's truly one of a kind.  The Mr. is no carpenter; he's been learning as he went along, and I continue to be amazed by his skills...  and dedication to the project.

Just as the Mr. thought that he's safe to move along and close up the closet with trims and moldings, I added a special request for the closet.  Yup, the wifey requests never stop ;-) Can you guess what it is?

For the latest update, be sure to check my instagram feed!