One Year Anniversary at Our "New" House - THANK YOU!

The saying "Time flies when you're having fun" really applies to us here at our "new" house.  It's not so new anymore, we've just celebrated our first year anniversary here!  Our builder's cookie-cutter townhouse is slowly, but surely, turning into our home sweet home - thanks to the Mr.'s tightly packed DIY projects schedule.  

Addressing storage was on the top of our priority list when we moved in.  Having a spot for everything definitely helps with keeping the house more organized (though admittedly, I'm still not very good at staying organized!).

DIY Custom Closet Dressing Room | Classy Glam Living

If you've been following along, then you would know the Mr.'s ultimate build was our closet/ dressing room.  We had designed it to have a spot for everything, from his ties to my scarves.

Since the building of the closet was a lengthy process, we decided to make a video of it instead of blogging about it with pictures.  To our surprise, the YouTube video of his entire process has more than 12,000 views and our channel has more than 170 subscribers!  

Of course, this is nothing compared to the millions of views garnered by celebrities!  But your continued support and kind comments, both on YouTube and Instagram, mean a great deal to us!! The Mr. and I are immensely grateful for all the love you've shown us, and we thank you for that.

If you haven't watched our video, grab a coffee and take a moment to enjoy it (see video below).  Let us know of any feedback in the comment section.  We want to make our videos better and are open to any constructive feedbacks.

You can read more about our DIY Custom Closet here, with links to previous updates in the post.  You can also check out my post on how to add glam to your boudoir here.

I think our one year house anniversary calls for a review/ roundup of our home projects this year.  I will have that up on the blog soon.  Be sure to subscribe to our blog for our latest update!

WOO HOO! We've moved in!

Master Ensuite New House | Classy Glam Living

We have officially moved in over the past weekend.  *HAPPY DANCE!!!!!*  It's a great relief for us all, including our little fur baby, to be in our own home again!  It's a smaller house than our old house, but after staying at the rental for a good year+, we're glad to have more space at the new house.  Check out my Instagram feed for some snippets of our new house!

Even though this is our third house, it's still a daunting task to unpack all of the boxes.  It's just common sense to unpack and organize the daily essentials first and foremost, starting with the bathrooms and kitchen.  Bathrooms/ toiletries are the easiest for me, and I've purchased some organizers to help with that task.  

Then comes the kitchen...  It's all unpacked, and I've shoved (neatly) whatever I can into the cabinets.  As I unpacked and organized, I was reminded that we really have to be efficiently organized in this smaller kitchen.  I tried to look for wire pullout storage to save the Mr. some time and to concentrate on other to-do's around the house, but their sizes don't fit optimally in our cabinets.  Why buy them for $$$ when they don't fit?  Not to mention, the drawer hardwares are only a fraction of the price of those ill-fitting wire pullouts.  

So, you guessed it, the Mr. will need to build the pullouts himself.  Good that he's done it before at our old house for the pantry pullouts.  

And since we're "saving" on the wire pullouts, we splurged on this blind corner storage unit at Lee Valley.  It's great to not have to crawl inside the blind corner to get the rarely used stuff out!

Blind corner kitchen storage organizer | Classy Glam Living

The kitchen is now somewhat organized, but it's still a work in progress.  Most of the appliances have been installed, minus the hood, but we still need the panels to be put on the fridge/ freezer drawers and dishwasher (see Design Board).  For now, at least the kitchen is functional...  we just need time to go grocery shopping!  I'm sure the Mr. can't wait to cook up a feast in his new kitchen!

With all this organizing going on at home, I figured it's also time to post a new to-do list for our new house.  Our projects at the previous house can still be easily accessible on the "Completed Projects" tab above.  

It's all about prioritization with this to-do list.  We still have so much STUFF even after rounds of moving and purging, that storage requirement comes before any improvement on esthetics - trim work and painting.  The order is flexible, and of course, depending on deals and budgets.

We're going by a daily to-do list to get the house in better order each day.  As time goes by, this builder's house will turn into our home, with our personalized touches and DIY projects, much like our previous house.  Remember to check back from time to time on our progress!


Vacation Withdrawal and This-just-in

So I haven't been active in this blog space for a while. I can only blame it on my laziness caused by vacation withdrawal,  We had too much fun during our 1-week+ vacation and being thrown right back in the grind at work after coming back...  I was too brain fried to write anything interesting.  Instead, I bummed on the couch at night, reminiscing about the food and drinks we devoured during our trip, the beautiful architectural history in Barcelona, Pompeii, Rome, and Pisa, and the hot sand between my toes at the beaches in Cannes and Palma de Mallorca.  Life is a beach sometimes!

Life is a Beach | Classy Glam Living

Seeing that the Mr. has eased himself back to his DIY projects gave me the motivation to start documenting our progress so far.  

Our builder notified us that our new house's closing date will be in the fourth week of September. We practically begged our builder's site supervisor to advance the closing day.  They budged, and we'll be moving-in the second week of September!  Woohoo!  *Happy Dance!!!!*  I can finally see the light at the end of the tunnel!!

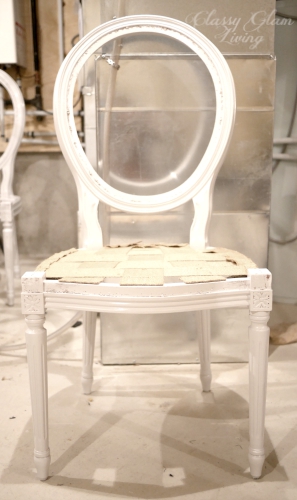
As the Mr. wishes to finish the reupholstering of the 4 French chairs before moving in, he's turned up his turbo DIY engine on those.  The chairs are for a game/ eating/ craft table in our family room basement.  He had removed all previous upholstered material on the chairs down to the frame before we left on vacation.  We picked out the paint colour for the chairs after we came back.  To date, he has primed and painted the chairs in Behr's White Metal, which is a pale grey with a high gloss finish.  He has now started the first stage of the upholstering process - added webbing under the seat. 

DIY refinish repaint reupholster french chairs | Classy Glam Living

With the Mr. revving up his turbo charged engine, I had to keep pace and have finally decided on (and purchased) the fabrics for upholstering these chairs.  We had always loved the Vintage Blossom in Dove by Dwell Studio, and it's great to finally be able to use it in a project. I love this colour combination and it'll work perfectly for our basement. 

Copenhagen, Sky and Vintage Blossom, Dove:  Tonic Living; White Metal:  Behr Paint

Copenhagen, Sky and Vintage Blossom, Dove:  Tonic Living; White Metal:  Behr Paint

Have you noticed that we've been painting our vintage pieces of furniture in a variance of light grey tones (as in the night tables and these chairs)?  We're very into grey furniture ever since we chose it as the colour of our office built-in at the old house.  We prefer re-painting these vintage pieces in a light grey instead of white, as grey gives them a fresh new look without looking too plain in white.  The grey also brings out the details in the piece that would otherwise be underwhelmed in white.  Plus, a high gloss finish freshens up the piece and ups the glam factor.

I will post a complete tutorial on the reupholstering process from start to finish...  depending on when the Mr. can get it done.  For now, I need to get back to my couch potato position.  Before you know it, I'll need to start packing for our move again!  YEAH!  I'm happy about the packing, for real...  seriously!