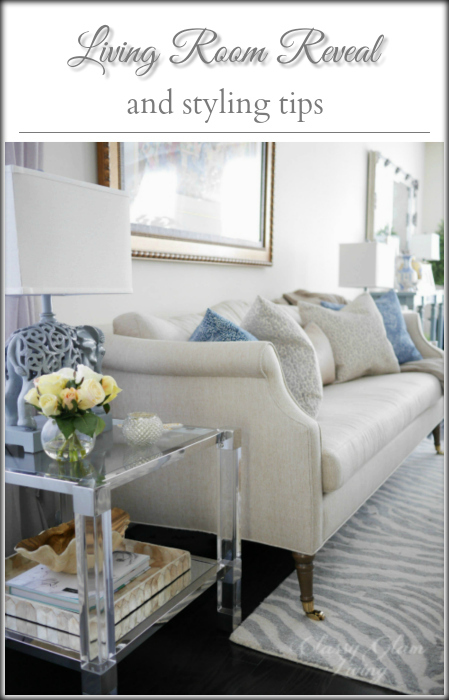
Living Room Reveal and Styling Tips

Living Room Reveal + Styling Tips | Classy Glam Living

Being in a townhouse, there usually isn't a separate living room so to speak.  Since we had the builder finished the basement as a family room, it freed up space on the main floor (and no TV!).  We also didn't need the builder-designated breakfast area, which is in close proximity to the breakfast bar and dining room (c'mon we're only a family of 3).  That gave rise to the idea of a seating area in place of the breakfast area.

After months of anticipation, we finally (!!!) received the end tables we ordered back in October for the living room/ seating area.  I had decor items lined up for its arrival since our purchase, and we can now focus on beautifying our living room.  

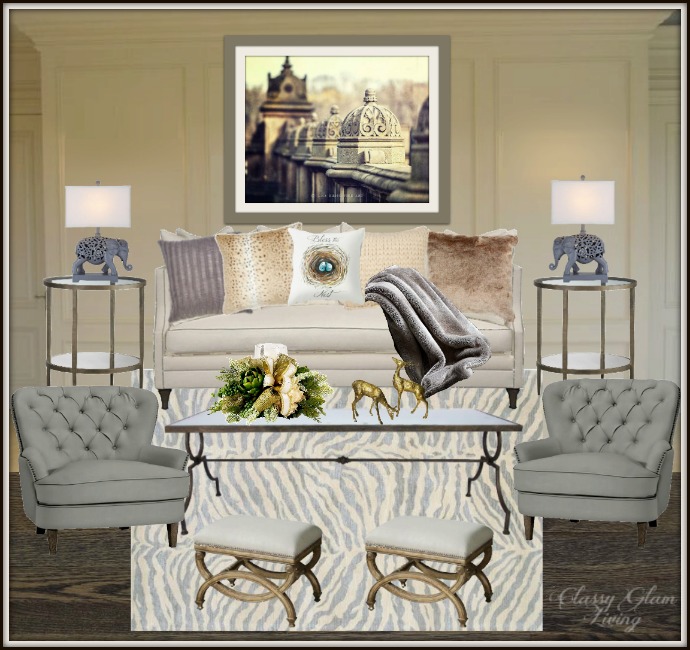
It's been more than a year since I wrote about our living room design board, and this was what I had in mind for our living room in that post:

New House Living Room Design Board Christmas Decor | Classy Glam Living

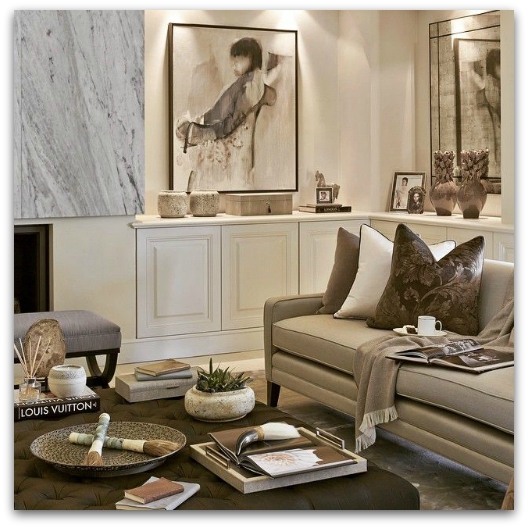
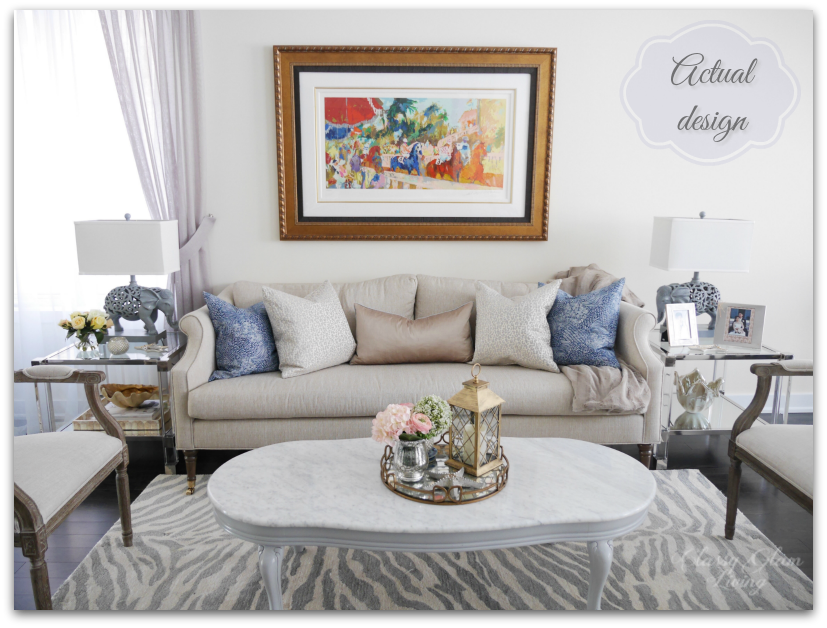
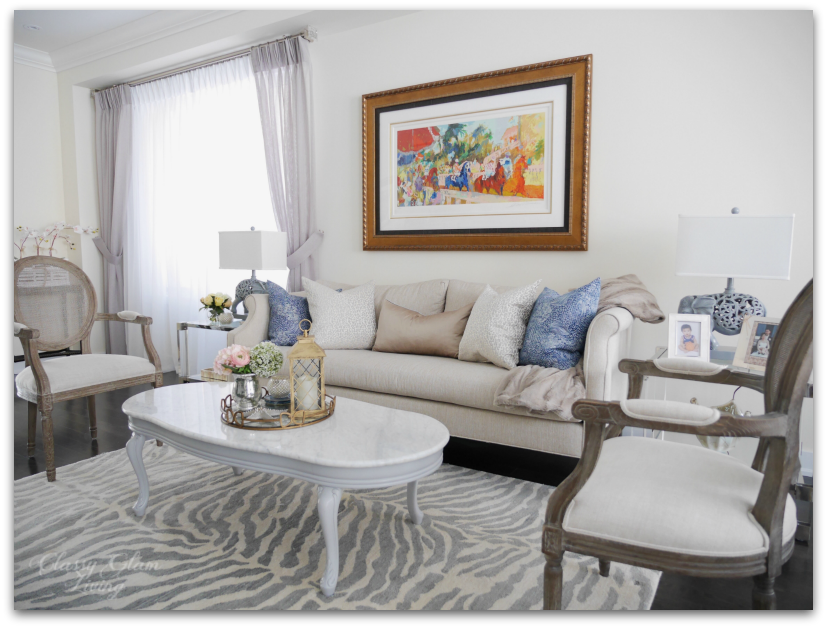
Deals come and go, and so our furniture choices differ from our design board.  We incorporated pieces that we love, while still staying true to our decorating style.  Here is how our living room actually turned out:

Living room reveal + styling tips | Actual design | Classy Glam Living

First to set the stage is of course an elegant and comfy sofa.  We've scoured through stores, but none other than the Nicole sofa by Sarah Richardson was our one true love.  The curvy sides and arms add the touch of uniqueness that distinguishes it from traditional sofas.  Plus, I love its large fluffy seat cushion, so nobody would be sitting on cushion gaps.  

Natalie Hodgins, who managed our furniture order seamlessly at Sarah Richardson Design, suggested we also include the back cushions.  We're so glad we went with her suggestion, the back cushions up the comfy factor of a tight back sofa.

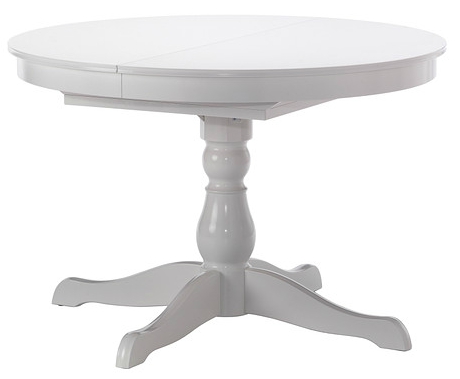
With the statement art piece above the sofa as the focal point, we decided to go with a pair of end tables with acrylic legs.  The tables almost seem to disappear into the surrounding, but the chrome accents and mirror bottom shelf bring out the gleam in them.  

Furniture placement | Living room reveal + styling tips | Classy Glam Living

Its hard lines are a nice contrast to the curvy marble coffee table and delicate arms on the sofa.  We also love how the mirrored bottom shelf reflects the light from the table lamps and creates depth for whatever decor placed on it. 

Living room reveal + styling tips | Classy Glam Living
Acrylic end tables | Living room reveal + styling tips | Classy Glam Living

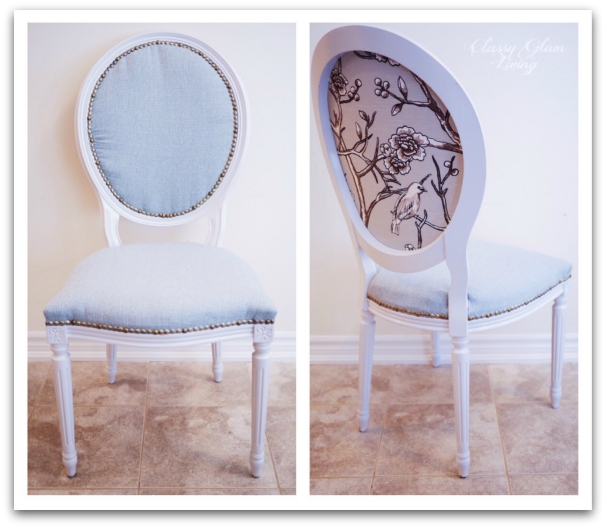
Instead of using large armchairs on either side of the sofa, as in my original design board, we opted to use a pair of cane back dining armchairs from Restoration Hardware.  It was one of those decisions that was prompted by a deal, and worked out great in the end.   We already had one from our old house's home office, and saw the second one at the RH Outlet while it was running a 30% off lowest ticket price campaign.  It was a no brainer to grab it!  

Their narrow footprint streamlined the seating area, so that the living room appears less crowded than if we had used chunky armchairs. 

Furniture placement | Living room reveal + styling tips | Classy Glam Living

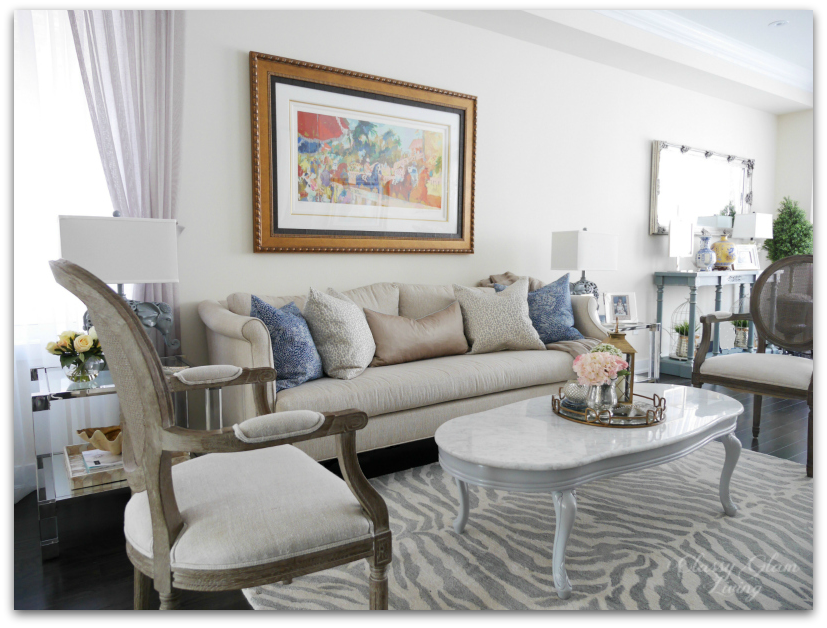
With our living and dining areas being next to each other, we used a silvery blue as a transition colour between the two areas.  The silvery blue tone can be found in the animal print rug, the kitchen stools, and the dining room console.  

Furniture placement | Transitional colour | Living room reveal + styling tips | Classy Glam Living

It's All in the Details

Now that we have our essential pieces down, it's time to beautify and liven up the seating area with accessories!  This is a stark contrast to the year at our rental, which I never bothered to decorate.  It was a boring place to stay at, lacking in character without something beautiful to look at.  

Since moving in at our new house, I've purged through our old home decor accessories and curated items that we love.  I don't really work with a theme, other than a seasonal one.  However, the objects still look coherent, because they all represent us.

With a prominent piece of artwork above the sofa, we picked out neutral tones for the throw pillows.  Pulling a darker tone from the art, in this case the navy, for a contrasting pillow colour helps to ground the space that would otherwise appear washed out.

Furniture placement | Living room reveal + styling tips | Classy Glam Living

We didn't want too many accessories to crowd up the small seating area.  Afterall, if I didn't exercise control, I could easily pile up the coffee and end tables with everything I love ;-)  

In keeping with the spirit of less-is-more for this small space, instead of filling up the coffee table with books, I decided to give it some breathing space by corralling simple accessories on a tray.

Coffee table styling with mirror tray | Living room reveal + styling tips | Classy Glam Living

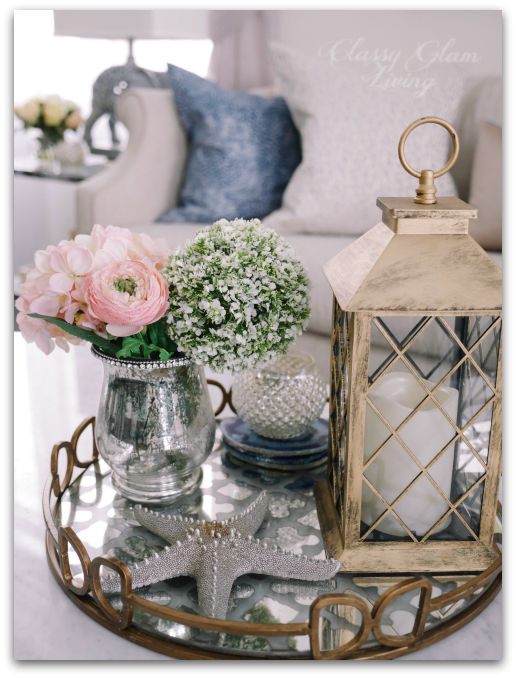
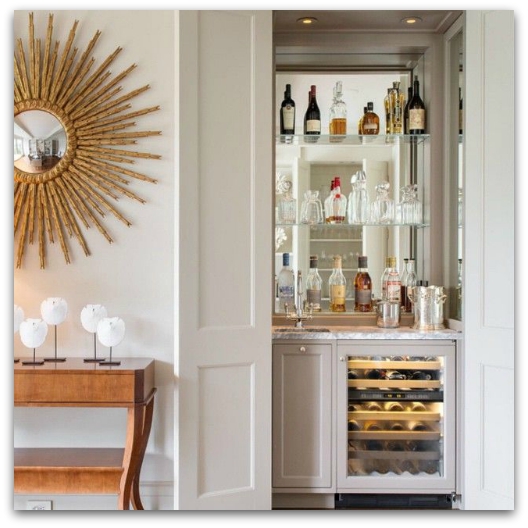
I used metallics throughout to balance the strong copperish gold tone of the frame.  It helps to avoid washing out the rest of the seating area against the strong piece of art.  

Here on the pale marble coffee table, I used a mirror tray with bronze frame and an antiqued gold lantern:

Coffee table styling acrylic end tables | Living room reveal + styling tips | Classy Glam Living

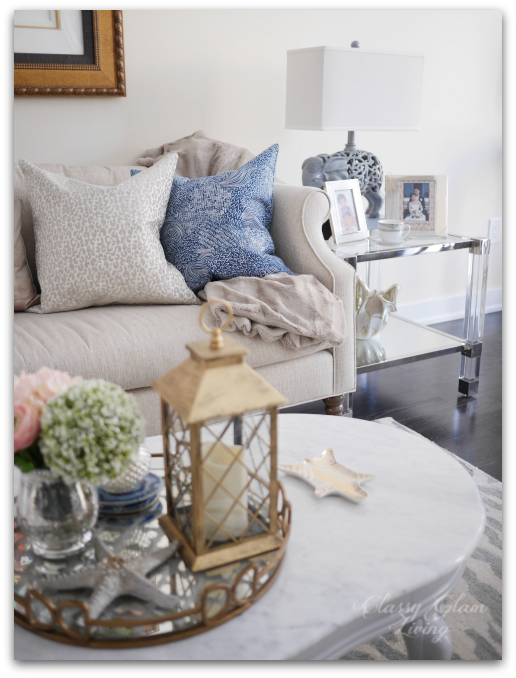
And at the end table here, with the gold resin shell bowl and beige-gold toned capiz shells tray.  I love how the gold Jonathan Adler Carnaby Zebra dish echoes the animal print rug to subtly tie in the accessories.  

Acrylic end tables styling | Living room reveal + styling tips | Classy Glam Living
Jonathan Adler Zebra Carnaby dish | Living room reveal + styling tips | Classy Glam Living

Just in case you're wondering, no, the seating area is not considered done until the Mr. installs the full-panel wainscoting as in my design board.  He gave me the "I've got a lot on my plate" look when I reminded him about it the other night.  I brought it up, just because...  I'll leave him alone for now, as he's still finishing up with our dressing room.   =)

It was exciting to envision this builder-designated breakfast area to be a seating area when I first saw the floor plan.  Even more fun was the design process, and now furnishing and personalizing it to suit our living style.  

We love how it is neutral enough to not fight with the artwork, and yet everything works in harmony.  This is the first room that we see when we walk into the living area, and it should naturally feel welcoming.  We wanted it to be a focal point without being too formal (ie. realistically livable with a kid).  

I think with the speed the little man dashes to the couch after coming home, we've at least managed the livable part =)

P.S.:  The wainscoting should be a piece of cake for the Mr., since he's done the wainscoting with the chair rail for our old house's living/ dining room.


Reupholstering French Louis Chairs

This summer seemed to have been a blur, as does every summer.  It went by too fast and now it's a wrap with the little man back to school.  The Mr. also wrapped up the reupholstering of the chairs, meeting his deadline goal of finishing them before we move into our new house. 

Today, I'm sharing the Mr.'s approach to his first attempt at reupholstering. Note that these are not professional instructions, but they were what worked for him.

Gather your tools

Basic DIY Upholstery Tools | Classy Glam Living

1. Remove original upholstered material (trim, fabric, foam, padding, and webbing) 

Remove the finishing trims around the seat and back.  Beware of staples coming out of the trims:

Check the condition of the foam or filling under the fabric.  You may replace it if you want everything new.  For us, we chose to re-use the original foam as it was in decent condition.  If you choose to re-use the foam, take care in removing the staples around it.  

Set aside foam to be re-used.

Set aside foam to be re-used.

Continue to remove the staples until you've gutted the chair down to the bones.  The Mr. found the upholstery staple remover very helpful in saving his wrist.

Stripping original fabric from chair | DIY Reupholstering chairs | Classy Glam Living

Remove the original webbing.  This step is optional, but the Mr. opted to install new ones so that the chairs have a new and sturdier support.

TA DA!  All 4 chairs stripped to the bones!  This was by far the most time-consuming and back breaking part of the job.

4 stripped chairs | Reupholstering tutorial | Classy Glam Living

2. Prime and paint chair frames (optional)

This step is optional, depending on whether or not you plan on giving the chairs a new look.  We're not big fans of this cherry wood colour, and decided on another colour instead.  Since the original chairs were not painted, sanding down wasn't necessary.  The Mr. applied a good coat of his favourite primer before painting with an angled brush. 

Primer and paint | Reupholstering tutorial | Classy Glam Living
Primed chairs.

Primed chairs.

An angled brush helps getting into the grooves.

An angled brush helps getting into the grooves.

3. Reupholstering back of the chair

I bought enough fabric to account for a safe margin and mishaps.  Now, turns out we have more for throw pillow covers :-)

Using the fabric removed from the back of the chair, the Mr. created a template so that we can easily see and adjust the pattern that would be used.  Make sure to note your pattern repeat dimensions.  If your pattern is linear, lineup so that the lines are straight.  For beginners, I think a pattern that's not linear would be more forgiving.

Apply template on fabric to determine best placement

Apply template on fabric to determine best placement

After you have determined where it is best to place your template, either mark it with fabric marker, or take a photo of it.  Cut enough fabric all around so that you have enough to grab onto when pulling it taut to staple.

Iron out any creases in the fabric.

Iron out any creases in the fabric.

The Mr. loved his new Ryobi Airstrike cordless nailgun for this upholstery project.  I, on the other hand, loved not having to live through the noise of a compressor of corded nailguns...  win/ win for both of us with his new toy.

Check where your fabric should show in the back of the frame.  Once you've determined the correct area, staple the fabric to the top middle frame.   

Staple from top middle | Reupholstering tutorial | Classy Glam Living

Line up the pattern again and check at the back of the frame.  Hold down on one side and staple along the frame, until the middle of the back.

Staple down one side | Reupholstering tutorial | Classy Glam Living

Again, ensure pattern at the back is lined up, pulling taut on the other side and staple down to the middle of the frame.

Staple down opposite side | Reupholstering tutorial | Classy Glam Living

Once the top half of the back is in place, staple the bottom middle while pulling the fabric taut.

Staple bottom of seat back | Reupholstering tutorial | Classy Glam Living

Continue along both sides, similar to the top half.  The Mr. would staple the fabric around the frame at around 1/2" apart. 

Trim excess fabric around the frame with fabric sheers.

Trimmed excess fabric around the back | DIY Reupholstering french chairs tutorial | Classy Glam Living
Upholstered backs of chairs

Upholstered backs of chairs

Add webbing to back of chair

Tip:  Always start webbing the back of the chair first.  For the first chair, the Mr. webbed the seat first, and then realized how the webbing would get in his way as he worked on the back of the seat.

The original back of the chair had no webbing, with the only support as fabric and foam.  We preferred the chair to have a tighter back and firm support, so the Mr. attached burlap to the back.  Burlap should be readily available at fabric or craft stores.

1. Start from the middle of the back, staple burlap webbing onto the edge with 2 rows of staples. 

2-6. Using the webbing stretcher, pull the webbing taut against the other end of the back.  Hold the stretcher tool downward (which helps pull the webbing taut) and staple that end into place.  Trim excess webbing burlap with sheers.

Using the webbing stretcher | DIY reupholster french chairs | Classy Glam Living

Repeat the above steps according to your preferred back support preference.  The Mr. used 3 vertical pieces of webbing for a stronger back support.

TIP:  The Mr. noticed the burlap is usually straight on one side, and ruffled on the other.  (Could be due to how it was spooled?!) He found it easier to line up the subsequent piece of webbing against the stapled one using the straighter side.

Straight and curvy side of webbing burlap | DIY reuphostering chairs | Classy Glam Living
Lining up burlap webbing | DIY reupholster chairs | Classy Glam Living

Here is how we like ours with a tighter back support:

Webbing on back of chair | DIY Reupholstering chairs | Classy Glam Living

Add fabric and padding to back of chair

  1. The Mr. found it easier to lie the top down on a flat surface. Starting from the middle...

  2. Staple along one side and the other.

  3. Once the fabric has been stapled in place about 3/4 of the way, pull the bottom fabric taut and staple in the middle.

  4. Continue to staple around and close up the bottom.

Attaching fabric to back of chair | DIY Reupholstering french chairs | Classy Glam Living

Once the back is all stapled, remove excess fabric as close to the edge as possible with sheers.

Trim excess fabric around the back of chair | DIY Reupholstering chair | Classy Glam Living

4. Reupholstering seat of the chair

Similar to the back of the chair...

Add webbing to seat of chair

1-5. We start by attaching the webbing to the middle of the seat with 2 rows of staples.  Double up the burlap for a more secure attachment.

6-8.  The seat webbing is woven according to your personal preference.  We went for a tight support by weaving the webbing right next to each other.  The more space between the woven webbing, the softer the support.

Installing webbing for seat | DIY Reupholstering chairs | Classy Glam Living

Add fabric and padding to seat of chair

1-2. We reused the original foam on the chairs.  Staple the bottom edge of the foam to the seat frame.

3-4. Lay fabric and padding on the foam and staple the middle to the frame.

Attach fabric to seat | DIY Reupholstering chairs | Classy Glam Living

Cut out the back corner with sheers.  Tuck in the edges as such:

Cut fabric for back corner of seat | DIY Reupholstering chairs | Classy Glam Living

  1. For the front corners, staple the fabric down on one side.

  2. Fold a straight seam down the front.

  3. Staple into place. Repeat for the other corner.

  4. Continue to staple around to the back legs.

Straight front corners | DIY Reupholstering chairs | Classy Glam Living

1. and 2. Staple and close up the back corners.

3. and 4. Trim excess fabric as close to the edge as possible with sheers.

Trim excess fabric on seat | DIY Reupholstering chairs | Classy Glam Living

5. Add finishing trim

To cover up all those staples along the frame, some options include sewn welting/ piping, lace trims, or nail tacks.  We decided to use the nailhead trim as the finishing touch on these chairs.  

1-3. Hammer nails into the holes of the trim, covering as much fabric edge as possible.

4-6. Finish the edge by snipping off trim.  Gauge how much to cut and finish off, so that the last tack is nailed in.

Attaching tacks trim | DIY Reupholstering french chairs | Classy Glam Living

Here again was how I first laid eyes on these chairs...

I saw their potentials to become beauties.  So glad the Mr. hopped on my crazy bandwagon and did his magic on them :-)  

DIY Reupholstering French chairs tutorial | Classy Glam Living

Not only did they turn out beautifully, but they're comfy on my tush and slouchy back.  I'm glad we went with different front and back fabrics for that custom look.  I love, love, love them!! And the Mr., of course!!!

There're still several things to be done before we can really call this project "complete".  The paint needs to be touched up, then a coat of min wax to protect the paint from chipping.  The Mr. still has to put on the dust cover fabric, which goes underside of the chair to hide the webbing.  I would also like to spray a protective coat on the fabric as a precaution. 

There's not enough time for all these right now, as we're gearing up for our upcoming move.  Really looking forward to set up these chairs in the basement for our game/ snack/ craft table!

It's a lengthy post, I know. If you're still here, you're a champ! If you see a good deal on vintage chairs, grab them!  I hope we've inspired you to take on a reupholstering project that you've been thinking about too! 

Basement Family Room Inspirations

The Mr. has been working endlessly on reupholstering the French chairs, but he joked that I pulled out my DIY whip at him after we came back from our vacation.  That was so not the case!  Being the eager beaver himself, perhaps he felt elated that he had worked out the kinks on the first chair, and just couldn't wait to get his hands on the other 3.  

I have to give kudos to the Mr. for his first attempt at reupholstering.  The chairs are turning out nicely, matching the overall decor scheme of our basement family room.

Our basement family room came about as we decided to have our builder finish the basement for our media/ lounge area.  It's not a huge space, but will be a cozy area comprising of these on our wish list:

Cozy Lounging Area

Basements don't need to feel like a dungeon.  We want the family room to be a style extension of our main floor's transitional decor, and a welcoming spot where we can comfortably put up our legs.   This photo below has all the right elements, down to the blue and white decor that we love.  An oversized ottoman as a coffee table is as inviting as it gets to putting up your legs.  This elegant and serene space is just the decorating style we're after.

Media Centre with Multiple Storage Duties

One can never have enough storage in their lives.   Since we're not planning to have a home office this time around, items that resided there at the old house need to go somewhere.  Where else would be a better place to park these items than a large media centre?  We need our media centre to handle multiple storage duties beyond media hardware and accessories.

We originally wanted one end of the family room to house full height storage, similar to our office built-in at the old house.  However, at our pre-dry wall appointment, we noticed the ceiling is partially dropped where we intended to have the built-in unit.  Instead of having full height built-in storage, having some low storage would suit our space better. I'm loving this series of low storage:

Another view of the same room:

Low storage doesn't take up the wall space above the unit, making that space more airy.  I also love how the lights installed close to the edge of the wall reinforces that roomier feel as the light bounces off the walls.  

Rather than filling up full-height shelves with knick-knacks, we can still style the top of the low storage unit with some statement pieces.  We won't have a fireplace as the focal point for our family room, instead that would be where our TV sits, and we would have the low storage continue across the length of the wall. 

Game/ Craft/ Eating Table

Now that little man has taken on an interest in board games, we occasionally spread out his monopoly set on the floor here at the rental.  We can technically play on the dining table, but half of it is in a constant state of disarray as the dumpster of miscellaneous items.  I'm not a huge fan of sitting on the floor for long, back issues and all.  And this is when the idea of having a separate table in the family room came up.  It'll also be a great spot for wrapping presents, building models (one of The Mr.'s favourite past time when he had no DIY projects), and other family crafts (my wish).  I also imagine us using the table as a pizza servery for our movie nights!  

Whatever the purpose may be, I think I found a table that fits our style and space.  This one from IKEA is a bang-for-the-buck choice!  Even better yet, it's extendible, which is excellent for those rare occasions when we may need a larger table.

And then come the chairs...  as mentioned in this post, we got these vintage French round back chairs at an awesome deal.  After lots of elbow grease, the Mr. has repainted and reupholstered them.  I think they'll pair perfectly with the IKEA table above.

Reupholstered French Chairs | Classy Glam Living

Stylish Bar Area

The Mr. and I love to wind down the day with beer or some wine, and having a bar area in the family room would be a fitting addition.  Our basement isn't humongous, so we would only allocate a small space for this dry bar.  With a smallish space to work with, traditional kitchen upper cabinets would feel too stuffy, not to mention it's too predictable.  

These chic dry bar nooks below demonstrate that we don't need a large bar area to be functional.  Installing open shelves keep the bar essentials readily accessible, while the mirror back opens up the space by reflecting light.  An under-counter beverage centre keeps the drinks fresh and cool, completing the stylish nook.

Source Unknown

Source Unknown

Powder Room

Don't we all dread the need for a bathroom break in the middle of an action-packed sequence?  Be it game night or movie night, to make that necessary yet annoying trip as short as possible, having at least a powder room in our basement is a must. Instead of a full bathroom, we opted to have a powder room so that we're not wasting valuable space for our basement family room.  We'd rather let our lifestyle dictate our use of space than wasting the bathroom space just to have a higher resale value down the road. 

Since it's a powder room, no doubt the builder would just drop in a white pedestal sink in there.  We would eventually like to swap that with a bathroom vanity with storage.  This powder room needs to have its own inventory of linens and tissue papers, because the last thing I want to do is to go up and down the stairs just to refill supply!  This vanity here has drawers storage that I love.  Those dresser legs lift it high off the ground, giving the small powder room a more spacious feel.

Just a bit more than a month to go, and we'll be in our new house!  It can't come soon enough!  I think I will be overwhelmed with emotions when we finally get to use this basement family room for the first time.