Basement Family Room Inspirations
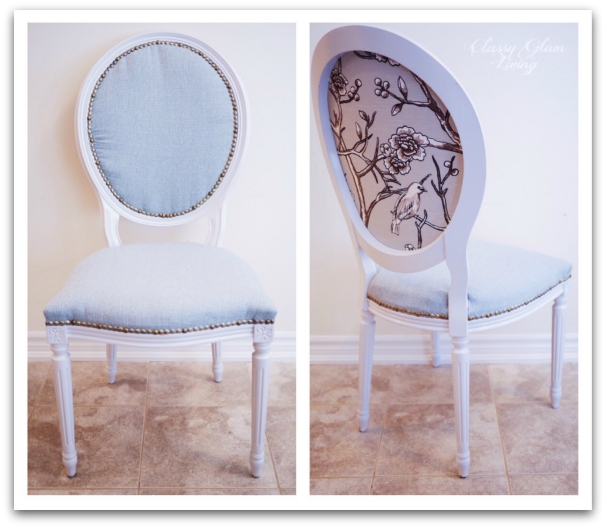
The Mr. has been working endlessly on reupholstering the French chairs, but he joked that I pulled out my DIY whip at him after we came back from our vacation.  That was so not the case!  Being the eager beaver himself, perhaps he felt elated that he had worked out the kinks on the first chair, and just couldn't wait to get his hands on the other 3.  

I have to give kudos to the Mr. for his first attempt at reupholstering.  The chairs are turning out nicely, matching the overall decor scheme of our basement family room.

Our basement family room came about as we decided to have our builder finish the basement for our media/ lounge area.  It's not a huge space, but will be a cozy area comprising of these on our wish list:

Cozy Lounging Area

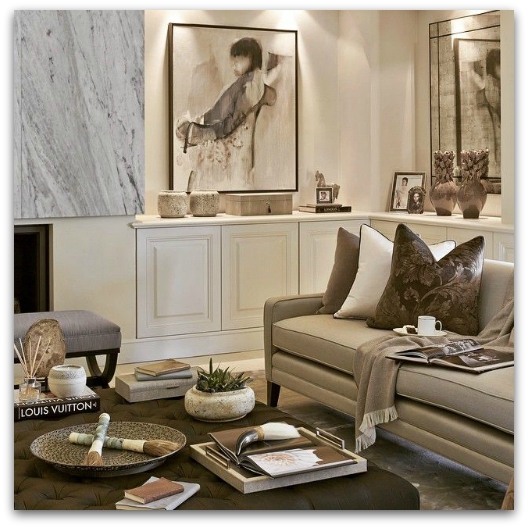
Basements don't need to feel like a dungeon.  We want the family room to be a style extension of our main floor's transitional decor, and a welcoming spot where we can comfortably put up our legs.   This photo below has all the right elements, down to the blue and white decor that we love.  An oversized ottoman as a coffee table is as inviting as it gets to putting up your legs.  This elegant and serene space is just the decorating style we're after.

Media Centre with Multiple Storage Duties

One can never have enough storage in their lives.   Since we're not planning to have a home office this time around, items that resided there at the old house need to go somewhere.  Where else would be a better place to park these items than a large media centre?  We need our media centre to handle multiple storage duties beyond media hardware and accessories.

We originally wanted one end of the family room to house full height storage, similar to our office built-in at the old house.  However, at our pre-dry wall appointment, we noticed the ceiling is partially dropped where we intended to have the built-in unit.  Instead of having full height built-in storage, having some low storage would suit our space better. I'm loving this series of low storage:

Another view of the same room:

Low storage doesn't take up the wall space above the unit, making that space more airy.  I also love how the lights installed close to the edge of the wall reinforces that roomier feel as the light bounces off the walls.  

Rather than filling up full-height shelves with knick-knacks, we can still style the top of the low storage unit with some statement pieces.  We won't have a fireplace as the focal point for our family room, instead that would be where our TV sits, and we would have the low storage continue across the length of the wall. 

Game/ Craft/ Eating Table

Now that little man has taken on an interest in board games, we occasionally spread out his monopoly set on the floor here at the rental.  We can technically play on the dining table, but half of it is in a constant state of disarray as the dumpster of miscellaneous items.  I'm not a huge fan of sitting on the floor for long, back issues and all.  And this is when the idea of having a separate table in the family room came up.  It'll also be a great spot for wrapping presents, building models (one of The Mr.'s favourite past time when he had no DIY projects), and other family crafts (my wish).  I also imagine us using the table as a pizza servery for our movie nights!  

Whatever the purpose may be, I think I found a table that fits our style and space.  This one from IKEA is a bang-for-the-buck choice!  Even better yet, it's extendible, which is excellent for those rare occasions when we may need a larger table.

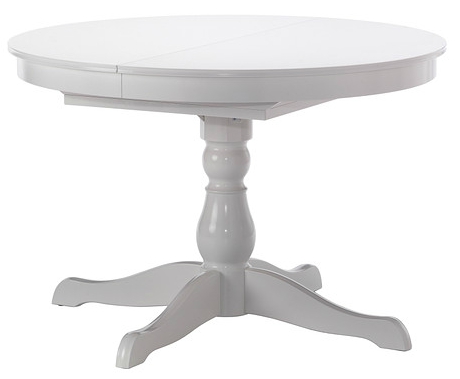
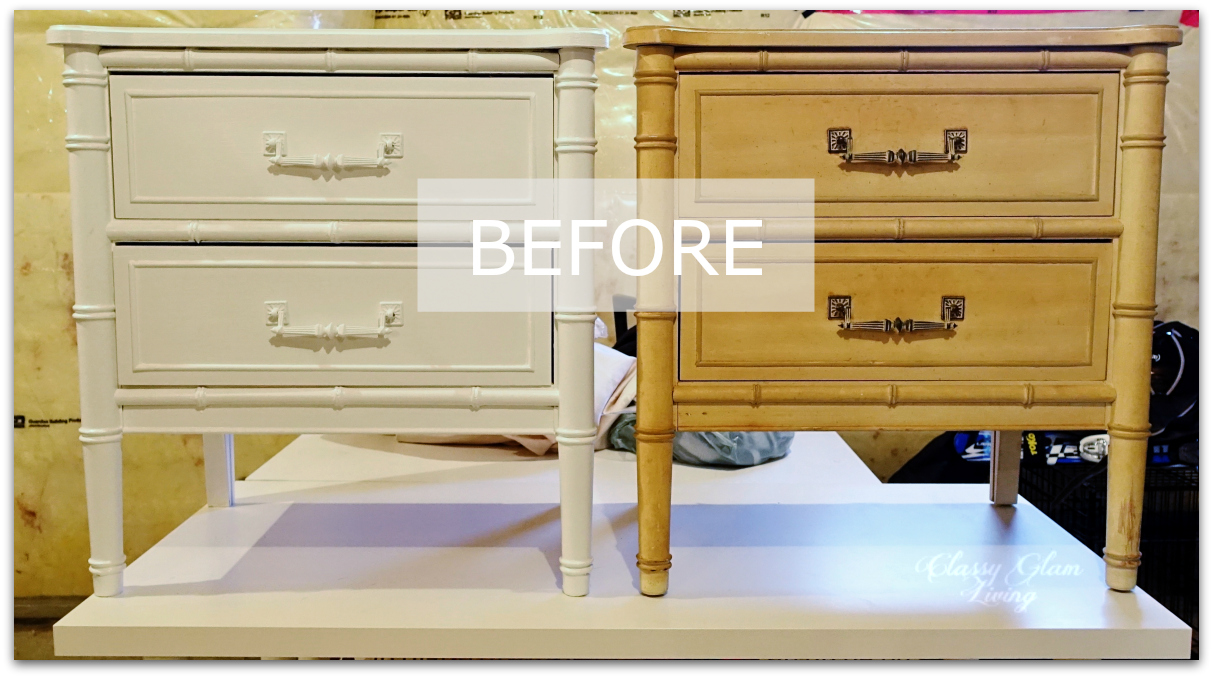
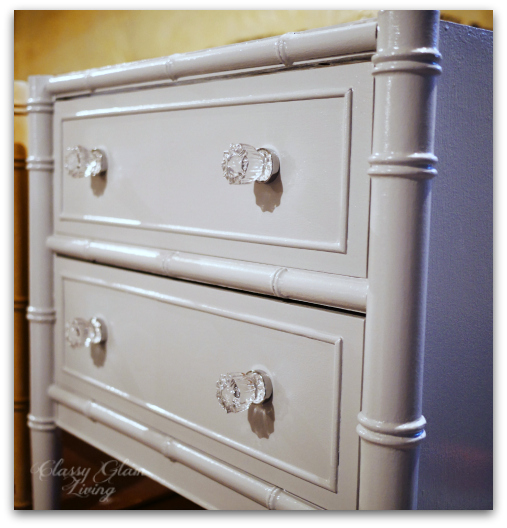
And then come the chairs...  as mentioned in this post, we got these vintage French round back chairs at an awesome deal.  After lots of elbow grease, the Mr. has repainted and reupholstered them.  I think they'll pair perfectly with the IKEA table above.

Reupholstered French Chairs | Classy Glam Living

Stylish Bar Area

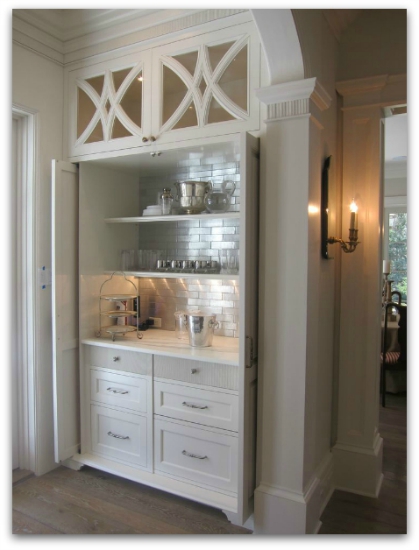
The Mr. and I love to wind down the day with beer or some wine, and having a bar area in the family room would be a fitting addition.  Our basement isn't humongous, so we would only allocate a small space for this dry bar.  With a smallish space to work with, traditional kitchen upper cabinets would feel too stuffy, not to mention it's too predictable.  

These chic dry bar nooks below demonstrate that we don't need a large bar area to be functional.  Installing open shelves keep the bar essentials readily accessible, while the mirror back opens up the space by reflecting light.  An under-counter beverage centre keeps the drinks fresh and cool, completing the stylish nook.
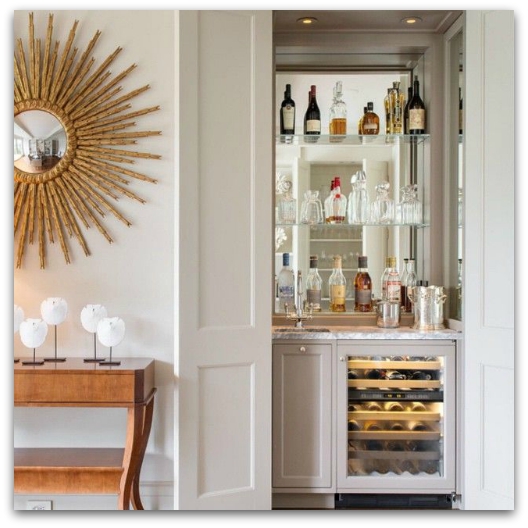
Source Unknown

Source Unknown

Powder Room

Don't we all dread the need for a bathroom break in the middle of an action-packed sequence?  Be it game night or movie night, to make that necessary yet annoying trip as short as possible, having at least a powder room in our basement is a must. Instead of a full bathroom, we opted to have a powder room so that we're not wasting valuable space for our basement family room.  We'd rather let our lifestyle dictate our use of space than wasting the bathroom space just to have a higher resale value down the road. 

Since it's a powder room, no doubt the builder would just drop in a white pedestal sink in there.  We would eventually like to swap that with a bathroom vanity with storage.  This powder room needs to have its own inventory of linens and tissue papers, because the last thing I want to do is to go up and down the stairs just to refill supply!  This vanity here has drawers storage that I love.  Those dresser legs lift it high off the ground, giving the small powder room a more spacious feel.

Just a bit more than a month to go, and we'll be in our new house!  It can't come soon enough!  I think I will be overwhelmed with emotions when we finally get to use this basement family room for the first time.

DIY Refinishing Vintage Bedside Tables

DIY Refinishing Vintage Bedside Tables | Classy Glam Living

When I was still under my parents' roof, I painted my bathroom's boring laminate grey vanity in a sky blue colour and changed out the ugly plastic knobs to brushed nickel ones from Umbra.  Quality of the paint job?  Questionable.  Changed for the better?  Absolutely.  It was a joy for my young self to walk into my bathroom with a cheerfully coloured vanity. I had it in me back then to beautify dull dinginess, and I've grown to love discovering potentials in pieces even more.  That was how I discovered these vintage night tables in the Henry Link Bali Hai collection, and the Mr. breathed new life into them. (I've now passed on the dirty work (-;)

Source list at the bottom of the post.

DIY Refinishing Vintage Bedside Tables | Classy Glam Living 2

The Mr. did some basic prepping a while ago, as mentioned in this previous post. He removed the backing and unscrewed the top, since we planned on replacing it.

DIY Refinishng Vintage Bedside Tables | Basic Prepping Steps | Classy Glam Living

Removing the drawer pulls made it easier for cleaning. Make sure you give the piece of furniture a thorough cleaning on all surfaces if you're planning to repaint it. The primer and paint need to stick to the surface, not on dirt!

We chose to go with two knobs on each drawer.  We first eyeballed the approximate positions for the two knobs, and the Mr. measured the distance from one side and replicated that on the other side.  

DIY Refinishing Vintage Bedside Tables | Drilling for Drawer Knobs | Classy Glam Living

He then filled out the holes left from the original hardwares and sanded them.  For a smoother finish, the holes were re-filled and re-sanded a second time.  

DIY Refinishing Vintage Bedside Tables | Classy Glam Living

The Mr. preferred to use a roller when applying the primer and painting the tables, and a brush for touching up the details.  The tables were in decent vintage condition, so he only applied one coat of the Zinsser primer.  His review on the primer was that it went on very well, and the paint adhered to the primer smoothly.

DIY Refinishing Vintage Bedside Tables | Primer Application | Classy Glam Living

He noticed brush strokes on the finished white table, which was most likely painted with a brush.  He had to lightly sand the surface before it could be re-painted.  

We chose a light grey colour in a glossy finish for a contemporary look. Two coats of paint were applied on the tables to get the evenly layered glossy look.  

DIY Refinishing Vintage Bedside Tables | Behr's Silver Bullet in Glossy Finish | Painted in Glossy Grey | Classy Glam Living

After the paint had cured (best to wait a day for the paint to fully dry), it was time to re-attach the backing of the bedside tables.  He also painted them with the same grey paint before re-attaching.  This project was a good excuse for the Mr. to get the one tool that he's been missing - a cordless staple gun.  

DIY Refinishing Vintage Bedside Tables | Re-attaching Backing with Staple Gun | Classy Glam Living

Next was adding some jewels to the tables.  We love the style of this glass knob; it gives a vintage vibe, while the chrome backing gives it a bit of modern touch.  

DIY Refinishing Vintage Bedside Tables | Lee Valley Tools | Classy Glam Living
DIY Refinishing Vintage Bedside Tables WITH Glass Knobs Installed | Classy Glam Living

Last but not least was the crowning of the bedside table with our beloved marble top.  Its lines and edge profile were fabricated from the original table top.  We love how the marble top adds sophistication to the simple elegance of the night tables.

DIY Refinishing Vintage Bedside Tables WITH Statuario Marble Top | Classy Glam Living

And with that, here's the completed look of the refinished bedside table!  I can't wait to move into our new house, so that we can finally install our mirror headboard and see how our "new" bedside tables match up against it!

DIY Refinishing Vintage Bedside Tables Finished Look with Statuario Marble Top | Classy Glam Living

Thanks to the Mr.'s elbow grease, the tables turned out exactly how I envisioned them!  They now look all grown up from their previous ugly duckling selves when I first laid eyes on them.

DIY Refinishing Vintage Bedside Tables Closeup with Statuario Marble Top | Classy Glam Living
DIY Refinishing Vintage Bedside Tables | Closeup with Statuario Marble Top | Classy Glam Living

I had initially wanted to install new brass pulls to mimic the original feel of the tables, but I'm glad the Mr. convinced me to use two glass knobs on either side of the drawers instead. They made the pieces look more elegant.

The grey paint on the tables is a nice neutral colour that helps to accentuate the grey veining in the statuario marble top. 

DIY Refinishing Vintage Bedside Tables | Closeup with Statuario Marble Top | Classy Glam Living

I'm so glad the Mr. agreed to refinish this set of vintage bedside tables.  They turned out gorgeous!  We finally have the storage we've always wanted in the night tables, and the marble top gives it all the more reason to clear off the surface to enjoy its natural beauty, 

Another DIY project in the queue done and done!  Stay tuned for the next one in queue!

Source List

Painted French Blue Console Table

French Blue Painted Console Table | Classy Glam Living

As the Mr. was finishing up the dining room wainscoting and chair rail project, I started looking for the perfect size console table.  How did we determine what's the perfect size for our dining room?  

Our dining room is a shared large room with the living room, measuring 24-ft. in length.  We wanted THE piece to be at the short wall of the lengthy room, so that we can put a large mirror above it to reflect the light from the large patio doors. The dining table is 8-ft. in length.  We also wanted to ensure there would be enough room to walk behind a chair at each end of the table, let's say around 2.5-ft. or so including the back of the chair.  

Space between chair and console table.

Space between chair and console table.

Doing the math, that left us 24' (length of the room) - unextended dining table 8' - walk space 2.5-ft. x2 = 9-ft. to allot to the living room and a dining room console.  We don't usually leave the dining table extended, so we're fine with having the extended table eating a bit into the living room when need be.  However, I would want the living room to be at least 8-ft in length to fit in a decent sized settee.  That means, we need to find a piece that's only around 1-ft in depth.

All the math confirmed our suspicion - a chunky sideboard is out of the question, as most are at 20" or more in depth.  We loved this console table from Restoration Hardware - the zinc and cast iron would be a nice contrast to our rustic wooden dining table.  However, it comes in 20" deep, argh!  According to my math above, the ideal console table could only be around 12" deep.  The extra 8" would make or break a "just right" look.  

It proved to be a huge challenge to find such a shallow console, not to mention a style that we wanted.  Most consoles usually come in closer to 20" deep.  When we saw the style we liked, it was too deep.  When we saw the right depth, it was just...  BLEH...  You get the idea!

I usually don't look for antique/ used furniture, but I always loved checking out Châtelet Home's current inventory.  As I was casually browsing through their online photo inventory gallery, low and behold, I found the perfect piece!  I was so excited I called them right away to put a hold on the item! 

With it being a used item though, it doesn't come PERFECT.  I should've kept a before photo of the piece, it was in pastel granny's apple green with peachy pink highlights...  can it be more 80s than that?  Despite its Miami Vice colors, I couldn't pass on the gorgeous details, perfect size, and marble top!  It came at a lower price as is or a bit more than double the price for a finished piece.  Of course, I would go for the lower price option!  You know we (the Mr.) don't mind to put in some elbow grease to add our personal touch to it!

French Blue Painted Console Table | Classy Glam Living

We chose a French blue that the Mr. painted over the entire piece.  I then finished it off by dry brushing some Martha Stewart champagne gold acrylic paint around the details.  The final step was to add a coat of Min Wax on it.  Easy peasy, lemon squeezy, as the little man would put it.  Saved us some bucks by doing it ourselves...  and to our liking!

French Blue Painted Console Table | Classy Glam Living

We loved how the console table turned out.  Looking pass its original colors, it has great lines and is the perfect size for our dining room.  

French Blue Painted Console Table | Classy Glam Living

Incorporating our personal touches was a nice way to inject some colors into our neutral-colored dining room.  The Mr. also pointed out how he liked the details on the console table reflecting the baluster design on the dining table.  

French Blue Painted Console Table | Classy Glam Living

Now we have the perfect spot for everyday decor accessories and party essentials.

French Blue Painted Console Table | Classy Glam Living

I hope we have inspired you to look at used furniture in a new light, especially when you're stuck at finding the PERFECT pieces for your home.  I was never a vintage person, until I realized what magic some TLC can do.  

Good luck on your search for the perfect piece for your home!

French Blue Painted Console Table | Classy Glam Living