Adding Glam to Your Boudoir - a Blog Hop

Adding Glam to Your Boudoir - a Blog Hop | built-in vanity in dressing room, vanity decor, jewelry display, perfume display, glam vanity | Classy Glam Living

Is your morning routine a mad dash around your wardrobe trying to find your favorite piece of jewelry?  Has it become more of a chore than an enjoyment?  Then you need to slow down and smell the roses, and perhaps this blog hop will make your ideal morning routine a reality!  

If you're linking over from my friends Kim and Lacey's blog, Styled with Lace, welcome!  I'm so thrilled you are here!  If you're a regular reader, welcome back as I share some boudoir styling tips with you today. 

Welcome to our master suite!  The dressing area greets us as we step in, so I try to style the built-in vanity with a welcoming view.  I'm sure you've heard many times that being organized makes your morning routine much more efficient.   My goal is to keep my vanity organized while staying pretty. 

Adding Glam to Your Boudoir - a Blog Hop | built-in vanity in dressing room, vanity decor, jewelry display, perfume display, glam vanity | Classy Glam Living

I share this vanity area with the hubby.  So nice of him to let me hog the vanity, while he gets the space of that marble dish on the right 😁

I've styled the vanity in several different ways over the months since its completion, and I always use some common elements to keep all the stuff from looking like a hot mess. 

Trays

I have two main trays on the vanity; one for perfume bottles and the other for jewelries.  The trays help to corral like items together, and make cleaning much easier.  

Adding Glam to Your Boudoir - a Blog Hop | vanity decor, vanity trays, tray styling, jewelry display, perfume display on vanity, glam vanity | Classy Glam Living

I love how the mirror trays add glam and sparkle to the vanity.  The perfume bottles seem to sparkle even more with the light reflected from the mirror tray.

Adding Glam to Your Boudoir - a Blog Hop | vanity decor, vanity trays, tray styling, jewelry display, perfume display on vanity tray, glam vanity | Classy Glam Living

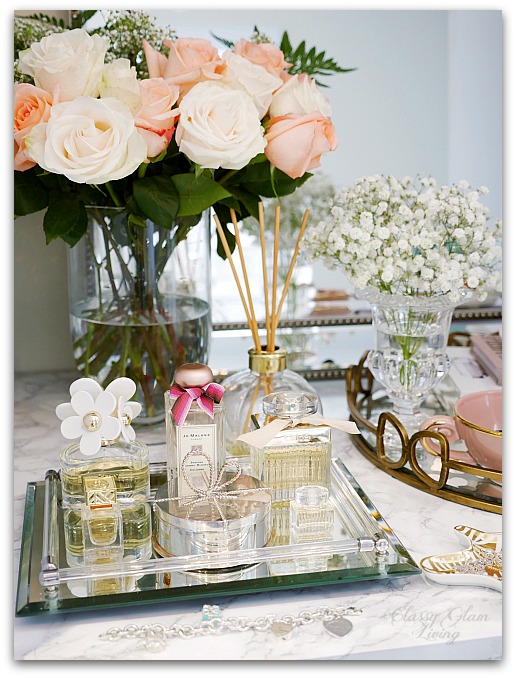
I don't own a huge collection of perfume, just enough for the different seasons and occasions.  I'm lucky the fragrances that I love come in such pretty bottles to be displayed!

Adding Glam to Your Boudoir - a Blog Hop | vanity decor, vanity trays, tray styling, jewelry display, perfume display on vanity tray, glam vanity | Classy Glam Living

Pretty Dishes

On the jewelry tray, I keep several pretty dishes of daily jewelries for easy access; one of each for my bracelets/ bangles, rings holder and earrings.  

Adding Glam to Your Boudoir - a Blog Hop | vanity decor, vanity trays, tray styling, jewelry display, glam vanity | Classy Glam Living

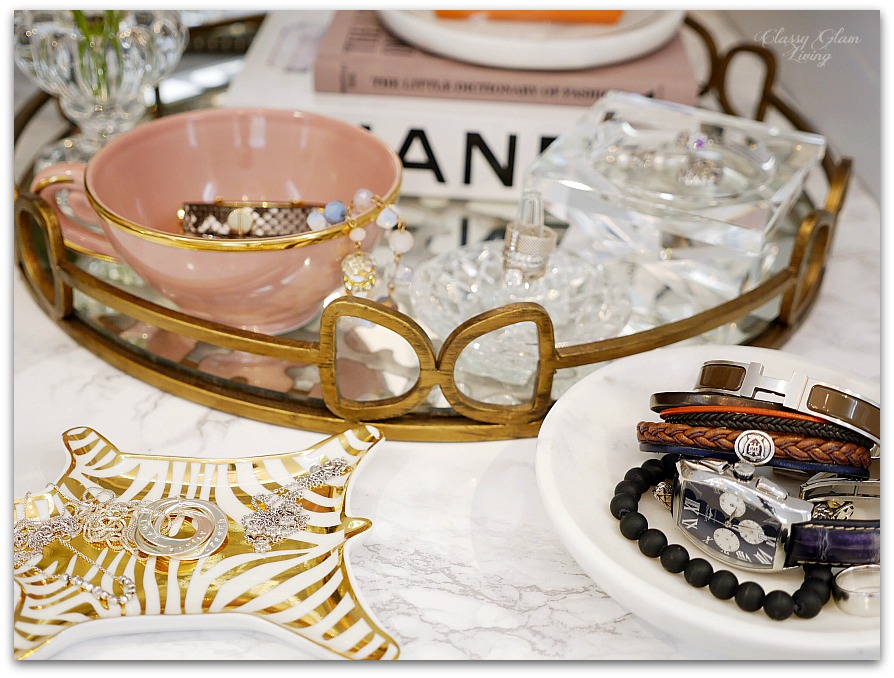
It's fun to discover how objects can be multi-functional. I'm using a crystal pillar candle holder as a dish for earrings, and a tea cup for my bracelets.

Adding Glam to Your Boudoir - a Blog Hop | vanity decor, vanity trays, tray styling, jewelry display on vanity tray table, glam vanity | Classy Glam Living

I love how they serve up some sparkles and add color and dimensions to the vanity.

Adding Glam to Your Boudoir - a Blog Hop | vanity decor, vanity trays, tray styling, jewelry display on vanity tray table Jonathan Adler dish, glam vanity | Classy Glam Living

Display Items

Some jewelry boxes are pretty enough to stand on their own as part of your vanity's decor. The rarely worn and precious pieces can be kept in their pretty boxes and displayed in a cloche. 

Adding Glam to Your Boudoir - a Blog Hop | vanity decor, vanity trays, tray styling, jewelry display, glam vanity | Classy Glam Living

With such a pretty display of jewelry boxes, you would want to elevate it so that it's easily visible.  The simplest way to achieve this is to lift the display on cute books or boxes to create a beautiful vignette.  

Adding Glam to Your Boudoir - a Blog Hop | vanity decor, vanity trays, tray styling, jewelry display, glam vanity | Classy Glam Living

I decorate the vanity as with any vignette, by creating different layers of height.  My tray of perfume bottles is at the lowest. The lifted display cloche creates a mid-tier.  A tall gorgeous bouquet of roses completes the vignette by adding a touch of femininity and glam to the vanity.

Adding Glam to Your Boudoir - a Blog Hop | vanity decor, vanity trays, tray styling, jewelry display on vanity table tray, perfume display on vanity table tray, glam vanity | Classy Glam Living

But we're not done!  I didn't want to hide my statement necklaces in drawers; I love seeing their colors and bling!  This glass display box heard my calling and it's perfect for the necklaces!

Adding Glam to Your Boudoir - a Blog Hop | vanity decor, glam bedside table decor, glam nightstand decor, jewelry display on nightstand, perfume display on nightstand, glam decor | Classy Glam Living 1

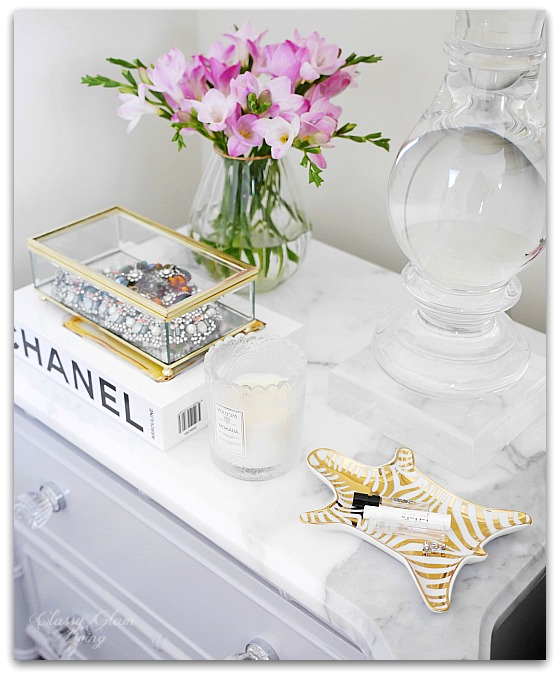
What's better than waking up to beautiful jewelries at your bedside table?

Adding Glam to Your Boudoir - a Blog Hop | vanity decor, glam bedside table decor, glam nightstand decor, jewelry display on nightstand, perfume display on nightstand, glam decor | Classy Glam Living 2
Adding Glam to Your Boudoir - a Blog Hop | vanity decor, glam bedside table decor, glam nightstand decor, jewelry display on nightstand, perfume display on nightstand, glam decor | Classy Glam Living 3

And those perfume samples that I collect?  I love keeping the light scents by my bed on a pretty dish.  Spritz away at bed time, and fall asleep with a delightful scent.

Adding Glam to Your Boudoir - a Blog Hop | vanity decor, glam bedside table decor, glam nightstand decor, jewelry display on nightstand, perfume display on nightstand, glam decor | Classy Glam Living 4

Your jewelries aren't only for dressing you up; by decorating with them, they become an extension of you.  I'm a believer that you should display items that you love and make you happy. Seeing the beautiful and organized display on your vanity would give you a great start to your day.  As your day ends, you once again enjoy the view of your beloved possessions as you retire for the night. 

Remember, the simplest way to pamper yourself is by beautifying your surroundings.  Then why not start with your boudoir so that it gives you a happy boost to your day?

I hope you feel inspired to look through your pretty things and find a way to display some of your favorite pieces.  Thank you for joining me here and I hope you come back soon!  Remember to sign up for our blog updates as we continue to DIY our way to add personal touches to our home.  I invite you to hop on over to Bethany's blog The Posh Home and find even more inspiration!  I am loving the ideas shared today.  Don't forget to share these ideas on Facebook or pin them on Pinterest so that you have them when you start decorating!

Don’t miss the rest of these glam boudoirs:

SheLeavesALittleSparkle.com

Moth-Design.com

LoveYourAbode.com

StyledWithLace.com

ClassyGlamLiving.com

ThePoshHome.com

LetsDazzleDarlings.com

TheBlissfulLane.com

Master Bedroom Chandelier Straight from the Fairytales

Seems like we're always pushing projects for the master bedroom until the rest of the house is done up. As we near the end of winter (hopefully) and putting its darkness behind us, I guess it's only fitting that it's about time we bring back some light for our master bedroom.  What happened to our light?  Read on...

It all began with an unplanned trip to a lighting store, with no expectations in mind, just to check out some lighting styles and prices.  And you know how it is, you always end up walking out with something when you weren't looking to make any purchases. 

We walked to the chandeliers section of the store, and how can you not be drawn in by all that bling?  Mind over matter, mind over… wow, that looks gorgeous! Is that a red tag? Matter won. 

Out of the hundreds of lights and chandeliers at the store, this Schonbek (and the red tag) won us over. Its intricate crystals trimmings are absolutely stunning. Each piece of crystal dangling off of it is carefully positioned for maximum oomph factor. We both knew we've found THE ONE... cue heavenly angels "ah~~~".

Here's a photo of it without the silk shade.

via Schonbek

The grandeur of its style and size is exactly what I wished for as the focal point of our master bedroom as we walk through that long alley that separates the dressing nook and the ensuite.  At about 2-ft all around, it's the perfect size and proportion for our bedroom (see design board).  

I just checked my Instagram photo of this chandelier, and it was 45 weeks ago that we bought this light. It's been sitting in its box for that long. We've moved in for more than 5 months now, but as you know, the Mr. has been busy with building our dressing room.

Master bedroom chandelier | Close up Schonbek 2995 | Classy Glam Living

It's not that he hasn't attempted to put this chandelier up. One day while installing other lights around our new house, he thought he "might as well" put up this Schonbek. He removed the builder's boob light in our room, wires hanging out from the light box and all. He opened the Schonbek, shuffled around the box, cursed, and closed it.  

I looked at him "what the?!" as he put the wire nuts on the wires and shoved them back up in the light box. He said the arms of the Schonbek are not wired to the body.  Being busy with the closet and the side projects (this and this) I've thrown at him, he didn't want to deal with this yet.  Totally understandable...

And that was how we've had no ceiling fixture in our bedroom ever since (thank goodness for our bedside table lamps). 

Master bedroom chandelier | Schonbek 2995 closeup | Classy Glam Living

But that was until this past weekend, when the spring-like temperature reminded me of the longer days, and my mind jumps like it does, I (ie. The Mr.) NEED TO PUT UP THAT SCHONBEK!

I opened up that box that was collecting dust, shuffled around, cursed… AND then checked the almighty YouTube in the hopes to find some kind of assembly instructions.   

Found it!   I was entrusted by the Mr. to wire each arm of the chandelier to the centre column.  We've never had to do this with the other chandeliers in our house, so it was a first for us, and for me!  But it wasn't hard at all, I followed the video to a T.

And here it is, in all its naked glory.  My photos don't do it justice, it's hard to capture the spectral colours reflected by the crystals.  Our eyes just naturally get drawn to its beauty and spectrum of light.

Master bedroom chandelier | Schonbek 2995 | Classy Glam Living

This is the view as you walk in to the bedroom area from the alley.  The right side of the room will eventually be the seating area.

The opulence of the chandelier also complements our sumptuous tufted headboard like they belong together.  Those side tables were the ones the Mr. refinished with love while we were still waiting at our rental to move into this house.

Master bedroom chandelier | Schonbek 2995 Tufted headboard mirror trim | Classy Glam Living

We also got the silk shade for the chandelier to visually increase the size.  Its soft oyster colour can complement any decor or future wall colour we may use, and it doesn't cover too much of the crystal trimmings at the bottom of the chandelier.  

Master bedroom chandelier | Schonbek 2995 with silk shade | Classy Glam Living

The drapes are an integral part of this whole package.  They're gathered like ball gowns to act as a dramatic backdrop for the chandelier as seen from down the hall.  

6 shade wall to wall.png
Master bedroom chandelier | Schonbek 2995 with silk shade.  Turfted headboard with mirror trim | Classy Glam Living
Master bedroom chandelier | Schonbek 2995 with silk shade | Classy Glam Living

We'll eventually give this room a fresh coat of paint (and maybe some wainscoting) and set up the seating area on the opposite wall.  Until then, we'll be happily mesmerized by our newly installed chandelier, straight from the fairytales.

DIY Refinishing Vintage Bedside Tables

DIY Refinishing Vintage Bedside Tables | Classy Glam Living

When I was still under my parents' roof, I painted my bathroom's boring laminate grey vanity in a sky blue colour and changed out the ugly plastic knobs to brushed nickel ones from Umbra.  Quality of the paint job?  Questionable.  Changed for the better?  Absolutely.  It was a joy for my young self to walk into my bathroom with a cheerfully coloured vanity. I had it in me back then to beautify dull dinginess, and I've grown to love discovering potentials in pieces even more.  That was how I discovered these vintage night tables in the Henry Link Bali Hai collection, and the Mr. breathed new life into them. (I've now passed on the dirty work (-;)

Source list at the bottom of the post.

DIY Refinishing Vintage Bedside Tables | Classy Glam Living 2

The Mr. did some basic prepping a while ago, as mentioned in this previous post. He removed the backing and unscrewed the top, since we planned on replacing it.

DIY Refinishng Vintage Bedside Tables | Basic Prepping Steps | Classy Glam Living

Removing the drawer pulls made it easier for cleaning. Make sure you give the piece of furniture a thorough cleaning on all surfaces if you're planning to repaint it. The primer and paint need to stick to the surface, not on dirt!

We chose to go with two knobs on each drawer.  We first eyeballed the approximate positions for the two knobs, and the Mr. measured the distance from one side and replicated that on the other side.  

DIY Refinishing Vintage Bedside Tables | Drilling for Drawer Knobs | Classy Glam Living

He then filled out the holes left from the original hardwares and sanded them.  For a smoother finish, the holes were re-filled and re-sanded a second time.  

DIY Refinishing Vintage Bedside Tables | Classy Glam Living

The Mr. preferred to use a roller when applying the primer and painting the tables, and a brush for touching up the details.  The tables were in decent vintage condition, so he only applied one coat of the Zinsser primer.  His review on the primer was that it went on very well, and the paint adhered to the primer smoothly.

DIY Refinishing Vintage Bedside Tables | Primer Application | Classy Glam Living

He noticed brush strokes on the finished white table, which was most likely painted with a brush.  He had to lightly sand the surface before it could be re-painted.  

We chose a light grey colour in a glossy finish for a contemporary look. Two coats of paint were applied on the tables to get the evenly layered glossy look.  

DIY Refinishing Vintage Bedside Tables | Behr's Silver Bullet in Glossy Finish | Painted in Glossy Grey | Classy Glam Living

After the paint had cured (best to wait a day for the paint to fully dry), it was time to re-attach the backing of the bedside tables.  He also painted them with the same grey paint before re-attaching.  This project was a good excuse for the Mr. to get the one tool that he's been missing - a cordless staple gun.  

DIY Refinishing Vintage Bedside Tables | Re-attaching Backing with Staple Gun | Classy Glam Living

Next was adding some jewels to the tables.  We love the style of this glass knob; it gives a vintage vibe, while the chrome backing gives it a bit of modern touch.  

DIY Refinishing Vintage Bedside Tables | Lee Valley Tools | Classy Glam Living
DIY Refinishing Vintage Bedside Tables WITH Glass Knobs Installed | Classy Glam Living

Last but not least was the crowning of the bedside table with our beloved marble top.  Its lines and edge profile were fabricated from the original table top.  We love how the marble top adds sophistication to the simple elegance of the night tables.

DIY Refinishing Vintage Bedside Tables WITH Statuario Marble Top | Classy Glam Living

And with that, here's the completed look of the refinished bedside table!  I can't wait to move into our new house, so that we can finally install our mirror headboard and see how our "new" bedside tables match up against it!

DIY Refinishing Vintage Bedside Tables Finished Look with Statuario Marble Top | Classy Glam Living

Thanks to the Mr.'s elbow grease, the tables turned out exactly how I envisioned them!  They now look all grown up from their previous ugly duckling selves when I first laid eyes on them.

DIY Refinishing Vintage Bedside Tables Closeup with Statuario Marble Top | Classy Glam Living
DIY Refinishing Vintage Bedside Tables | Closeup with Statuario Marble Top | Classy Glam Living

I had initially wanted to install new brass pulls to mimic the original feel of the tables, but I'm glad the Mr. convinced me to use two glass knobs on either side of the drawers instead. They made the pieces look more elegant.

The grey paint on the tables is a nice neutral colour that helps to accentuate the grey veining in the statuario marble top. 

DIY Refinishing Vintage Bedside Tables | Closeup with Statuario Marble Top | Classy Glam Living

I'm so glad the Mr. agreed to refinish this set of vintage bedside tables.  They turned out gorgeous!  We finally have the storage we've always wanted in the night tables, and the marble top gives it all the more reason to clear off the surface to enjoy its natural beauty, 

Another DIY project in the queue done and done!  Stay tuned for the next one in queue!

Source List