Our Marble Alternative Kitchen Counterop Revealed!
/
***UPDATE***: SEE HOW OUR KITCHEN CURRENTLY LOOKS IN THIS POST!
OUR MOST RECENT KITCHEN UPDATE!
As of 3 months ago, we were still very optimistic about using marble as our kitchen countertop, and have decided we're going with statuario marble. But... this wasn't the first time we again changed our minds...
I forgot how many times we've decided on marble, only to have doubts about it. Time and time again, we would check out any evidence of etching during our meals at restaurants that use marble tabletops and we would be assured that marble isn't too bad afterall. We would decide that we can live with some patina from usage. Even our test of red wine on marble didn't deter us from going forward with the Statuario marble.
However, while living at the rental, every spill and missed spot from cleaning would remind us of our roughness on countertops. We wanted what we love, but we're not the best cleaners. At the rate we go, the marble will be "patina'd" in no time.
We were both probably waiting for the other to say no first!
What we chose in the end
We wanted a polished countertop with a white background to match our light grey cabinets. We looked into Caesarstone's Pure White (we didn't want specks like the Blizzard) but it was just a tad cheaper than Statuario Marble. We're old fashioned, and don't feel like we're getting the bang for the buck if we're paying that much for manmade "stone". We then narrowed down to natural stone, and we all know that there aren't a lot of choices of natural stone with a white background!
We could choose from Statuario marble, or a whiter piece of carrara marble that wouldn't be as expensive. As luck would have it, the stone expert introduced us to the NEW Superwhite quartzite. The slab we saw was absolutely gorgeous; a white background with grey veining, plus crystalization within the slab that we love. It's different from Superwhite, which tends to be more grey. Sadly, the whole block was already sold out. Well, all's not lost, at least we found a marble alternative that we love. Patience now...
And then we got the call from the stone warehouse that a new block of New Superwhite arrived! It's not as white as the slab we previously saw, but it has more crystallization in the slab.
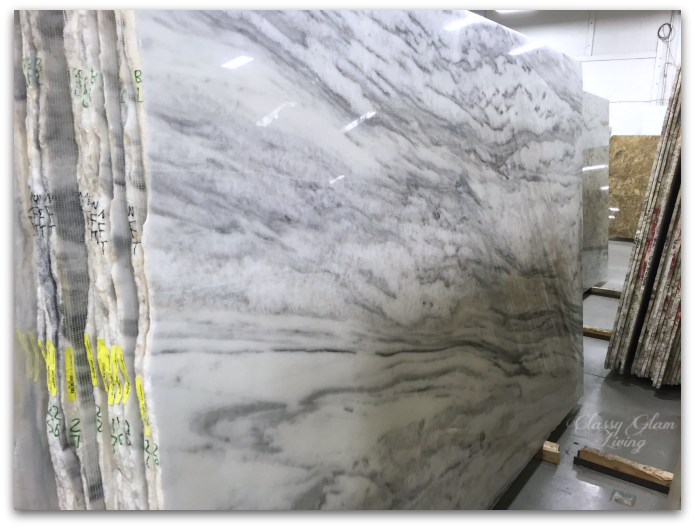

The slab is quartzite, tiny crystals are visible, making the slab sparkly.
We're sold! We get the white background that we wanted, without the pain and fuss of maintenance as with marble. Nothing beats the beautiful veining of Statuario marble, but the crystals formed in the slabs of New Superwhite quartzite are just as mesmerizing and beautiful. Not to mention, it's a stronger material compared to the softness of marble.
From ordering the slabs to fabrication, I would say it was a pretty easy and smooth process. We're so glad we didn't go with the builder's expensive stock upgrades with limited choices!
Here are some photos of the installed countertop:


The crystallization inside the slabs are difficult to pick up in photos, and the countertop is sparkly in person. The veins in the stone are actually formed by dark crystals.


Zoomed in of the grey veining from the red portion in the photo above, showing dark crystals in veins.

More tiny crystals visible at the ogee edge.
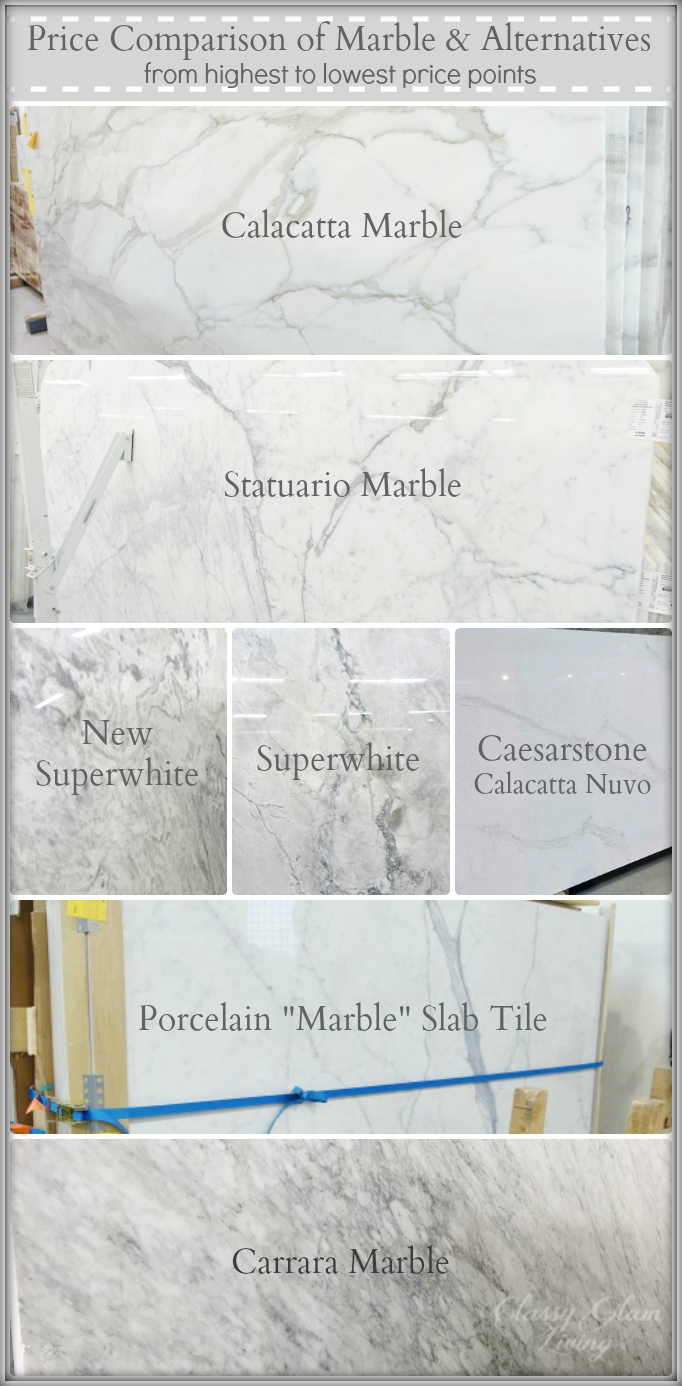
I'm sure you're interested in the price points of these different marbles and alternatives. Based on the size of our kitchen and quotes that we got:
We absolutely love our new countertop, as much as we would had it been made of statuario marble, if not more. It's a great alternative to Statuario marble, at a cheaper price and less maintenance hassle. Not that we would care any less with this New Superwhite quartzite, but It would save us from unnecessary heart attacks if we spill anything on it!
The kitchen is slowly taking shape, and we've finally had the appliances panels installed! We had been going back and forth on using silver or gold hardware, until we saw these pulls at Gingers.

So now I guess it's decided we're going with gold. These are actually bronzy-gold, and they go nicely with our bronze Kohler Karbon faucet! Pure fluke on our part!

Bit by bit our kitchen will take shape and become our dream kitchen that's functional and outfitted in our style. Here's our view from the living room, as mentioned in our kitchen and living room design boards.

Our next to-do's for the kitchen are:
- Change out cabinet knobs and pulls
- Install mirror backsplash
- Build more drawers in lower cabinets
- Replace solid doors with glass doors at uppers above the fridge (see kitchen trends post)
- Install mirror backs + glass shelves for those upper cabinets
- Install LED rope lighting for under the upper cabinet
- Install valence
I hope we've shown you a marble alternative that you can consider if you're having trouble deciding on a marble countertop like we did. Here's how we use our kitchen:
- As per the Mr., I have butter fingers, that means a higher chance of spillage :-(
- We're rough on the counters, being efficient cooks sometimes means that banging stuff on the counters may be inevitable
- We may not clean up right after we cook
- We're not the best cleaners, ie. best if stains on the countertops can be somewhat camouflaged
Do you have butter fingers like me? Do you love marble enough to live with its patina?