We Need a Drop Zone!!! + Design Inspirations

This past weekend's gorgeous Spring-like weather has put me into cleaning mode.  But just like how this Spring tease won't stick around for long, neither would this "cleanliness" at our home.  The one main culprit is CLUTTER.  

Mail, papers, homeless decor items...

Mail, papers, homeless decor items...

One thing I'm not diligent with is dealing with all the papers that come through our door.  No matter how much I try to cut down on our paper trail, some are still inevitable.  At times (actually, most of the time), our dining table is a dumping ground for piles of papers and homeless decor items.  On the rare occasion that it's cleared off, I snap a photo for Instagram:

Dining Room | Classy Glam Living

It all comes down to the fact that I'm just not a good cleaner-upper.  Our main floor has no closed storage at all, except for our kitchen and cloak closet.  As much as I want to hide my keys and mail in a kitchen cupboard, it just doesn't make sense (and I better not start with that habit!).  I desperately need a place to temporarily put away these things!

What I need is a drop zone/ storage/ command centre by the entrance.  A designated spot where I can drop off my keys/ sunglasses as I walk through the door and hide the mail that I'll eventually attend to.  A place where I can store papers temporarily until I file/ shred them, and where I can have a simple filing system for our family.

At the home office of our old house, the lower right cabinet of this DIY built-in unit was my drop zone.  It wasn't ideal, since the office was on the second floor, and I just didn't drop off the stuff in there often enough...  ie. the stuff would linger on our kitchen counter back then.

Home office | Classy Glam Living

At our current house, there's a perfect spot for a multi-purpose drop zone right by our garage entrance.  It's an empty corner beside our seating area; a space that's only 32" wide, where we put out our Christmas tree.

Our designated drop zone

Our designated drop zone

When it's not Christmas time, it's literally a drop zone...

It's a drop zone in reality, and I hate it.

It's a drop zone in reality, and I hate it.

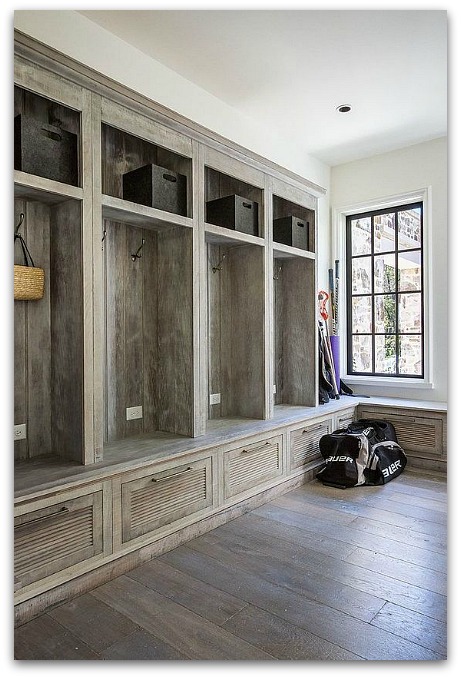
So, as usual, I flipped through Pinterest for design inspirations to make this little space of our main floor more functional and presentable.  What I get are very out-in-the-open, in-your-face kind of drop zones/ command centres.  I see designs of...

1. mudrooms...  It's beautiful, but we don't need a closet that's out in the open.  

2. gorgeous built-in command centres/ work stations in the kitchen.  Unfortunately, our kitchen isn't designed with this purpose.

Drop zone inspirations | kitchen work station | Classy Glam Living

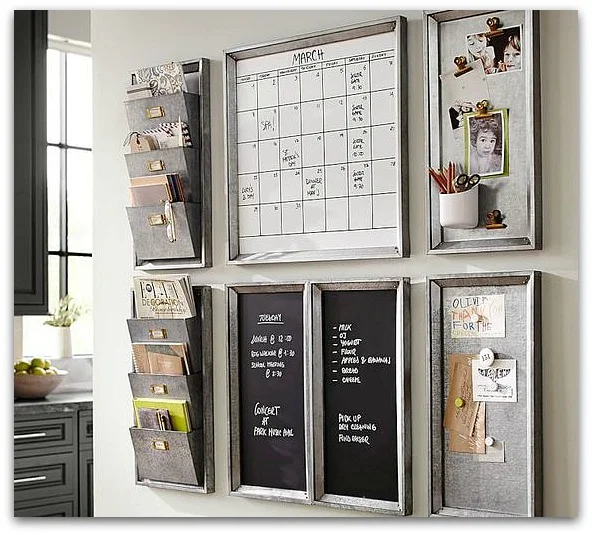
3. gallery walls of command centre.  These products are beautifully designed, but it looks too busy for my liking.

Pottery Barn

Pottery Barn

Pottern Barn

Pottern Barn

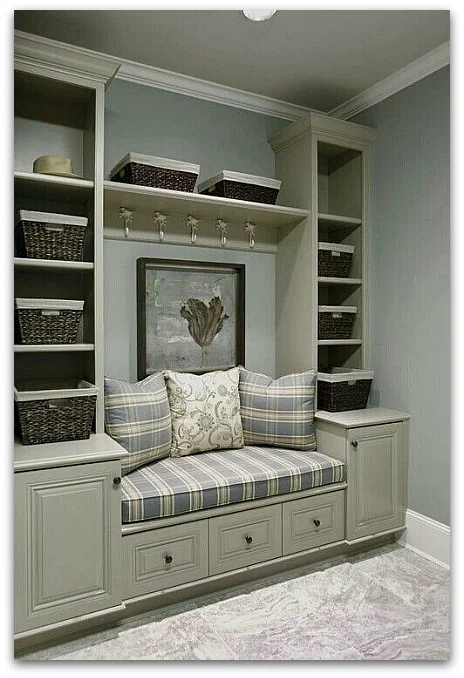
My preference is to have our drop zone blend in with our seating area, such that it appears to be more of a decorative element than an actual "drop zone".  Most recently, Jen at Rambling Reno also added a drop zone of a similar idea at her new house.  I wish we had addressed our need of a drop zone early on like she did when we first moved in.  

These beautiful inspirations show how drop zones can be functional and beautiful:

Simple, right?  It's basically just a dresser, or so I thought.  I wanted to limit the depth of the unit to a max of 15", so that it's not in the way of the window by too much.  That proved to be a problem in finding a piece at the right size.  

Anything that's at around 15" in depth is the height of a side table, which is around 28"-30".  That would look too short for our 9' ceiling.  I need a piece that's at counter height of 36", but it automatically becomes the depth of a dresser at 18-20".  That's too far out for the little nook.  

Could it be that a piece that fits our dimensions and budget does not exist?  The simplest things are always the hardest to find!

Seems like I've no choice but to add this drop zone unit to the Mr.'s to-build list.  Check back soon, as I'll talk about the design of this DIY unit next!

DIY Projects in Queue

The Mr.'s favourite pastime is undoubtedly working on home projects.  This long hiatus from them while we're at the rental is making him anxiously restless,  Some nights, he would be watching DIY videos, to sharpen his skills and gather as many tips as he can for our new house's home projects.  

Seeing that his hands are itching for some projects, I put my shopping skills and eagle eyes to work!  I've been curating some small projects for the Mr. to work on, to keep him at top notch condition :-)  

DIY Sea Fan Artwork

We picked up this gold sea fan placemat during our recent visit to Elte Mkt.  It's a great size, and we knew it would look amazing as a framed piece of art.

Gold Sea Fan Placemet at Elte Mkt | Classy Glam Living

Framed sea fan pieces can get quite pricey.  With this inexpensive placemat (only $10!), we can DIY something similar at a fraction of the retail price!  This is an inspiration piece that we would often see:

And here is our take on the framed sea fan. 

DIY Floating Sea Fan in IKEA RIBBA Deep Frame | Classy Glam Living

This was one of the two projects he completed over the recent long weekend.  Of course it's the Mr.'s masterpiece...  it would've been an epic fail if I had attempted any part of it.  We'll share the details of this DIY soon!

Refinishing Bedside Tables

I knew that the sea fan project wouldn't keep the Mr. busy for too long.  As mentioned in a previous post, I came across this pair of vintage beside tables and just loved the bamboo detailing of the pieces.  

PAIR OF HENRY LINK BALI HAI BEDSIDE TABLES | CLASSY GLAM LIVING | DIY REFINISH

It's still a work in progress, but I'm happy to report that everything's ready to go!  The Mr. is in the process of painting the pieces in a glossy finish with Behr's Silver Bullet:

BEHR paint Silver Bullet | Classy Glam Living

After he's done with painting the bedside tables, he can install the hardwares that we've recently picked out for the drawers.  Instead of going with drawer pulls, we chose these glass knobs to go on either side of the drawer.   It's a more contemporary look and would transform the tables glamourously!

Glass Knobs for Beside Tables | Classy Glam Living

The 2 pieces of statuario marble have also been fabricated.  The edge profile of the marble mimics that of the original table top.  We can't wait to install them on the bedside tables!!!

Fabricated Statuario Marble Bedside Tables Top | Refinishing Night Tables | Classy Glam Living

Marble Coffee Table 

I had wanted an open bottom coffee table with glass top for the living room, as illustrated in the design board.  Instead, I found a traditional marble coffee table on kijiji at an amazing deal!  It has solid wood construction, with a carrara marble top, but the wood stain was too traditional to our liking.  At the price we paid, I don't think we can even get the coffee table legs of a new piece!  I love the curvy lines of the marble top and had originally planned to replace the legs with fabricated brass coffee table legs, but the Mr. loves the original ones.  The seller was nice to note there were some nicks on one of the legs, but it didn't matter to us, as we planned to repaint the wooden bottom to a glossy light grey.  That would be a better match for our living room's transitional and neutral style.

Refinishing Traditional Marble Coffee Table | Repainting | Classy Glam Living

Refinishing and Reupholstering a Set of 4 Louis Chairs

I never thought that Instagram would be my shopping source.  When I came across this set of 4 previously-loved Louis chairs posted for sale on Paint It Like New's Instagram account, I knew I just had to snatch them..  How can I pass on the great deal of $50 each for these maple chairs?  

We plan to eventually have a bar area built in our finished basement/ family room, with a small eating area.  These chairs would be perfect for the spot!  My plan is to have them repainted and reupholstered with tacks.  I'm so glad the Mr. is all game for our (HIS) first attempt in reupholstering!  This is the look we're going for:  

I think the Mr. has enough on his plate for now, and I seriously need to stop looking at kijiji or other vintage shops...  it's not easy to pass on a good deal!  He's a happy camper again, rushing down to the basement to continue with his project after we put little man to bed, not to mention the occasional runs to the home improvement "candystore" to get supplies for his DIY project.  

The Mr.'s goal is to complete the reupholstering of the chairs before we move in.  It's all about time management, and he knows he'll be busy with other projects after we're in the new house.  These small DIY projects not only help to keep the Mr. entertained, but his refinishing of the pieces will beautify our home, each piece with a story to tell.

Powder Room Touch-up for the Holidays

Powder Room Makeover for the Holidays | Classy Glam Living

By:  Sherina So

With the Black Friday hype soon to pass, it also marks the start of the holiday season.  Gatherings with families and friends will be at full force in the coming weeks.  Have you been browsing Pinterest for the latest trends in holiday decorating and tablesetting?  Take a peek at my design board for winter and holiday accessories for the living room.  Aside from the living and dining rooms that will be obvious destinations for your guests, there's another room they will most certainly visit during the gathering - the powder room.  It's a small space that is usually neglected, but you can easily touch it up with some holiday decor to enrich your guests' holiday experience at your beautiful home.

I've put together a short and easy list of powder room touch-ups that will show your guests how thoughtful of a host you are!

Holiday-themed Soap and Lotion Sets

fruits passion soap lotion.jpg

This is by far the simplest way to add any holiday glamour into your powder room.  Let the holiday infused scents of the soap and lotions put your guests in holiday spirit.  This set from Fruits & Passion even comes with a ceramic plate, so all you need to do is just unwrap the package and voila!  The powder room instantly looks much put together!

Create an Area for Holiday Display

If you have a pedestal sink with minimal space on it to put anything, a small display shelf would be a safer place for guests to place their belongings on.  An elegant glass shelf would easily blend in with any existing style. 

If you're blessed by a spacious  powder room, a small side table would complete the space.

source:  joss & main

source:  joss & main

PILLAR CANDLEHOLDER AS RING AND BRACELET HOLDER

ring holder.jpg

I love mercury glass decor!  It adds the bit of glam and sparkle to any vignette, so it's especially fitting for the holidays!  I saw this mercury glass pillar candleholder, and thought it would be an awesome ring/ bracelet holder for your guests in the powder room.  It's an interesting use for a candleholder, and takes up just as much space as a regular ring holder,  It also gives some height to your display surface mentioned above, and also to the holiday vignette...  see below.

Creating a Simple Holiday Vignette

A holiday vignette doesn't only belong to the entryway or entertaining rooms in your house.  You can quickly put one together in the powder room on the display surface.  All you need are 3 simple items:  a display container for interesting ornaments, holiday art piece, and of course, something green.

Display container  

A simple and popular display amongst decorators is to fill a small apothecary jar or cloche that's proportional to your display surface with some beautiful holiday decor.  Similar to this idea.

image via eab designs

image via eab designs

This small present lantern has some cute holiday details and is a good size for the display shelf.

source:  Pier 1

source:  Pier 1

It would be a great spot to display your collection of novelty ornaments and tie in with your holiday decor theme colour.  Canadian Tire has a new CANVAS line of holiday decor.  These are some of my favorites.

Novelty Ornaments from Canadian Tire CANVAS line | Classy Glam Living

In place of beaded garlands, you can use string lights as filler inside the container.  These battery powered string lights from Pier 1 would give your simple decor much added drama.  

source:  Pier 1

source:  Pier 1

Framed art

If you're a hoarder of celebration cards like I am, you'll probably find a beautiful Christmas card in your stash.  Simply put it in a frame as an art piece!  This is a cute and understated winter themed frame that would go with any of your decor.

source:  Pier 1

source:  Pier 1

If you're a purger and don't have stashes of holiday cards handy, these holiday foil prints add more sparkles and glam to your powder room.  You can never have enough sparkles and bling during the holidays!  

source:  SS Print Shop

source:  SS Print Shop

Holiday Greeneries

No vignette is complete without something green.  These mini wreaths are just the right size for a simple display.  If it's too plain for you, just add a bow with a ribbon of your choice.  Either just lean it on the display surface or hang it with 3M command hooks on the wall. 

source:  Anitque Farm House

Monogrammed Fluffy Towels

Indulging your guests with fresh and fluffy towels complete their holiday experience in your powder room.  Instead of plain towels, how about a set of monogrammed hand towels?  These designs look elegant and sophisticated.  They'll make you look like a professional party host!

I'm usually not a fan of themed hand towels, but this design with a subtle nod to the Holiday season has a sophisticated air to it.  I think this may just be my choice for the holidays!

Source:  sewsewcutesewing

I hope you have found this list of quick powder room touch up helpful and inspiring.  It's a space that we all tend to forget, but could well be the easiest to tackle in preparation for guests over the holidays.  It's little details like these that your guests will truly appreciate your effort in throwing them a holiday party at your house.  They will come out of the powder room all refreshed, after having indulged in your holiday spirit and be ready to party on!  Perhaps you may want to decorate your guest bathrooms also, in case some guests have too much fun and decide to spend the night!

What else would you add to ready your powder room for the Holidays?