Our Marble Alternative Kitchen Counterop Revealed!

Marble Alternative Kitchen Countertop New Superwhite Quartzite | Classy Glam Living

***UPDATE***:  SEE HOW OUR KITCHEN CURRENTLY LOOKS IN THIS POST!

OUR MOST RECENT KITCHEN UPDATE!

As of 3 months ago, we were still very optimistic about using marble as our kitchen countertop, and have decided we're going with statuario marble.  But... this wasn't the first time we again changed our minds...

I forgot how many times we've decided on marble, only to have doubts about it.  Time and time again, we would check out any evidence of etching during our meals at restaurants that use marble tabletops and we would be assured that marble isn't too bad afterall.  We would decide that we can live with some patina from usage.  Even our test of red wine on marble didn't deter us from going forward with the Statuario marble.  

However, while living at the rental, every spill and missed spot from cleaning would remind us of our roughness on countertops.  We wanted what we love, but we're not the best cleaners.  At the rate we go, the marble will be "patina'd" in no time.  

We were both probably waiting for the other to say no first!  

What we chose in the end

We wanted a polished countertop with a white background to match our light grey cabinets.  We looked into Caesarstone's Pure White (we didn't want specks like the Blizzard) but it was just a tad cheaper than Statuario Marble.  We're old fashioned, and don't feel like we're getting the bang for the buck if we're paying that much for manmade "stone".  We then narrowed down to natural stone, and we all know that there aren't a lot of choices of natural stone with a white background!

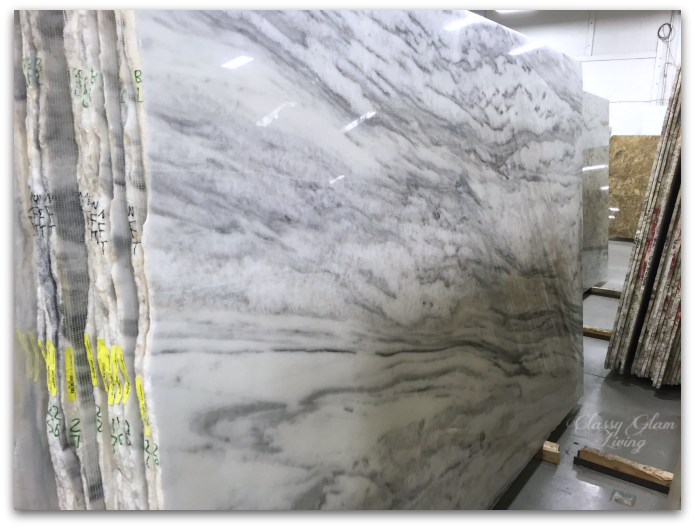
We could choose from Statuario marble, or a whiter piece of carrara marble that wouldn't be as expensive.  As luck would have it, the stone expert introduced us to the NEW Superwhite quartzite.  The slab we saw was absolutely gorgeous; a white background with grey veining, plus crystalization within the slab that we love.  It's different from Superwhite, which tends to be more grey.  Sadly, the whole block was already sold out.  Well, all's not lost, at least we found a marble alternative that we love.  Patience now...  

And then we got the call from the stone warehouse that a new block of New Superwhite arrived!  It's not as white as the slab we previously saw, but it has more crystallization in the slab.  

NEW SUPERWHITE QUARTZITE | Classy Glam Living
The slab is quartzite, tiny crystals are visible, making the slab sparkly.

The slab is quartzite, tiny crystals are visible, making the slab sparkly.

We're sold!  We get the white background that we wanted, without the pain and fuss of maintenance as with marble.  Nothing beats the beautiful veining of Statuario marble, but the crystals formed in the slabs of New Superwhite quartzite are just as mesmerizing and beautiful.  Not to mention, it's a stronger material compared to the softness of marble.

From ordering the slabs to fabrication, I would say it was a pretty easy and smooth process.  We're so glad we didn't go with the builder's expensive stock upgrades with limited choices!

Here are some photos of the installed countertop:

NEW SUPERWHITE quartzite kitchen counter | New house kitchen | Classy Glam Living

The crystallization inside the slabs are difficult to pick up in photos, and the countertop is sparkly in person.  The veins in the stone are actually formed by dark crystals.

NEW SUPERWHITE quartzite kitchen counter | New house kitchen | Classy Glam Living
Zoomed in of the grey veining from the red portion in the photo above, showing dark crystals in veins.

Zoomed in of the grey veining from the red portion in the photo above, showing dark crystals in veins.

More tiny crystals visible at the ogee edge.

More tiny crystals visible at the ogee edge.

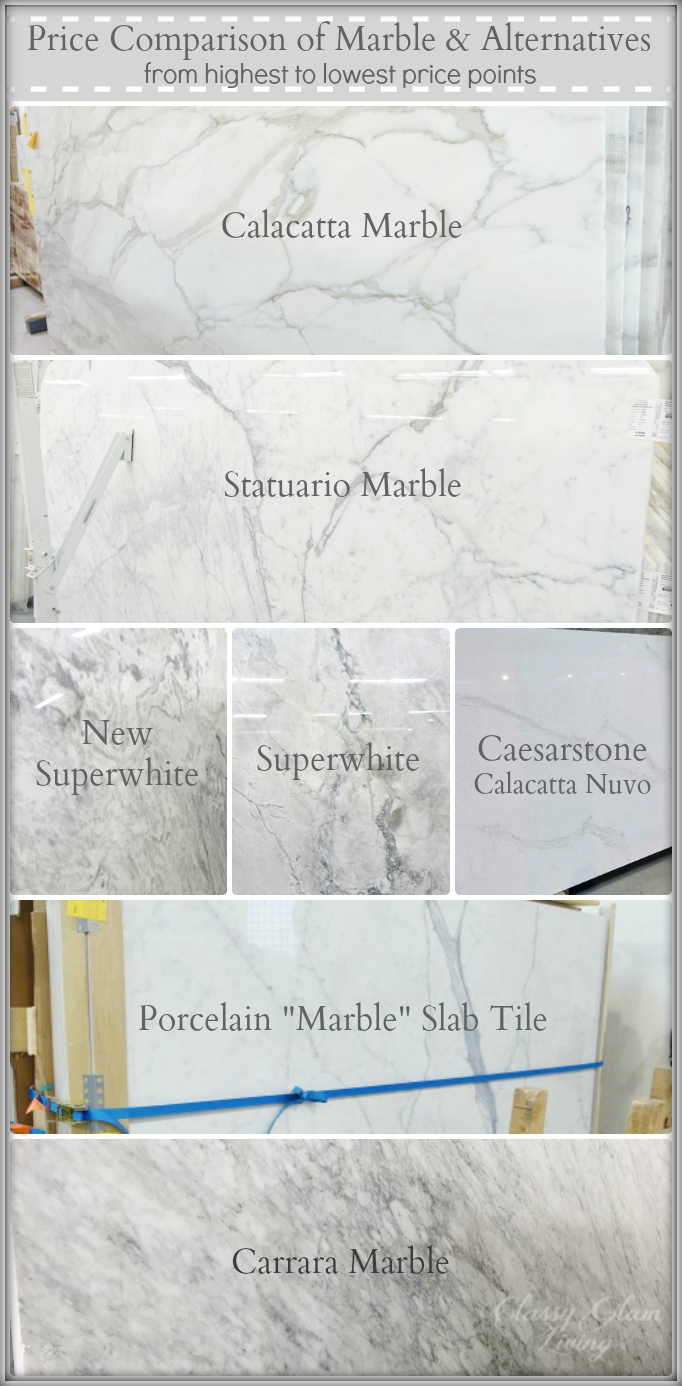
I'm sure you're interested in the price points of these different marbles and alternatives.  Based on the size of our kitchen and quotes that we got:

Price Comparison of Marble & Alternatives | from highest to lowest price points | Classy Glam Living

We absolutely love our new countertop, as much as we would had it been made of statuario marble, if not more.  It's a great alternative to Statuario marble, at a cheaper price and less maintenance hassle.  Not that we would care any less with this New Superwhite quartzite, but It would save us from unnecessary heart attacks if we spill anything on it!

The kitchen is slowly taking shape, and we've finally had the appliances panels installed! We had been going back and forth on using silver or gold hardware, until we saw these pulls at Gingers. 

Panel-ready undercounter fridge and freezer | New house kitchen | Classy Glam Living

So now I guess it's decided we're going with gold. These are actually bronzy-gold, and they go nicely with our bronze Kohler Karbon faucet! Pure fluke on our part! 

New Superwhite Quartzite kitchen counter | Classy Glam Living

Bit by bit our kitchen will take shape and become our dream kitchen that's functional and outfitted in our style.  Here's our view from the living room, as mentioned in our kitchen and living room design boards.

NEW SUPERWHITE quartzite kitchen counter | New house kitchen | Classy Glam Living

Our next to-do's for the kitchen are:

  • Change out cabinet knobs and pulls
  • Install mirror backsplash  
  • Build more drawers in lower cabinets
  • Replace solid doors with glass doors at uppers above the fridge (see kitchen trends post)
  • Install mirror backs + glass shelves for those upper cabinets
  • Install LED rope lighting for under the upper cabinet  
  • Install valence

I hope we've shown you a marble alternative that you can consider if you're having trouble deciding on a marble countertop like we did.  Here's how we use our kitchen:

  • As per the Mr., I have butter fingers, that means a higher chance of spillage  :-(
  • We're rough on the counters, being efficient cooks sometimes means that banging stuff on the counters may be inevitable
  • We may not clean up right after we cook
  • We're not the best cleaners, ie. best if stains on the countertops can be somewhat camouflaged

Do you have butter fingers like me?  Do you love marble enough to live with its patina?

Marble Testing with Household Staple - Red Wine

MARBLE ETCHING TEST RED WINE | CLASSY GLAM LIVING

*****  SEE OUR KITCHEN COUNTERTOP REVEALED HERE!  ******

CLICK TO SEE OUR MARBLE COUNTERTOP ALTERNATIVES

Using marble for kitchen countertop and backsplash is ever more popular nowadays.  We see the most beautiful kitchens on Houzz and Pinterest clad in some kind of marble, and without a second thought we would put that on our kitchen wish list.  But how practical is marble for a real kitchen that gets a fair deal of daily usage (and without an immediate wipe down)?  That's why we looked at marble alternatives in this post, and it actually became our blog's most repinned topic... 900+ and counting!

Us marble owners wannabe's are most likely concerned with the three main cons of marble:  cost, maintenance, and etching.  The nicest piece of marble is most likely double+ the price of manmade quartz stones, not to mention the extra care that natural stones need.  Proper sealing of the stone gives it some extra time to avoid severe etching.  So, what is etching?

Etching is the dulling effect caused by the chemical reaction of acidic spills on the calcium based marble.  Basically, any red wine, citrus juice, tomato sauce, etc that come into contact with the marble would "eat away" at the stone upon contact, and make it feel rough to the touch if left for a long time.  Is there an "appropriate" length of time that we can ignore these acidic spills?  We did a little experiment to test that out.  

BIANCO NEVE | CLASSY GLAM LIVING | MARBLE ETCHING TEST

We were given a sample of Bianco Neve at our appointment with the stone fabricator.  It is a white marble with beautiful depth and crystalization that sparkles as it catches the light.  As lovely as it is, we had to subject it to our household staple and etching culprit - red wine.

This piece of sample has a polished finish but is not protected by any sealant.  We separated the sample piece into quadrants...

MARBLE ETCHING TEST | CLASSY GLAM LIVING

Applied a teaspoon of red wine on each quadrant...

HERE WE GO!

HERE WE GO!

and did a time lapse test of 30 seconds, 5 minutes, 30 minutes, and 4 hours.

WAITING FOR THE MOMENT OF TRUTH

WAITING FOR THE MOMENT OF TRUTH

30 seconds is easily the time of a splash of tomato sauce on the counter while the Mr. is at the stove, before he notices the splash to wipe it up in time.  

30 SECONDS OF RED WINE STAIN | MARBLE ETCHING TEST | CLASSY GLAM LIVING

Don't know which of red wine or tomato sauce is worse, but even the 30-second rule yields a slight etched mark.

A SLIGHT OVAL DULL MARK IS SOMEWHAT VISIBLE 

A SLIGHT OVAL DULL MARK IS SOMEWHAT VISIBLE 

Next is the 5 minute mark, the dulling is a lot more visible now.

5 MINUTE RED WINE STAIN | MARBLE ETCHING TEST | CLASSY GLAM LIVING

Sometimes we wouldn't notice a splash at the stove until after a meal, which may be around 30 minutes.  If that's the case, the polish is gone.  I would consider this moderate etching.

30 MINUTES RED WINE STAIN | MARBLE ETCHING TEST | CLASSY GLAM LIVING

Under the reflection, here's how the sample looks like with the time lapse red wine test.  The 30 seconds, as expected, has the least visible etched mark.  The 5 and 30 minutes etching are comparable in person.

MARBLE ETCHES UNDER REFLECTION | RED WINE MARBLE ETCHING TEST | CLASSY GLAM LIVING

4 hours after the red wine spill...  oh that can easily be the time that we notice a spill after a gathering.  What will happen then?

4 HOURS RED WINE MARBLE ETCHING TEST | CLASSY GLAM LIVING

After 4 hours, the red wine darkened the spot it occupied on the marble.  The spot was clearly dull and also felt rough to the touch.

4 HOURS RED WINE MARBLE ETCHING TEST | DULL SPOT ROUGH TOUCH DISCOLORATION | CLASSY GLAM LIVING

In comparison to the other three quadrants, the 4 hour red wine stain has completely dulled the polish, even though they were all dulled to some extent.

4 HOURS RED WINE MARBLE ETCHING TEST | CLASSY GLAM LIVING

In this view, the discoloration of the 4 hour red wine stain has created a dark spot at the lower right quadrant.

DISCOLORATION OF MARBLE | 4 HOURS RED WINE MARBLE ETCHING TEST | CLASSY GLAM LIVING

And that concludes our test.  Looks like the 30 second rule also applies to spills on marble!

Did I just make your head spin even more, or did this test help to make your decision process much easier?  Will you be able to live with the etched marks on your beloved piece of marble and tell the story behind each mark?  Or does your kitchen countertop have to be perfectly polished even with serious daily usage?  Our decision may surprise ourselves either way.

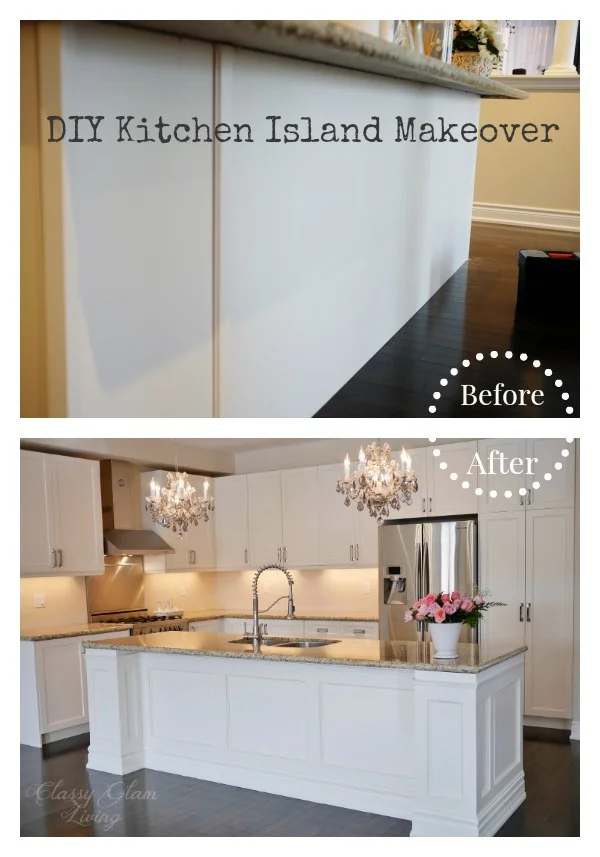
DIY Kitchen Island Makeover

DIY Kitchen Island Makeover - Classy Glam Living

We have always loved our huge kitchen island, which gives us ample prep space for meals.  At over 10-feet long, it's also the dumping spot for lunch bags, mail, and other uncategorized items.  It's great for buffet style get-togethers, where guests hover around to talk and eat.  However, it just looked like a hunk of cabinets, that acted as some sort of border between our family room and kitchen.  The island just looked too OUT THERE to be so plain.

As mentioned in my overly-excited post of our completed DIY kitchen island makeover, I wasn't too confident about this project.  But the Mr. seemed very serious about the project, and being the good wife, I should share his enthusiasm (right?!).  Well, as you know, the rest was history... and was I ever glad to let him perform this cosmetic surgery on our island!  So here it is, as promised, the elbow grease details of the project!


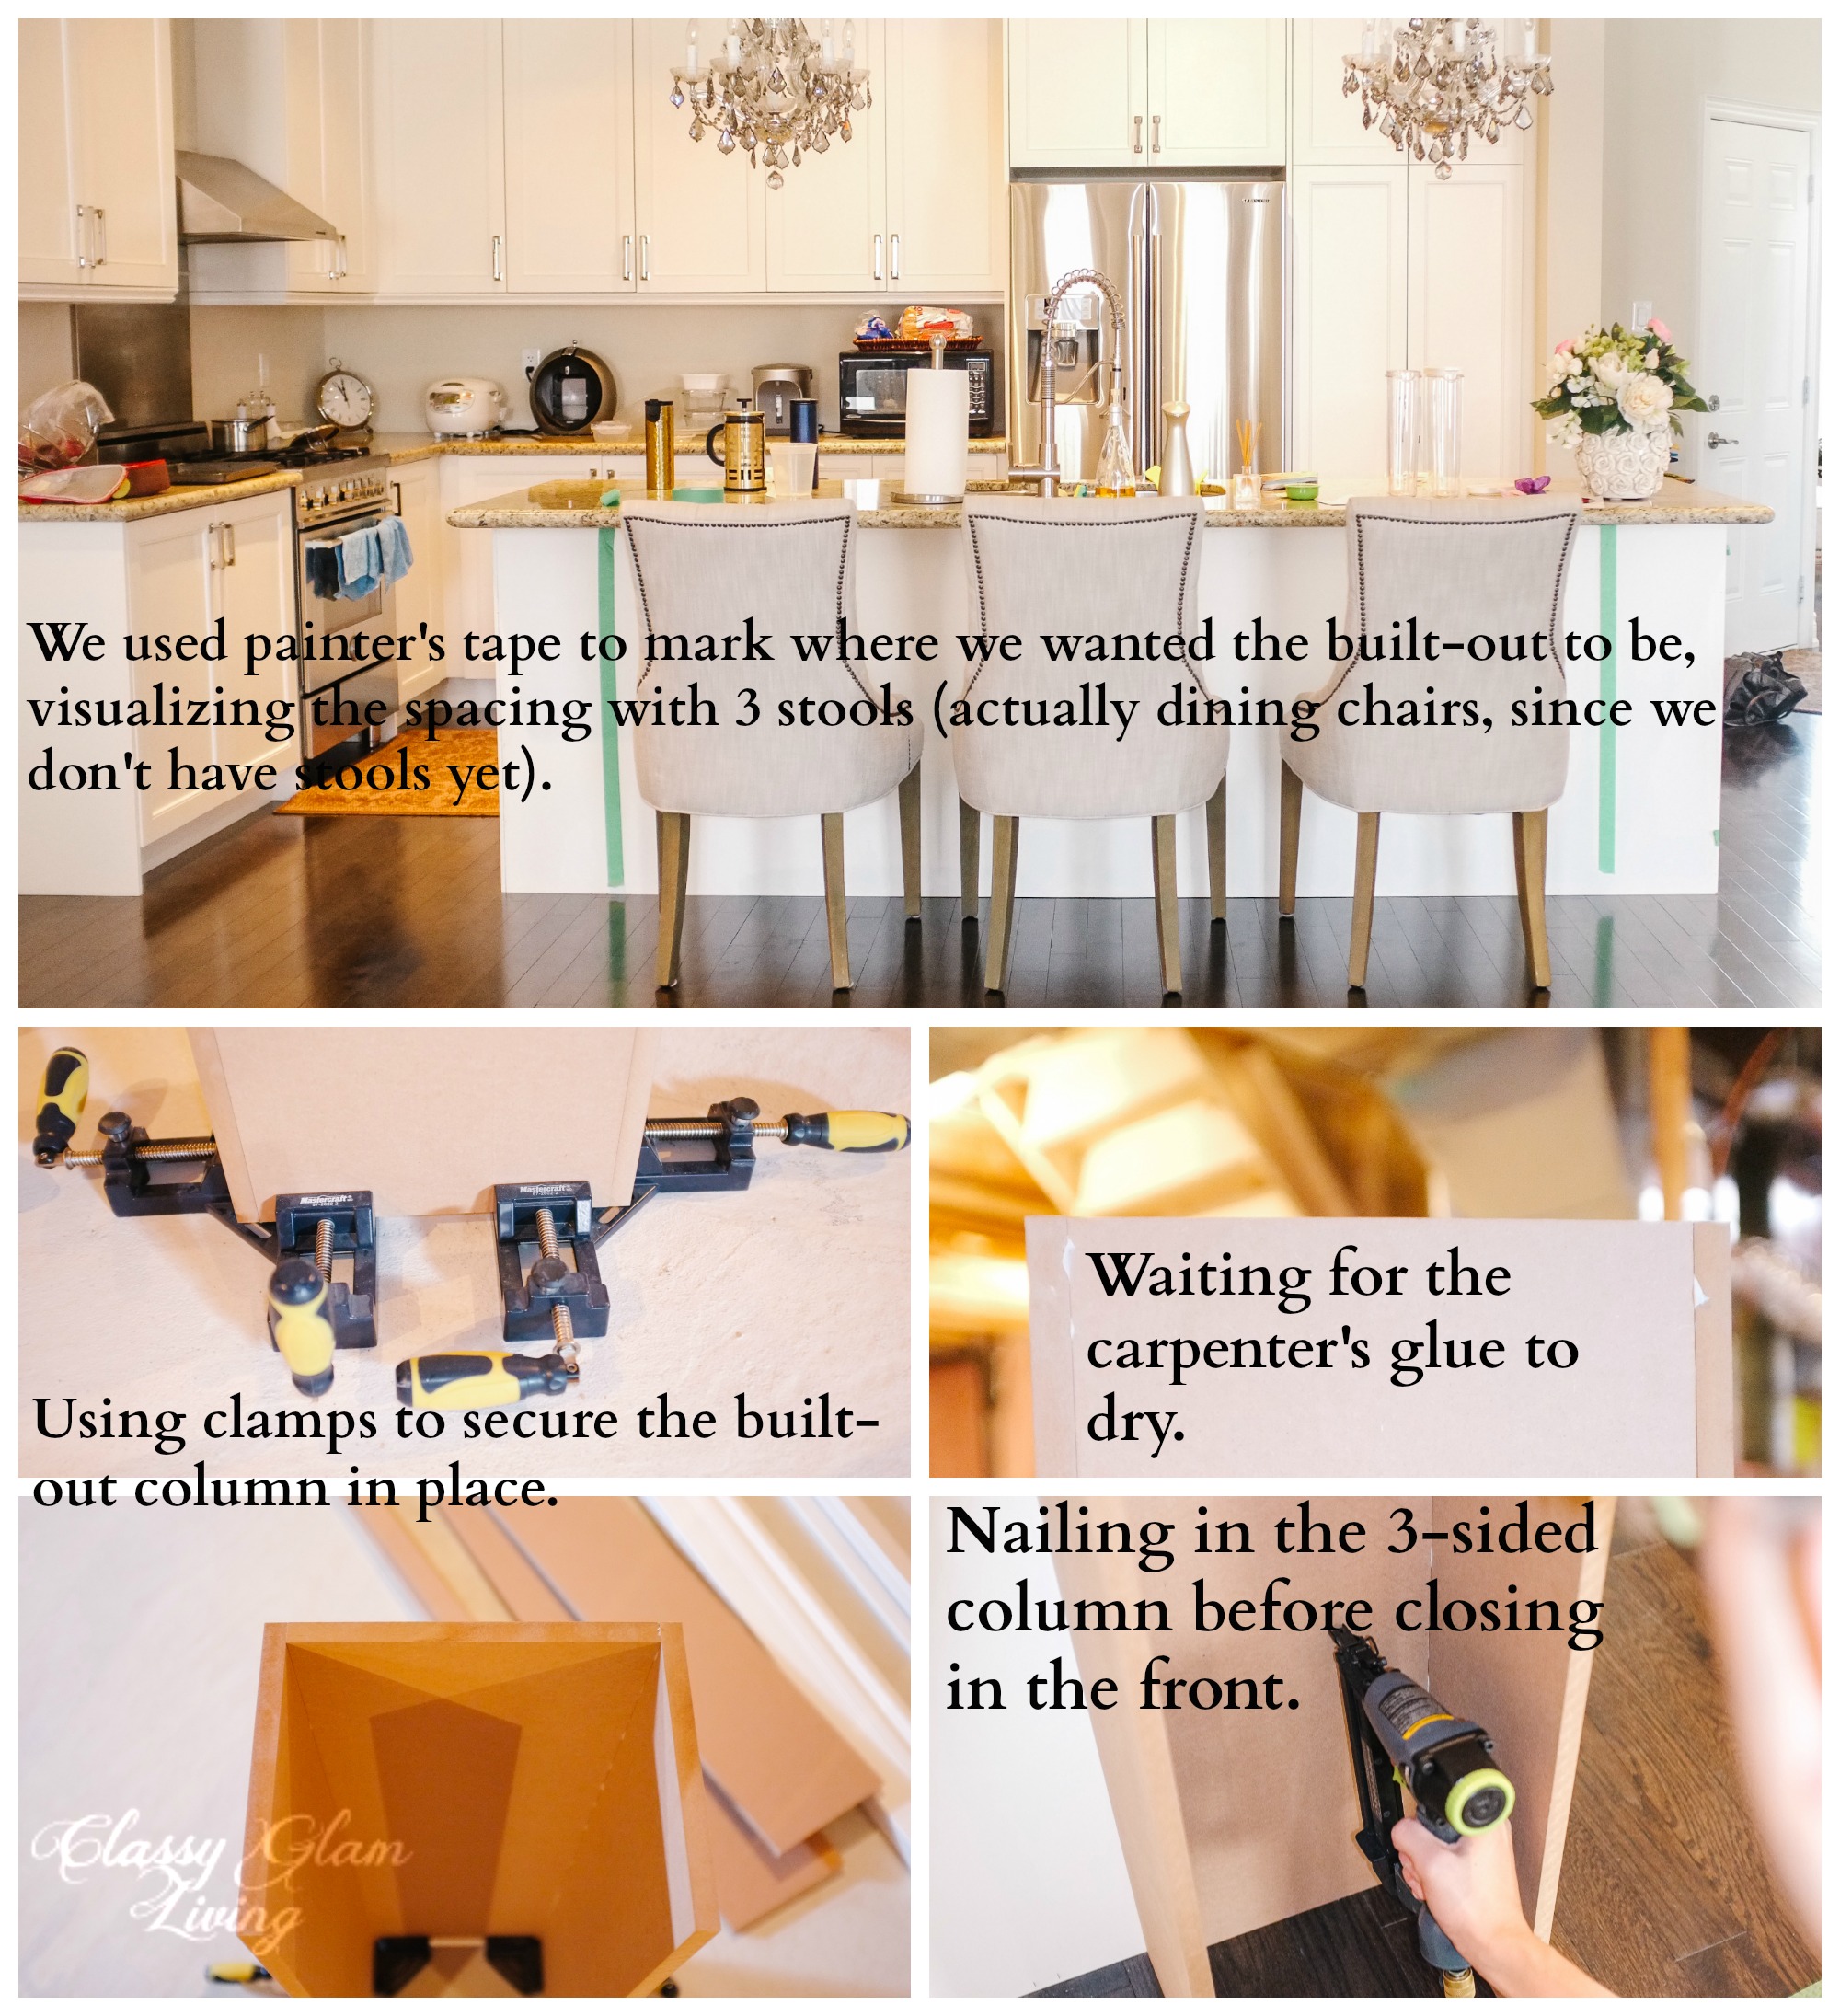
The Mr.'s plan was to build out each end of the island like columns, just to the overhang of the countertop.  We both agreed that a wider built-out would look more proportional to the island.  He decided the easiest way would be to build a 4-sided column.  He got the MDF boards cut to the height of the island, and attached the sides with carpenter glue and nail gun.  Once the columns were dried of the glue, he attached them to the back of the island using nail gun.

DIY Kitchen Island Makeover | Classy Glam Living

We were going for the wainscotting look, and decided that a 2.5" border around the frames would appear more proportional as we stepped away from the island to look at it as a whole. He attached MDF boards and framed around the perimeters, which would be the upper and lower borders of the wainscotting frame.  To cover up the seam between the back of the cabinet and the column, he used the white trim that would become part of the inset frame.  

DIY Kitchen Island Makeover - Classy Glam Living
DSCF0148-watermarked.jpg

He then added small frame trims around the "inner frame" to complete that wainscoting look (excuse the mess on the countertop - our dumping spot).

DIY Kitchen Island Makeover - Classy Glam Living
DSCF0164-watermarked.jpg
DIY Kitchen Island Makeover - Classy Glam Living

With such a long island, a higher baseboard would give it a more ornate look, so we chose a 7" high baseboard for that. 

DIY Kitchen Island Makeover - Classy Glam Living

Yup, that's our Miss. Nosy, running around restlessly with all the going-ons at the island!

Completed look of island with baseboard - my first TA-DA moment

Completed look of island with baseboard - my first TA-DA moment

We included an upper trim in our design to complete the custom look.  The Mr. had to account for an electrical outlet on the side of the island.  He removed the electrical outlet and used a jigsaw to cut out the opening in the MDF border.  

DIY Kitchen Island Makeover - Classy Glam Living

With all the fun in cutting and nailing done, here comes the dirty part...  filling in the nail holes with wood filler and also caulking the seams of the moldings.  Sand and repeat with filling as necessary...  I was the "supervisor" to this part, and of course I got to be as picky as I could be.  I lost count how many times I asked the Mr. to "sand and repeat"…  but he was all game, since he's as much a perfectionist as I am! 

DIY Kitchen Island Makeover - Classy Glam Living

And again, Miss. Nosy over on the right checking on the progress of her lover-boy's project.

Here's another fun part, and the next most stressful part other than getting the moldings done right - PAINT MATCHING.  If the paint didn't match the rest of our existing cabinets, it would make the whole island look like an eyesore.  Our cabinet colour is a creamy off-white, and even a little off would be VERY obvious.  Thank goodness, our local home improvement store was able to match the paint colour of a cabinet door, which Mr. removed to get it matched  (I told you he would do anything to get it perfect). 

Paint matched!  (Lighting in picture created the tone difference)

Paint matched!  (Lighting in picture created the tone difference)

Here we go again - paint, sand, and repeat as necessary...  and again, I searched and felt for imperfections around the built-out, just to have it re-sanded and re-painted.  The Mr. spent so much time on making-over this island, I didn't want a little imperfection to dent the look.  I was glad he had been patient through all this, and making it right the first time! 

DIY Kitchen Island Makeover - Classy Glam Living
Island turned out great!

Island turned out great!

So after lots of ups-and-downs (and that's literal, as his "workshop" is in the basement... carrying up his pieces of wood from the basement to the kitchen, build/ re-cut), I'm so proud of the Mr.'s masterpiece!  We hope you have enjoyed this lengthy tutorial.  The wordy parts don't do much justice to all the blood and sweat that went into the island's making.  

DIY Kitchen Island Makeover - Classy Glam Living

As I stand admiring his new masterpiece, glass of wine in hand, I would tell him how it completes the look of our kitchen.  It looks like it's always been there!  And with him looking so proud of himself, having proven his new-found capabilities, I'm sure he agrees that all his hard work was all worth it! 

We're shopping for some counter stools to make our breakfast bar more functional.  Found these at Target, but it's hard to collect all 3!  It would be nice to have a place to sit, as the Mr. and I chitchat, with one of us is working in the kitchen...  planning for our next home project...  maybe over a glass of wine. 

P.S.:  I guess the Mr. would have a can of Stella...  sorry for the unintentional product placement, but I didn't realize he enjoyed so many cans of Stella until I edited the pictures!