DIY Refinishing Vintage Bedside Tables

DIY Refinishing Vintage Bedside Tables | Classy Glam Living

When I was still under my parents' roof, I painted my bathroom's boring laminate grey vanity in a sky blue colour and changed out the ugly plastic knobs to brushed nickel ones from Umbra.  Quality of the paint job?  Questionable.  Changed for the better?  Absolutely.  It was a joy for my young self to walk into my bathroom with a cheerfully coloured vanity. I had it in me back then to beautify dull dinginess, and I've grown to love discovering potentials in pieces even more.  That was how I discovered these vintage night tables in the Henry Link Bali Hai collection, and the Mr. breathed new life into them. (I've now passed on the dirty work (-;)

Source list at the bottom of the post.

DIY Refinishing Vintage Bedside Tables | Classy Glam Living 2

The Mr. did some basic prepping a while ago, as mentioned in this previous post. He removed the backing and unscrewed the top, since we planned on replacing it.

DIY Refinishng Vintage Bedside Tables | Basic Prepping Steps | Classy Glam Living

Removing the drawer pulls made it easier for cleaning. Make sure you give the piece of furniture a thorough cleaning on all surfaces if you're planning to repaint it. The primer and paint need to stick to the surface, not on dirt!

We chose to go with two knobs on each drawer.  We first eyeballed the approximate positions for the two knobs, and the Mr. measured the distance from one side and replicated that on the other side.  

DIY Refinishing Vintage Bedside Tables | Drilling for Drawer Knobs | Classy Glam Living

He then filled out the holes left from the original hardwares and sanded them.  For a smoother finish, the holes were re-filled and re-sanded a second time.  

DIY Refinishing Vintage Bedside Tables | Classy Glam Living

The Mr. preferred to use a roller when applying the primer and painting the tables, and a brush for touching up the details.  The tables were in decent vintage condition, so he only applied one coat of the Zinsser primer.  His review on the primer was that it went on very well, and the paint adhered to the primer smoothly.

DIY Refinishing Vintage Bedside Tables | Primer Application | Classy Glam Living

He noticed brush strokes on the finished white table, which was most likely painted with a brush.  He had to lightly sand the surface before it could be re-painted.  

We chose a light grey colour in a glossy finish for a contemporary look. Two coats of paint were applied on the tables to get the evenly layered glossy look.  

DIY Refinishing Vintage Bedside Tables | Behr's Silver Bullet in Glossy Finish | Painted in Glossy Grey | Classy Glam Living

After the paint had cured (best to wait a day for the paint to fully dry), it was time to re-attach the backing of the bedside tables.  He also painted them with the same grey paint before re-attaching.  This project was a good excuse for the Mr. to get the one tool that he's been missing - a cordless staple gun.  

DIY Refinishing Vintage Bedside Tables | Re-attaching Backing with Staple Gun | Classy Glam Living

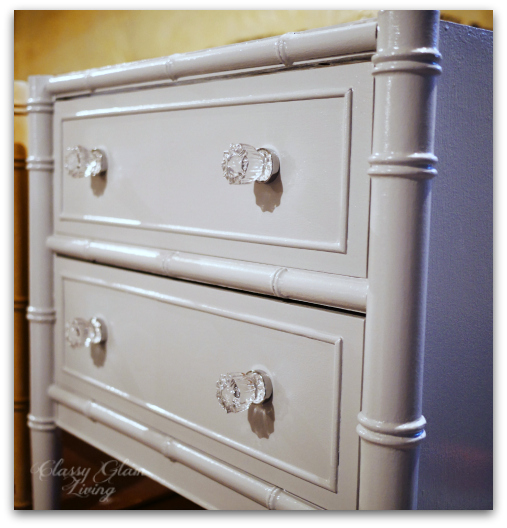
Next was adding some jewels to the tables.  We love the style of this glass knob; it gives a vintage vibe, while the chrome backing gives it a bit of modern touch.  

DIY Refinishing Vintage Bedside Tables | Lee Valley Tools | Classy Glam Living
DIY Refinishing Vintage Bedside Tables WITH Glass Knobs Installed | Classy Glam Living

Last but not least was the crowning of the bedside table with our beloved marble top.  Its lines and edge profile were fabricated from the original table top.  We love how the marble top adds sophistication to the simple elegance of the night tables.

DIY Refinishing Vintage Bedside Tables WITH Statuario Marble Top | Classy Glam Living

And with that, here's the completed look of the refinished bedside table!  I can't wait to move into our new house, so that we can finally install our mirror headboard and see how our "new" bedside tables match up against it!

DIY Refinishing Vintage Bedside Tables Finished Look with Statuario Marble Top | Classy Glam Living

Thanks to the Mr.'s elbow grease, the tables turned out exactly how I envisioned them!  They now look all grown up from their previous ugly duckling selves when I first laid eyes on them.

DIY Refinishing Vintage Bedside Tables Closeup with Statuario Marble Top | Classy Glam Living
DIY Refinishing Vintage Bedside Tables | Closeup with Statuario Marble Top | Classy Glam Living

I had initially wanted to install new brass pulls to mimic the original feel of the tables, but I'm glad the Mr. convinced me to use two glass knobs on either side of the drawers instead. They made the pieces look more elegant.

The grey paint on the tables is a nice neutral colour that helps to accentuate the grey veining in the statuario marble top. 

DIY Refinishing Vintage Bedside Tables | Closeup with Statuario Marble Top | Classy Glam Living

I'm so glad the Mr. agreed to refinish this set of vintage bedside tables.  They turned out gorgeous!  We finally have the storage we've always wanted in the night tables, and the marble top gives it all the more reason to clear off the surface to enjoy its natural beauty, 

Another DIY project in the queue done and done!  Stay tuned for the next one in queue!

Source List

Refinishing Plans for Vintage Night Tables

BEDSIDE NIGHT TABLES REFINISH DIY | CLASSY GLAM LIVING

If you follow me on instagram, you might've noticed that we have a work-in-progress pair of vintage bedside tables.  It's a perfect though small project for the Mr., who has been feeling restless through this drought of home projects as we continue to long for the completion of our new house.  

Funny thing was, I wasn't really looking for bedside tables, but rather a sideboard for our dining room.  Since I had previously lucked out with a vintage piece of console table, I decided to try my luck again for a vintage sideboard.  

Of course, when my intent was to look for something specific, I would never find it!  Doesn't this always happen when we shop for anything?  Well, everything happens for a reason...

I've wanted to replace our current bedside tables with ones that have storage, as in the mirrored bedside tables/ cabinets mentioned in this post.  However, most of the nicer ones almost always come too wide.  That may not work, considering we will only have 30" on either side of our bed to work with in our new master bedroom,  Not to mention, a nicer pair would cost close to $1000, if not more.  I've been holding back in an attempt to find a (much) better deal.  

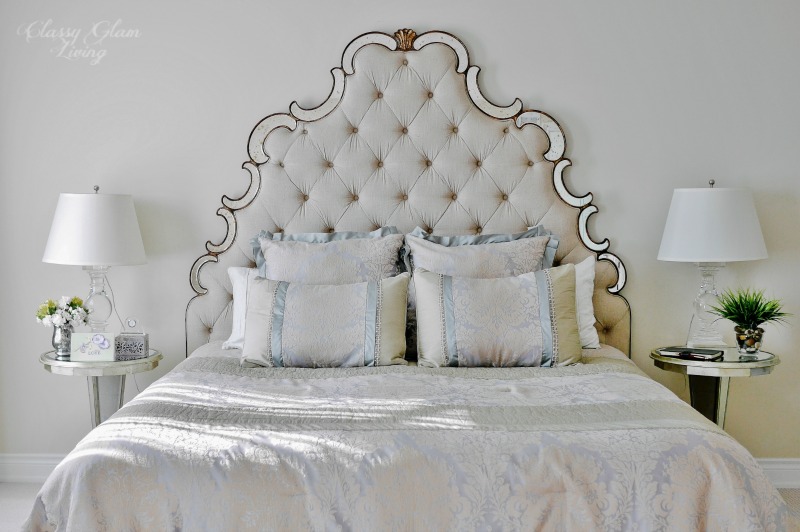
But I guess something is just not meant to be.  Lately, I've started to re-think about the mirrored bedside tables, and wondered if that would be too much mirror with our mirrored trimmed headboard.  

MIRROR FRAMED HEADBOARD | CLASSY GLAM LIVING

So, instead of finding a sideboard, I had ideas churning in my head when I saw this pair of bedside tables.

PAIR OF HENRY LINK BALI HAI BEDSIDE TABLES | CLASSY GLAM LIVING | DIY REFINISH

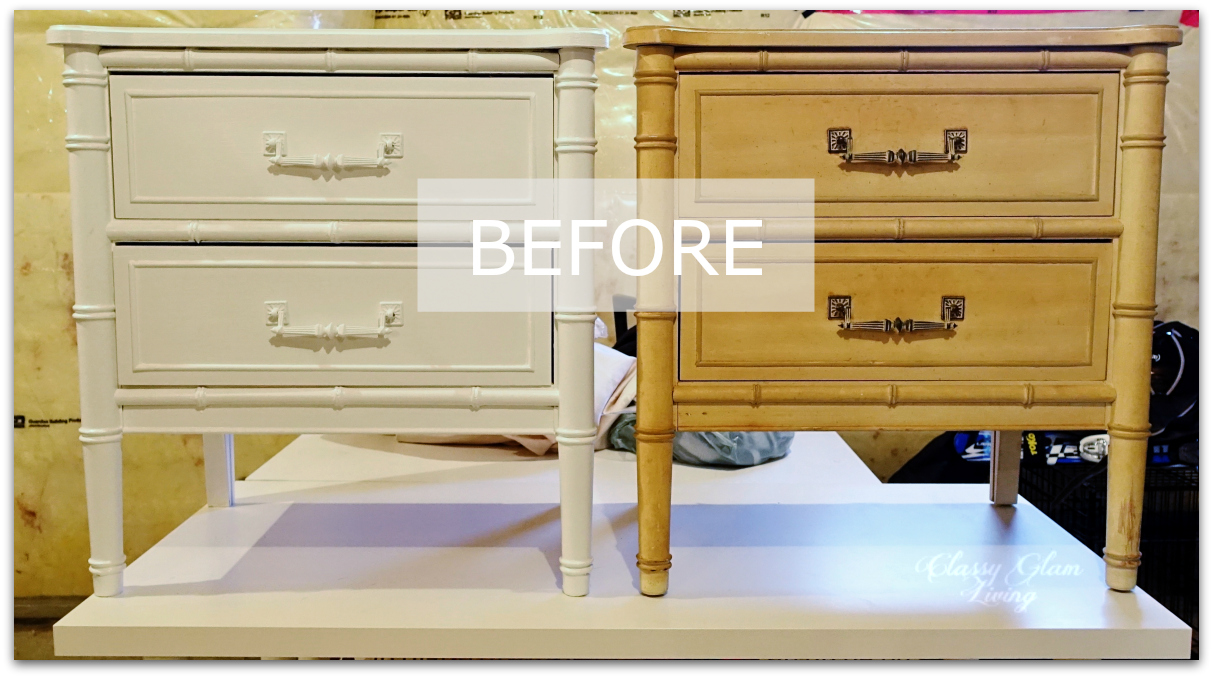
Faux bamboo furniture is making a comeback from its mid-century hollywood regency hype.  This pair of bedside tables were from the Henry Link Bali Hai collection...  from the 70s!  I love the bamboo detailing, and how the table top is curved along the faux bamboo front legs.  The rounded and curved detailing echoes our curvy headboard frame.  I showed the photos of the pair to the Mr., told him about my big plan for them, and waited for his judgment.  The Mr. agreed to once again be my DIY'er!  

The tables are of good quality, and drawers were built with dove tail joints, something that we no longer see in modern furniture construction.  

DOVETAIL JOINTS DRAWER CONSTRUCTION | CLASSY GLAM LIVING

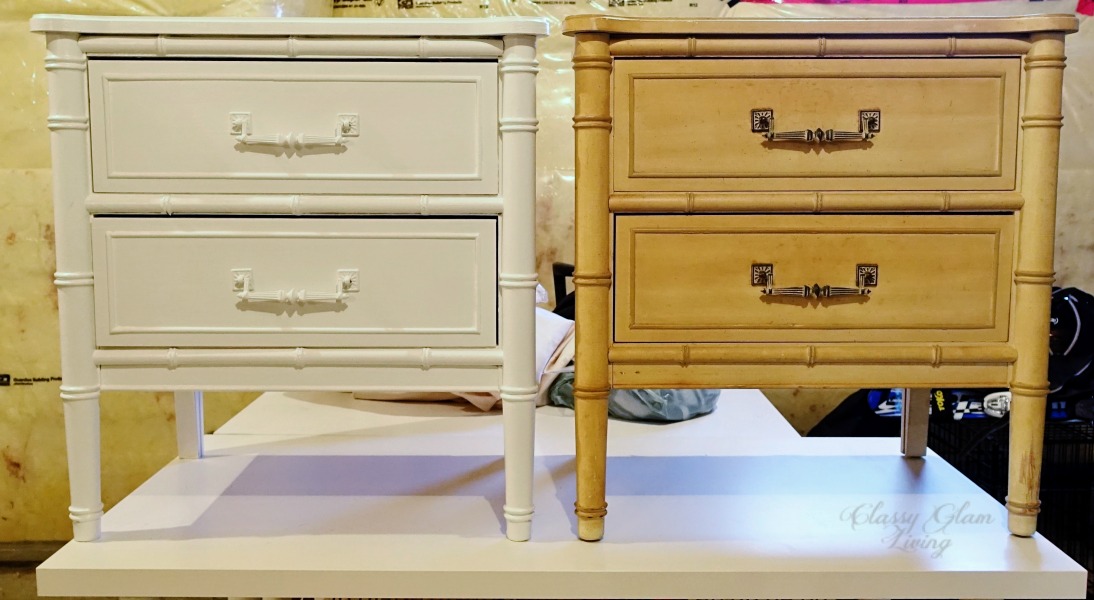
As you can see, the pair are of the same style but one was painted over, and the other was in its original glory.  That didn't matter to us, since we were going to refinish them with our design in mind.

HENRY LINK BALI HAI BEDSIDE TABLES REFINISH DIY | CLASSY GLAM LIVING

I'm looking to paint the pieces over in a bluish grey colour, that'll give some contrast to our linen coloured headboard.  That's my part in this DIY project, figuring out the paint colour!  Thinking of doing a high gloss on this piece, that'll make it look a bit more modern and elegant.

All our trips to stone fabricators have made marble even more appealing to me.  My plan is to remove the existing top, and replace it with a piece of statuario marble fabricated in the exact shape. The bluish grey paint colour would complement the grey veining of the statuario marble.  The Mr. has already gotten the backing and the top off of the units...  he's really anxious to start!

REMOVE BACKING OF FURNITURE | CLASSY GLAM LIVING

REMOVE BACKING OF FURNITURE | CLASSY GLAM LIVING

UNSCREW TOP OF BEDSIDE TABLE | CLASSY GLAM LIVING

UNSCREW TOP OF BEDSIDE TABLE | CLASSY GLAM LIVING

TOP AND BACK REMOVED | BEDSIDE TABLES REFINISH DIY | CLASSY GLAM LIVING

TOP AND BACK REMOVED | BEDSIDE TABLES REFINISH DIY | CLASSY GLAM LIVING

We're not planning to keep the original drawer pulls, even though it's probably a big no-no to replace them on a highly sought after piece of vintage furniture.  We would rather finish it to our liking since we're already painting it over and such.  I think a set of simple brass bail drawer pulls would complete the look.  I also like the lucite pulls, with the rings picking up the bamboo ring details.  Here are some of my top choices:

sources:  1 AND 2.. QUMUSE; 3. SIGNATURE THINGS.COM; 4. A ROSE RAMBLING

sources:  1 AND 2.. QUMUSE; 3. SIGNATURE THINGS.COM; 4. A ROSE RAMBLING

This easy peasy refinishing project should keep the Mr. occupied for a little bit.  We'll have a ton of projects to start when we move in.  Even the little man has volunteered to help paint the walls for his room!

Until then, stay tuned for the reveal of the refinished bedside tables!

Have you scored a diamond in the rough lately?

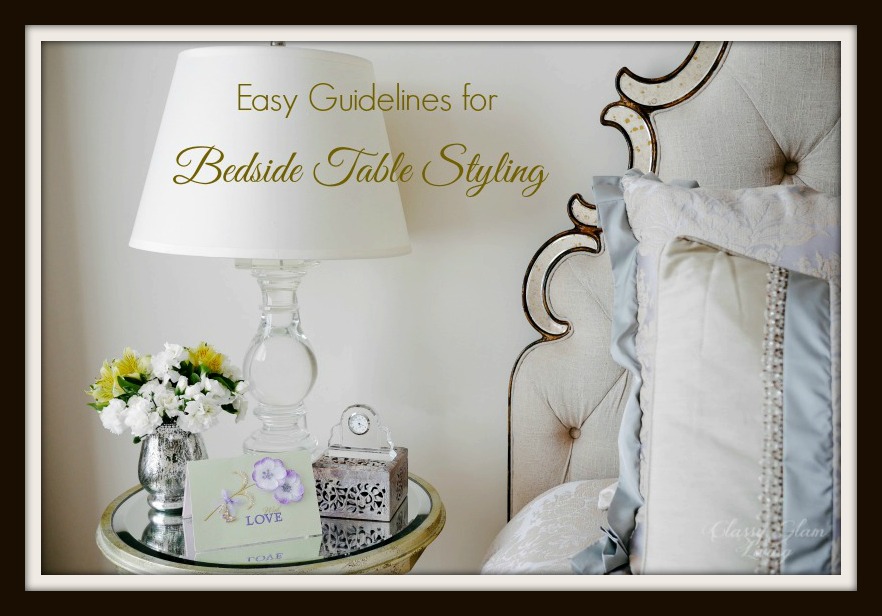
Easy Guidelines for Bedside Table Styling

We welcomed the first long weekend of the summer season a week ago.  The weather was nice, and the sun was shining through my bedroom window...  onto my messy bedside table.  Don't know about yours, but mine has turned into my home's "command centre".  I can occasionally find a pen and notepad on it...  Need a tissue?  I've some remnants of little man's booger/ snot tissue.  Need something to read so I can wind down before bedtime?  There's a stack of mags, no problem.  Time to pay the hydro bill?  It's ok, I have the bill RIGHT THERE.

Sounds like I have a large bedside table huh?  NOT!

Bedside Table Styling Guidelines | Classy Glam Living

How was I able to build a command centre on a small table?!  As I looked at my stash in amazement, I've decided that I would revamp my lovely bedside table from the state of nastiness.  I will make the Mr. proud!

Bedside Table Styling Guidelines | Classy Glam Living

I wanted the headboard's intricate design to be focal point of the space, so I kept items on the beside table to a minimum.

Bedside Table Styling Guidelines | Classy Glam Living

These general guidelines would beautify any table vignettes:

1. Varying Heights - Curating items in varying heights is the constant guideline to achieving balance for any vignettes -  (remember my post on decorating the dining table?) 

2. Something green - Read plants.  What they say is true, any shade of green livens up a space. It compliments any colours in your decor...  is it any wonder that it's the middle colour in the rainbow?

3. Something sparkly - all vignettes should have something shiny to reflect light to attract your eyes, making them linger to appreciate the whole scenery.  

4. Objects with textures - offering contrasting details through different textures is just another way to add visual interest for any tablescape.

Of course the above 4 guidelines aren't the be-all and end-all to decorating your bedside table. Keeping the guidelines short would prevent your bedside table from turning into one with a muddled collection like mine!  So, with these guidelines in mind, here's how my essentials played out.

Bedside Table Styling Guidelines | Classy Glam Living

The lamp is usually the anchoring piece on the bedside table, with it most likely being the tallest item.  A general rule of thumb would be that the height/ size of the lamp should be proportional to the height of the headboard or size of the bed, in order to anchor the space beside the bed. Think lamp sizes at Target...  a king size bed should at least be paired with large lamps.  Anything smaller may be dwarfed by the large size of the bed.  Smaller beds can get away with smaller lamps, but keep in mind that a large shade may take away the presence of a small bed.  If you have small table lamps, then artwork can also be hung beside the bed to visually bridge the gap between the height of the headboard and the table.   

Bedside Table Styling Guidelines | Classy Glam Living

I went with some fresh flowers for "something green" to liven up my side of the bed, and kept them in a shorter vase for varying height.  I chose carnations as they just last forever with minimal care!  The vase mimics mercury glass, which together with its rhinestone edging, adds the "something sparkly" element on my table.  Our mirror top tables also reflect light from the nearby window...  more sparkly! 

Bedside Table Styling Guidelines | Classy Glam Living

The florals and my soap stone knick-knack box created some contrasting textures against the smooth and shiny lamp and vase.  I like having a lidded box on the table to keep my tube of hand cream and other lose items (you know, pens and paper pads).  Aside from its obvious purpose, the rectangular box was juxtaposed with the roundness of the baluster lamp and barrel shape vase to create a balancing effect with different shapes.  It was also the next layer in the height variance of the tablescape.

Bedside Table Styling Guidelines | Classy Glam Living

If our bedside tables were a bit larger, then maybe there would be room for some artwork .  For now though, I would add some colours with a special occasions card - birthdays, valentine's, Mother's Days, and Christmas (did I miss any?).  At the rate I clear my bedside table (not very often), each can stay on for several months for a good rotation!  Little man's masterpieces sometimes also make their way to my table - "Mommy, I drew something awesome for you!" They're FOR ME, so I feel obligated to showcase it by my bed.  ;-)

The Mr.'s side?  Bleh...  

Bedside Table Styling Guidelines | Classy Glam Living

He's utilitarian (and territorial) and doesn't like too many things on HIS table.  So I've only added a faux grass plant on his side, leaving his black notebook for home project ideas untouched.  =)

In the meantime, we're looking to upsize our bedside tables to something like these...  Anything with hidden storage to cover my mess, as the Mr. would say!

New Bedside Table | Classy Glam Living

Sources:  1. Pottery Barn / 2. One Kings Lane / 3. Bowring / 4. Joss & Main

So...  when was the last time you cleaned up and beautified your bedside table?  Time for a late spring cleaning!

Bedside Table Styling Guidelines | Classy Glam Living