Annual Review of Home Projects

New House Home Projects | Classy Glam Living

After a mostly sunny and hot summer, it's like payback time now in Toronto.  I can count the number of beautiful crisp Fall days maybe with 2 hands.  Fall also marks the beginning of a busy season for our family, with weekends now being taken up by hockey practices!  The Mr. barely has time to continue or start any new projects around the house now.

As we planned out project after project, sometimes it's easy to lose sight of our accomplishments.  Having just celebrated our one year anniversary at the house, it's probably a good time to do an annual review of our progress thus far.    

With downsizing to a smaller house, our top priority has been tackling storage needs around the house.  From addressing what drives us (me) absolutely insane to storage that incorporates beauty, here's a list of the Mr.'s most accomplished DIY projects around our house this past year:
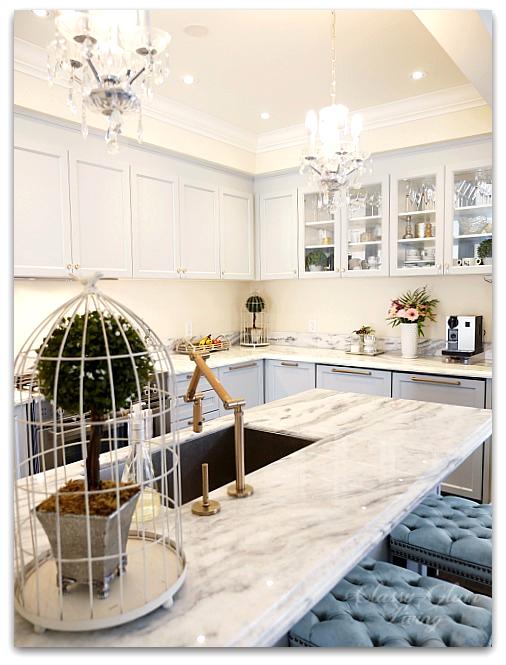
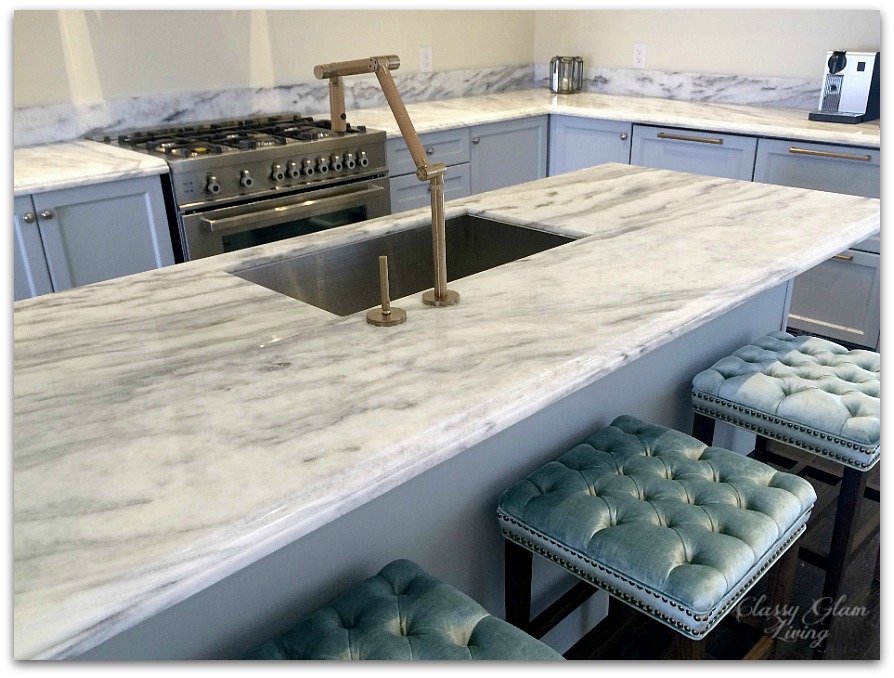
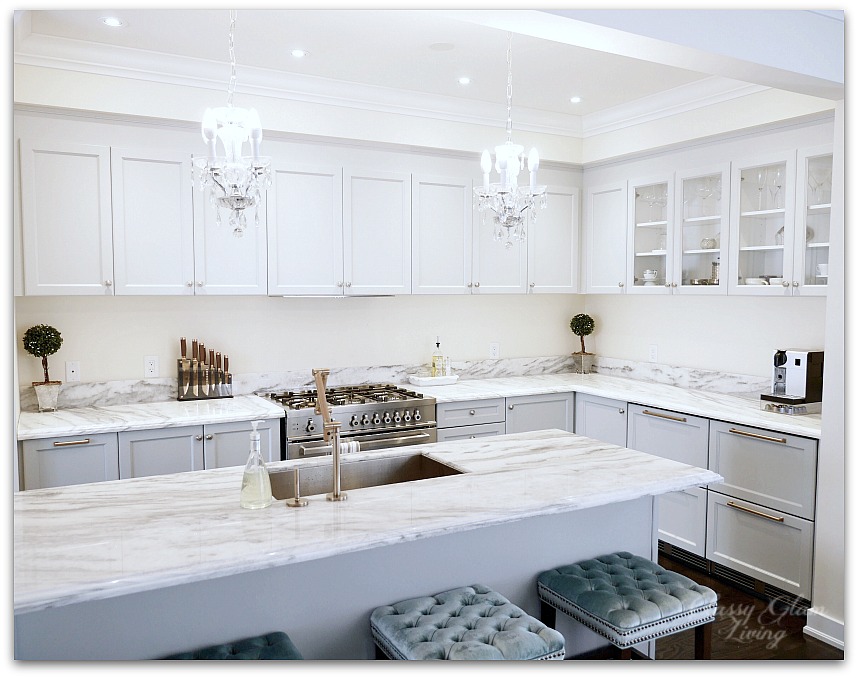
KITCHEN

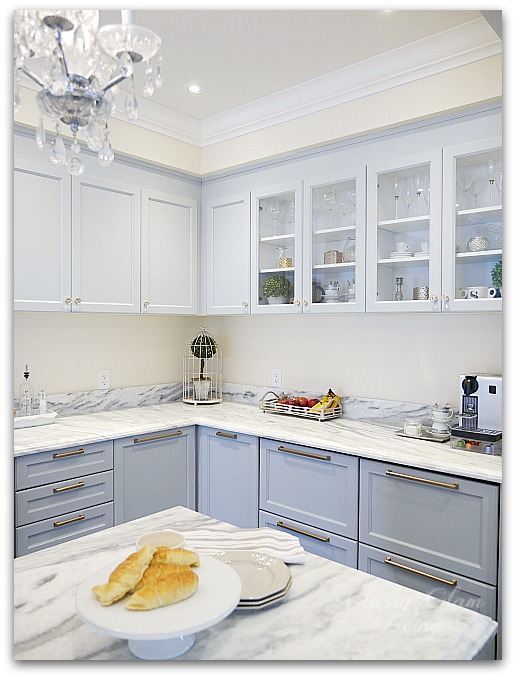
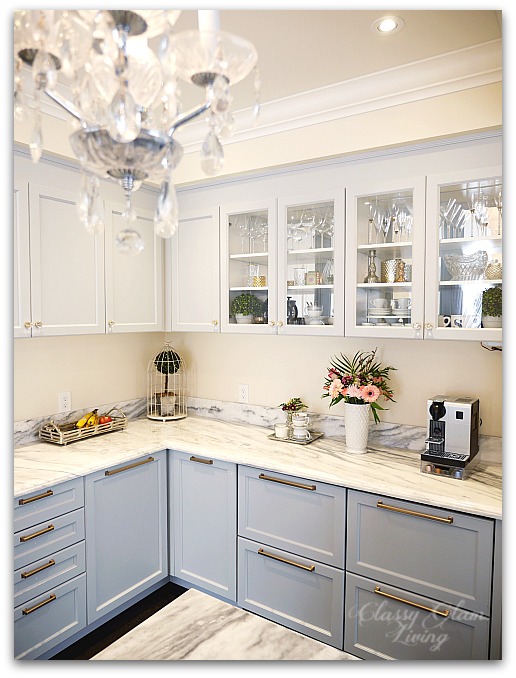
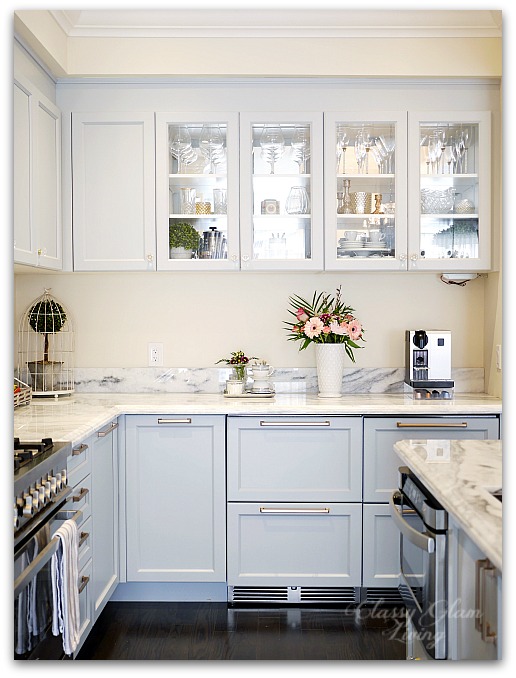
The kitchen is the heart of the home, and it was naturally the space in the house that got the most attention from the get-go.  With it being used practically on a daily basis, it has the highest potential to drive us insane if it doesn't function well.  This was what our kitchen looked like when we closed the house last year:

New House Kitchen Before | Classy Glam Living

Terrifying, isn't it?  Since then, we've replaced the countertop, sink, and faucet.  

New House Kitchen | New Superwhite Countertop Kohler Karbon Faucet | Classy Glam Living

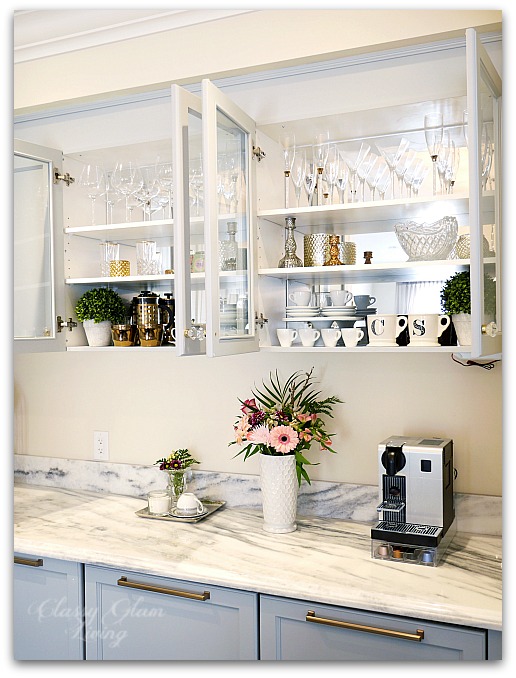
This was when we finally installed the integrated range hood (hidden inside the cabinet above the range) and replaced the solid doors with glass doors.

New House Kitchen | Glass cabinets | Classy Glam Living
New House Kitchen | Glass cabinets mirror back cabinet hardware | Classy Glam Living

When I was making too many one-pot pasta to avoid crawling into the pots and pans cabinet, the Mr. built some drawers in lower cabinets.

New House Kitchen | DIY pots and pans drawers | Classy Glam Living
New House Kitchen reveal | Classy Glam Living

Our kitchen has come a long way from its ugly duckling beginnings.  It may be small, but it has functioned really well for us.  Even when both the Mr. and I are in the kitchen, we never seem to be in each other's way.  Cooking isn't my forte, and I'm not an organized cook at all.  When you think making one-pot pasta sounds as easy as can be, I can still manage to spread out everything onto the 4 countertop spaces around the stove, ie. both sides of stove, plus both sides of the sink.  The Mr. can laugh all he wants about it, but we both appreciate all the counter space our integrated appliances (fridge/ freezer drawers and microwave drawer) have freed up.  We still think it's the best design decision we've made for this kitchen.

DRESSING ROOM

New House Dressing Room reveal | Folding table station | Classy Glam Living

Another space in our house with a humbling beginning was our DIY custom closet/ dressing room.  As mentioned in my previous post, we made a video of the building process and there have been 15,000+ views as of writing.  

I'm so proud of the Mr.'s ultimate build of my dream closet; it's both beautiful and functional.  The pull-out folding table gets the award for beauty in function.  It has made all the folding more bearable, as I've taken the Marie Kondo* route to organizing my closet.  The Mr. was also worried that I wouldn't have enough room for my clothes in this shared closet, but I'm happy to report that I still have extra space even after some shopping 😁

You can see more photos of the dressing room in this post.

If you missed last week's post on the YouTube video, here again is the video:

PLAYROOM WORKBENCH/ STORAGE

New House Playroom reveal | Classic Gray work building bench | Classy Glam Living

I can stand my own mess (oh ya, anytime), but this is one room where mess can actually be hazardous (imagine the pain of stepping on a stray piece of Lego!).  Little man doesn't actually have much toys, but for some reason, the floor was covered with so much stuff at one point where I had to part the Red Sea to get to his desk.  

Thank goodness the Mr. came to the rescue!  He quickly whipped up this table top part of a storage bench that I designed.  It's been a great spot to store and display some of little man's Lego collections.  He has also used it as a building table; this ottoman is just the right height for him to work there.  

New House Playroom Reveal | Gallery wall Classic gray work building bench | Classy Glam Living

As for the storage part, the pieces of wood for the drawers that go underneath the bench have been cut...  just waiting for the Mr. to stain them and put them together!  That's the main (and most important) missing part of this playroom!!  (Can you tell I can't wait for it to be done by my exclamation marks? !!!!!!!!!!!!!!!!!!!!!!!!!!!!!!!!!)

I've sourced out decorative items that are suitable for a playroom, namely a low pile rug, vinyl-front frames for the gallery wall, caged light fixture instead of one with exposed bulb, just to name a few.  You can see my playroom design board in this post, and the reveal here.

UPCOMING PROJECTS

Basement Family Room

The Mr. and I started working on the basement family room design, which I wrote about in this post.  The walls have been painted to a more neutral colour, which is more pleasing to the eyes than the original too-yellowish cream colour.  

New House Family Room Layout Plan | Classy Glam Living

We had a poll for our basement DIY storage furniture - to build from scratch or do another IKEA hack?  You can submit your choice here!

Laundry Room

New House Laundry Room Design Board | Classy Glam Living

Oh, our laundry room can definitely use some storage help.  Back at our previous house, I used to store off-season decor items in our cabinets, which were of abundance.  I would love to clean up the laundry room once and for all, with the cleaning supplies hidden behind closed doors!

Here's the post of my laundry room design, which I hope will come into fruition one day!

Master Ensuite Vanity

Well, if you've been following along, then you would know how much I love (LOVE!!!) drawers.  Currently, this is our master ensuite's vanity situation:

New House Master Ensuite Bathroom Design Plan | Classy Glam Living

Yup, not drawers, and that means lots of wasted storage space inside the cabinets.  I know I need to purge some products, as they're now carefully sitting on each other like I'm building a pyramid.  That's what happens when I'm not working with drawers 😓

Ideally, these cabinets will house two drawers under each sink.  One would be for products and the other our linen drawer.  Between the Mr. and I, there should be plenty of room in each drawer.

This is one of my inspirations for our vanity.  You can read more about my bathroom design plan here and colour choice here.

Between work, family commitments, and other minor home projects, I think the Mr. has done an excellent job around the house.  He's meticulous with his planning (measure twice and cut once!), never rushes through his work, and gives his projects an amazing finish. I would give him an exceed expectations for his grading 😂  There're still loads of work to be done in our house, and they're enough to keep the Mr. busy for a long while!  

It's been fun to look over at the before's and after's of the projects.  You can see all these and some other projects on the Mr.'s honey-do list.  Yup, he'll be a very busy man!!

Adding Glam to Your Boudoir - a Blog Hop

Adding Glam to Your Boudoir - a Blog Hop | built-in vanity in dressing room, vanity decor, jewelry display, perfume display, glam vanity | Classy Glam Living

Is your morning routine a mad dash around your wardrobe trying to find your favorite piece of jewelry?  Has it become more of a chore than an enjoyment?  Then you need to slow down and smell the roses, and perhaps this blog hop will make your ideal morning routine a reality!  

If you're linking over from my friends Kim and Lacey's blog, Styled with Lace, welcome!  I'm so thrilled you are here!  If you're a regular reader, welcome back as I share some boudoir styling tips with you today. 

Welcome to our master suite!  The dressing area greets us as we step in, so I try to style the built-in vanity with a welcoming view.  I'm sure you've heard many times that being organized makes your morning routine much more efficient.   My goal is to keep my vanity organized while staying pretty. 

Adding Glam to Your Boudoir - a Blog Hop | built-in vanity in dressing room, vanity decor, jewelry display, perfume display, glam vanity | Classy Glam Living

I share this vanity area with the hubby.  So nice of him to let me hog the vanity, while he gets the space of that marble dish on the right 😁

I've styled the vanity in several different ways over the months since its completion, and I always use some common elements to keep all the stuff from looking like a hot mess. 

Trays

I have two main trays on the vanity; one for perfume bottles and the other for jewelries.  The trays help to corral like items together, and make cleaning much easier.  

Adding Glam to Your Boudoir - a Blog Hop | vanity decor, vanity trays, tray styling, jewelry display, perfume display on vanity, glam vanity | Classy Glam Living

I love how the mirror trays add glam and sparkle to the vanity.  The perfume bottles seem to sparkle even more with the light reflected from the mirror tray.

Adding Glam to Your Boudoir - a Blog Hop | vanity decor, vanity trays, tray styling, jewelry display, perfume display on vanity tray, glam vanity | Classy Glam Living

I don't own a huge collection of perfume, just enough for the different seasons and occasions.  I'm lucky the fragrances that I love come in such pretty bottles to be displayed!

Adding Glam to Your Boudoir - a Blog Hop | vanity decor, vanity trays, tray styling, jewelry display, perfume display on vanity tray, glam vanity | Classy Glam Living

Pretty Dishes

On the jewelry tray, I keep several pretty dishes of daily jewelries for easy access; one of each for my bracelets/ bangles, rings holder and earrings.  

Adding Glam to Your Boudoir - a Blog Hop | vanity decor, vanity trays, tray styling, jewelry display, glam vanity | Classy Glam Living

It's fun to discover how objects can be multi-functional. I'm using a crystal pillar candle holder as a dish for earrings, and a tea cup for my bracelets.

Adding Glam to Your Boudoir - a Blog Hop | vanity decor, vanity trays, tray styling, jewelry display on vanity tray table, glam vanity | Classy Glam Living

I love how they serve up some sparkles and add color and dimensions to the vanity.

Adding Glam to Your Boudoir - a Blog Hop | vanity decor, vanity trays, tray styling, jewelry display on vanity tray table Jonathan Adler dish, glam vanity | Classy Glam Living

Display Items

Some jewelry boxes are pretty enough to stand on their own as part of your vanity's decor. The rarely worn and precious pieces can be kept in their pretty boxes and displayed in a cloche. 

Adding Glam to Your Boudoir - a Blog Hop | vanity decor, vanity trays, tray styling, jewelry display, glam vanity | Classy Glam Living

With such a pretty display of jewelry boxes, you would want to elevate it so that it's easily visible.  The simplest way to achieve this is to lift the display on cute books or boxes to create a beautiful vignette.  

Adding Glam to Your Boudoir - a Blog Hop | vanity decor, vanity trays, tray styling, jewelry display, glam vanity | Classy Glam Living

I decorate the vanity as with any vignette, by creating different layers of height.  My tray of perfume bottles is at the lowest. The lifted display cloche creates a mid-tier.  A tall gorgeous bouquet of roses completes the vignette by adding a touch of femininity and glam to the vanity.

Adding Glam to Your Boudoir - a Blog Hop | vanity decor, vanity trays, tray styling, jewelry display on vanity table tray, perfume display on vanity table tray, glam vanity | Classy Glam Living

But we're not done!  I didn't want to hide my statement necklaces in drawers; I love seeing their colors and bling!  This glass display box heard my calling and it's perfect for the necklaces!

Adding Glam to Your Boudoir - a Blog Hop | vanity decor, glam bedside table decor, glam nightstand decor, jewelry display on nightstand, perfume display on nightstand, glam decor | Classy Glam Living 1

What's better than waking up to beautiful jewelries at your bedside table?

Adding Glam to Your Boudoir - a Blog Hop | vanity decor, glam bedside table decor, glam nightstand decor, jewelry display on nightstand, perfume display on nightstand, glam decor | Classy Glam Living 2
Adding Glam to Your Boudoir - a Blog Hop | vanity decor, glam bedside table decor, glam nightstand decor, jewelry display on nightstand, perfume display on nightstand, glam decor | Classy Glam Living 3

And those perfume samples that I collect?  I love keeping the light scents by my bed on a pretty dish.  Spritz away at bed time, and fall asleep with a delightful scent.

Adding Glam to Your Boudoir - a Blog Hop | vanity decor, glam bedside table decor, glam nightstand decor, jewelry display on nightstand, perfume display on nightstand, glam decor | Classy Glam Living 4

Your jewelries aren't only for dressing you up; by decorating with them, they become an extension of you.  I'm a believer that you should display items that you love and make you happy. Seeing the beautiful and organized display on your vanity would give you a great start to your day.  As your day ends, you once again enjoy the view of your beloved possessions as you retire for the night. 

Remember, the simplest way to pamper yourself is by beautifying your surroundings.  Then why not start with your boudoir so that it gives you a happy boost to your day?

I hope you feel inspired to look through your pretty things and find a way to display some of your favorite pieces.  Thank you for joining me here and I hope you come back soon!  Remember to sign up for our blog updates as we continue to DIY our way to add personal touches to our home.  I invite you to hop on over to Bethany's blog The Posh Home and find even more inspiration!  I am loving the ideas shared today.  Don't forget to share these ideas on Facebook or pin them on Pinterest so that you have them when you start decorating!

Don’t miss the rest of these glam boudoirs:

SheLeavesALittleSparkle.com

Moth-Design.com

LoveYourAbode.com

StyledWithLace.com

ClassyGlamLiving.com

ThePoshHome.com

LetsDazzleDarlings.com

TheBlissfulLane.com

Mirrors - The Luxe Factor in a Kitchen

Mirrors - The Luxe Factor in a Kitchen | Kitchen Design | Classy Glam Living

SEE OUR MOST RECENT KITCHEN UPDATE!

Mirrors, mirrors, and more mirrors!  Seems like these recent blog updates are all about mirror installations.  Can't help it, they're the easiest way to give the illusion of added square footage and improve brightness in a small space.  

Installing the mirrors at the back of the kitchen glass cabinets was one of our to-do items on the list, found here.  When we placed the order of acrylic mirrors for our DIY closet doors, we also included an order for the kitchen glass cabinets.  We could've gone to our local home improvement store for a sheet of acrylic mirror and cut them to size ourselves, but we figured we would let the professionals at the plastic company handle the custom-sized cuts.   The cost difference in terms of time and effort would work out to be the same.

The Mr. handled the easy installation process, which was the same as for the DIY closet doors. He test fitted the mirror against the cabinet's back before the installation.  He used the thinnest double sided tape to avoid the wavy reflections.  See?  Doesn't get any easier than double sided tape!

Mirrors - The Luxe Factor in a Kitchen | Acrylic mirror installation | Kitchen Design | Classy Glam Living

Here's a glance at the quick process:

Mirrors - The Luxe Factor in a Kitchen | Acrylic mirror installation in kitchen cabinet | Kitchen Design | Classy Glam Living

The "before" shot, taken after we changed out the builder's knobs and pulls.

Mirrors - The Luxe Factor in a Kitchen | Kitchen Design | Classy Glam Living

And this is the "after" of the mirror backs installation:  (The above photo was taken on a gloomy day.  This one below was taken on a sunny day...  what a huge difference especially with the mirrors!)

Mirrors - The Luxe Factor in a Kitchen | Acrylic mirror installed onto the back of glass cabinets | Kitchen Design | Classy Glam Living

The mirrors add brightness to the otherwise dull cabinet backs.  Not only did the mirrors multiply the brightness and give an illusion of depth, but they seem to have doubled our inventory of stemware as well!

Mirrors - The Luxe Factor in a Kitchen | Acrylic mirror installed onto the back of glass cabinets | Kitchen Design | Classy Glam Living 2
Mirrors - The Luxe Factor in a Kitchen | Acrylic mirror installed onto the back of glass cabinets | Kitchen Design | Classy Glam Living 3
Mirrors - The Luxe Factor in a Kitchen | Acrylic mirror installed onto the back of glass cabinets | Kitchen Design | Classy Glam Living 4

Here's the view of the kitchen from the dining room.  The mirrors are reflecting the light from the patio doors and large windows from this space.

Mirrors - The Luxe Factor in a Kitchen | Acrylic mirror installed onto the back of glass cabinets | Kitchen Design | Classy Glam Living 5

The brightest time of the day in the kitchen is a bit past noon.  On a bright sunny day like when this set of photos was taken, I usually don't bother switching on the lights in the kitchen.  With the lights on, the mirrors catch and reflect the light right back.

Mirrors - The Luxe Factor in a Kitchen | Acrylic mirror installed onto the back of glass cabinets | Kitchen Design | Classy Glam Living 6
Mirrors - The Luxe Factor in a Kitchen | Acrylic mirror installed onto the back of glass cabinets | Kitchen Design | Classy Glam Living 7

The simple addition of the mirrors livens up the little cabinet space, while making the kitchen more welcoming. Now that I'm spending more time at home, nothing makes me happier and more relaxed than a clean and bright kitchen. 

The designs we've integrated into this builder's kitchen allowed for ample counter space, which was a priority for this utilitarian kitchen.  We've added our personal touches to make it more luxe and less utilitarian.  

Mirrors - The Luxe Factor in a Kitchen | Acrylic mirror installed onto the back of glass cabinets | Kitchen Design | Classy Glam Living 8

The kitchen is very close to completion.  It's got most of the large items down, and it looks and functions amazing as is.  Here is a list of what's left to tackle:

  • Install mirror backsplash

  • Build more drawers in lower cabinets

  • Install glass shelves for the glass cabinets

  • Install LED rope lighting for under the upper cabinet

  • Install valence

  • and I forgot to mention to the Mr. that I want the builder's dinky trim at the bulkhead replaced with a thicker one ;-)

Mirrors - The Luxe Factor in a Kitchen | Acrylic mirror installed onto the back of glass cabinets | Kitchen Design | Classy Glam Living 9