New House - Kitchen Appliance Choices to Free-Up Counterspace
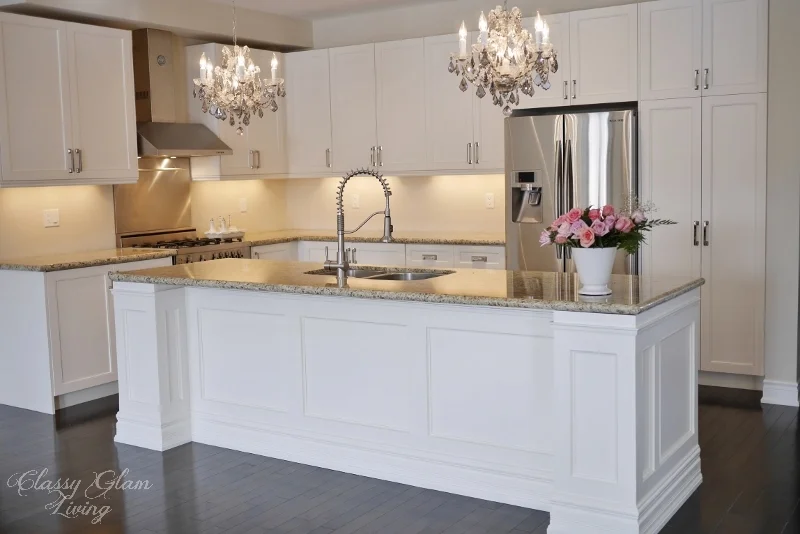
*** CHECK OUT OUR NEW KITCHEN! ***

With the Fall weather upon us, so is the craving for some sweet baked goods to go with a warm latte.  Before our move, I had been lazy to do any baking.  Now I just crave to power up my mixer to churn out some sweetness, but it's packed away...  somewhere.  How ironic is it that I only want to bake when there's really no counterspace at the rental that's conducive to baking?  The best I can do to satisfy my craving for warm baked goods is with this personal-sized mug cake.

Classy Glam Living

Counterspace in a small kitchen is like premium real estate - every single inch counts.  Limited counterspace means the chef and sous chef have a higher chance of being in each other's way.  To spare ourselves from yelling over each other like we're on Hell's Kitchen, my Chef Honey needs an efficient kitchen, and that starts with ample counterspace.  Remember my goal from last week's post on kitchen design?  Happy Chef Honey = More yummies in our tummies!  

My minor problem of not being able to bake is not as serious as the Mr.'s having to prep meals with limited space.  Now that we're experiencing this lack of counterspace efficiency, the Mr. and I can't agree more that we made some right decisions on appliance choices to maximize counterspace for the new house.  

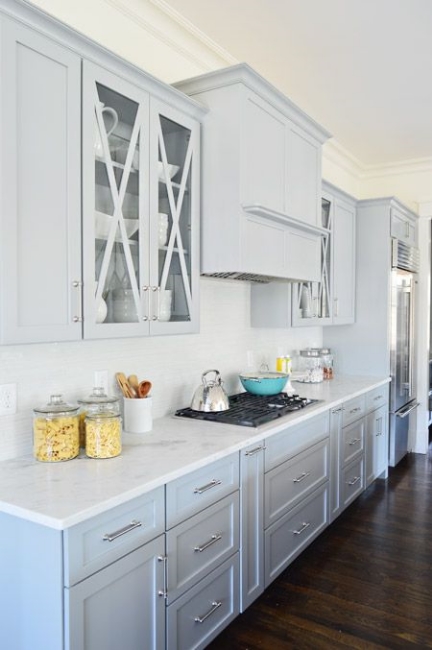
The layout of the kitchen at the new house is similar to the photo below - L-shaped with the sink at the island (or peninsula since there's a wall at the far end of it).  The stove is behind the sink, and forms a work triangle with the fridge on the side wall.  Our kitchen is around 13'x9', so it's similar in length to this kitchen below, but a bit shorter on the side wall where the fridge is.
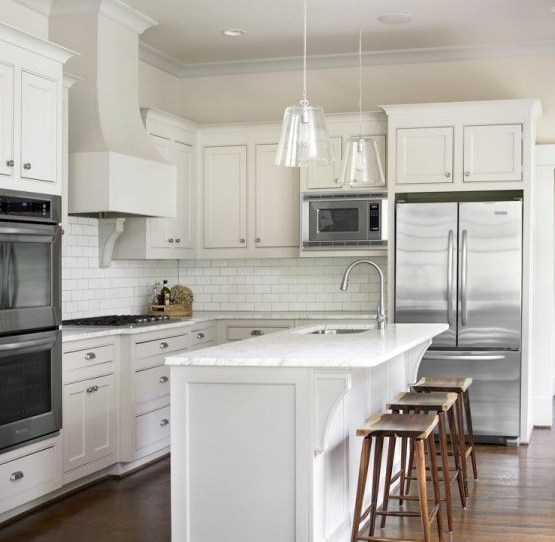
Chef Honey requested to have a 36" range to speed up his cooking process.  My first reaction?  That'll take up some counterspace.  Then we started looking at some wall ovens and microwave combos.  But again, I couldn't help but realize more counterspace will be given up.  With the wall oven and a fridge at the side wall, our counterspace at the L-shape would be like so, shaded in yellow:

counterspace 1.jpg

I could probably have configured the wall oven elsewhere, but the L-shape counter real estate would still be the same.  We also have a countertop microwave, so that means even less available space for Chef Honey.  

So we looked for alternatives and came up with a plan that offers a lot more counterspace.  In fact, the whole L-shape part minus the range will be available counterspace, shaded yellow:

Appliance choices to maximize counterspace | Classy Glam Living

Here are some of our appliance choices to make this ample counter possible.

Forgo wall oven, opt for conventional stand alone range

Our original plan was to go with all drawers under the counter for a minimalist look.  Naturally, that led us to consider a cooktop (with pots and pans drawers underneath) + wall oven combination.  To free up counterspace, I think the best option is to go with a stand alone range instead.  That saves at least 30" of counterspace, ie. the width of a wall oven.  Not to mention configuration problems in a smaller kitchen.  I think wall ovens are best saved for larger kitchens.

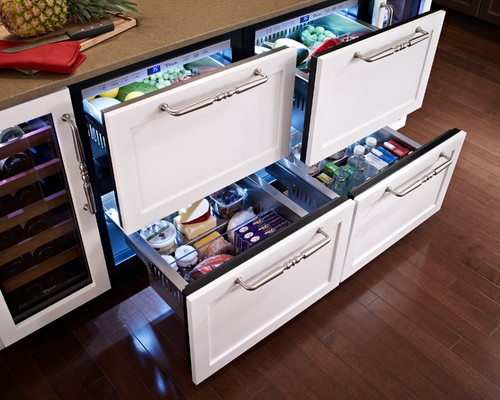
Forgo conventional fridge, opt for undercounter fridge & freezer combo

While we were pondering the minimalist look during the wall oven stage, the Mr. was searching for panel-ready fridges.   Then an ingenius idea lit up...  Since we're on the path to hiding things, why not hide the whole fridge under the counter?  We're a small family, and usually get our groceries on a weekly basis (if we're good).  Stocking up doesn't work for us...  we tried that, but we tend to lose sight of the inventory in the freezer, and more food would go to waste this way.  So for us, 24" of fridge + 24" of freezer drawers combo should work out just fine.  It forces us to keep our inventory moving and be organized inside the fridge space.  Not to mention the main point of freeing up valuable counterspace of almost 3' wide for a conventional fridge.

We would still be discreet with the fridge, and have chosen a fully-integrated unit with panel-ready fronts.  That would give the kitchen a much cleaner look, as the fridge and freezer units blend in with its surrounding cabinet fronts.  We loved the bottom freezer drawer of our fridge at the old house - we didn't have to rummage into the depth of the unit to look for stuff.  For the undercounter fridge and freezer, we'll be going for the drawer option as well.  They'll look similar to this photo:

Forgo the table-top microwave, opt for microwave drawer

The last bit of appliance that takes up counterspace is our existing microwave.  I've seen numerous examples on Pinterest of clearing off the counter of this piece, such as these:

hidden inside a pantry; image via Better Homes & Gardens

hidden inside a pantry; image via Better Homes & Gardens

high up in the upper cabinet; image via Terra Cotta Properties

high up in the upper cabinet; image via Terra Cotta Properties

tucked under the counter; image via Better Homes & Gardens

tucked under the counter; image via Better Homes & Gardens

We occasionally use the microwave to reheat dishes, and it just doesn't seem like a good idea to have it too high up above the counter.  For safety reasons, I think it is best to have the microwave under the counter if we're trying to clear up the counterspace.  On the other hand, I don't think it's very ergonomical to lift something hot out and up onto the counter.  Then I found out about microwave drawers.  The drawer opens up and we would only need to lift the hot item upwards.  That solves the problem!

To leave the lower cabinets of the L-shaped side undisturbed, we decided to put the microwave drawer at the island, on the left side of the sink.  In order to accommodate its size, we had asked the kitchen supplier to extend the island by approximately 9".  Unfortunately, that would have to eat into the space of the kitchen entrance from the hallway, but it should still be decent enough at around 3' wide.

With these space-saving appliance choices, there will be ample counterspace for Chef Honey to prepare some 9-course tasting menus!  He can practically spread out his prepping around the whole kitchen arena.  Did I just set myself up for a ton of washing and cleaning up after him?  Not a problem at all, he enjoys cooking and I want him to enjoy the time he spends in the kitchen, every single inch of it.  Maybe I can even prepare dessert for his tasting menu at the same time he cooks.  That'll be a first!  Let's just hope he shares his space...  

Trendspotting - Kitchen Designs

Trendspotting - Kitchen Designs | New Trends | Classy Glam Living

*** CHECK OUT OUR NEW KITCHEN! ***

Hello there!  I took a little break from blogging the last 2 weeks.  It was little man's birthday party last weekend, so I decided to focus on the last minute party-prepping (thanks to procrastination).  The party went well, kids had a blast, then we sent them home overloaded with sugar.  Ha!  That's what parties are all about!  And now, I've developed a case of paper-cutting phobia.  Anybody who had thrown a Ninjago-themed birthday party would know about the ninja eyes cutting...  

After nights of party-prepping tasks and cutting out ninja eyes and what nots, I quickly made myself a treat and curled up on the couch with the Chatelaine Kitchen and Bath special issue.  I needed to be away from Ninja's staring eyes for a bit.

Loading

A much deserved break after all the #partyprepping today. Time to be a #couchpotato with #Chatelaine's #kitchen&bath issue. Ovaltine with #almondmilk and #baileys Mmm Mmm good! #nomnom #decor #interiordesign

View on Instagram

As I flipped through the issue, I noticed trends that we're also contemplating for our new house's kitchen.  The kitchen is the heart of the house, and being mindful that our new kitchen will be smaller than the one at our old house, we wanted to make it functional and beautiful.  It'll definitely make prepping and cooking all the more enjoyable.  

We'll talk about the functional part of the kitchen in another post.  I'm always ready to talk design, so let's start with some kitchen trendspotting!

Brass or chrome hardware

Having had a white kitchen with chrome hardware, I think we're ready to take the plunge into the unknown.  The Mr. said he's tired of the white cabinets, and so am I.  Nothing was wrong with the colour, but I think we're ready to move on with another cabinet colour.  We've chosen a light grey cabinet colour, which will probably look like these:

image via Younge House Love

The vendor only had the colour swatch on an oak cabinet door, but the grains on it made it hard to imagine how the colour would look on our maple doors.  We will live with the colour a bit to see how we like it.  Ultimately, this is what we love:

A greige (grey + beige, like the first photo) or a darker grey cabinet colour, with brass hardware.  They just go so well together - the grey gives it a modern flare, while the gold tones it down with a bit of traditional touch.  

Why the unknown?  I'm not sure how our stainless steel appliances would go with the brass hardware...  or should I care if we love the look of grey and brass?

statement or practical faucet

Since we're on the topic of brass hardware, the next question is, do we also go with a faucet with a brass finish?  Or would that look way over the top?  I'm also not sure if this brass trend will be short-lived, and will quickly make the kitchen look dated once the fad is over.  If we're ready to embrace it, we've picked out the faucet that will look stunning against the brass hardware:

I think this bronze is a toned down version of its gold counterpart.  It's less "in your face" and yet has the touch of warmth like gold.  

If we decide not to go the brass hardware + faucet route, then I think we would go for a more practical solution for the faucet.  The touch-activated faucets are getting popular now, and I do see how it would be put into much use during meal prepping.  I keep seeing this on TV commercials:

Do let me know what you think about these touch faucets if you own one.  The Mr. and I are finicky about these high-tech gimmicks, afraid that they will break down easily.

Our other practical option would be a kitchen faucet that doubles as a water filter.  This one from Grohe does double duty while looking sleek.

Marble countertop, yay or nay

If you've been to the Interior Design Show in Toronto earlier this year, you would gasp again when you see this IKEA kitchen:

image via Domainehome.com

image via Domainehome.com

The grey cabinets with brass handle, topped with the elegant marble countertop, elevates this big-box kitchen to the next level...  even without those massive chateau chandeliers!  Who doesn't love a kitchen this dreamy?  But then again, lil' ole' practical me just isn't sure about how the marble can withstand our daily abuse.  With it comes along the commitment to reseal every 3-6 months.  Hmm...  The Mr. and I both love the natural grey veining of marble.  We've also considered the engineered stones that resemble the marble veining, like these:

Cambria stone in Torquay

Cambria stone in Torquay

The decision is still up for debate at this point...  I have a feeling that the Mr. will constantly hover over my clumsy back if we choose to go with marble.  Would I want that?

tile or slab backsplash 

While I was browsing through photos of marble countertops, it's not uncommon to find the marble slab carried up as the backsplash.

image via buknola.com

image via buknola.com

We love the beautiful seamless look of a slab backsplash, and it makes the kitchen look extravagant.  However, if budget constraint is a concern, I think the marble subway tiles would look just as classic, at a fraction of the cost.

image via revlayer.com

image via revlayer.com

one large sink or stainless steel apron sink

Enough is enough, I'm just sick of double sinks.  Sure it is more practical to have the divider in between (or is it?), but that divider becomes a nuance when it comes time to wash a large pot or grill, or anything!  It constantly gets in the way!  I used to use the other smaller side for a sink drying rack for little man's plastic cups and plates, but I could just easily place them on a counter rack.

I NEED a single large sink, in which I can soak a dirty frying pan laid down flat.  Not slanted with its handle hanging on the double sink divider...  FLAT!  So I started looking at single sink options.  In particular, I'm looking for a straight edge sink, like this:

Then I noticed apron sinks are all over kitchen renovations these days.  I'm not a big farmhouse fan, but I do love the practicality of having the edge of the sink closer to the edge of the counter.  In fact, it's easier on the back since one doesn't need to lean in as much as traditional sinks.  I'm not crazy about the traditional white apron sinks, but stainless steel options like this one can be a potential candidate:

image via decorpad.com

image via decorpad.com

open shelving or glass-front cabinet

Most builder's kitchens come standard with walls of cabinet doors.  In a smaller kitchen like ours, not only would it seem boring, but could also be a bit too closed-in.  I'm still trying to drill the idea into the Mr., that we don't need uniformity throughout the kitchen with closed doors.  I would like the side wall of the kitchen to have a sense of openness.  We can achieve that with open shelving or glass-front cabinets.

This beautiful display is a great example:

image via simpliedbee.com

image via simpliedbee.com

The corner of the upper cabinets were left as open shelves to avoid a whole upper wall of doors.  It's a great design element to reserve a space for displaying collections and instill some personality in the kitchen.  However, practical me again would question how often we would be dusting those open shelves.  So I think glass-front cabinets such as these would work better for our family:

image via housetweaking.com

The mirror back and glass shelves opens up this side of the wall, making it seemingly wider, while reflecting the light from the windows.  This is a similar side wall that I have in mind, as the mirror backs would reflect the light off of our patio doors.  This is a fight that I'm determined to win over the Mr.!

Wow, this turned out to be quite a lengthy post!  I didn't know I love kitchen design that much, since I'm not the cook of the house.  But a beautiful kitchen makes my Chef Honey happy, and a happy chef makes more yummies for our tummies!  

What's your favourite trend from the above?  What other kitchen design trends have you spotted lately?   


DIY Kitchen Island Makeover

DIY Kitchen Island Makeover - Classy Glam Living

We have always loved our huge kitchen island, which gives us ample prep space for meals.  At over 10-feet long, it's also the dumping spot for lunch bags, mail, and other uncategorized items.  It's great for buffet style get-togethers, where guests hover around to talk and eat.  However, it just looked like a hunk of cabinets, that acted as some sort of border between our family room and kitchen.  The island just looked too OUT THERE to be so plain.

As mentioned in my overly-excited post of our completed DIY kitchen island makeover, I wasn't too confident about this project.  But the Mr. seemed very serious about the project, and being the good wife, I should share his enthusiasm (right?!).  Well, as you know, the rest was history... and was I ever glad to let him perform this cosmetic surgery on our island!  So here it is, as promised, the elbow grease details of the project!


The Mr.'s plan was to build out each end of the island like columns, just to the overhang of the countertop.  We both agreed that a wider built-out would look more proportional to the island.  He decided the easiest way would be to build a 4-sided column.  He got the MDF boards cut to the height of the island, and attached the sides with carpenter glue and nail gun.  Once the columns were dried of the glue, he attached them to the back of the island using nail gun.

DIY Kitchen Island Makeover | Classy Glam Living

We were going for the wainscotting look, and decided that a 2.5" border around the frames would appear more proportional as we stepped away from the island to look at it as a whole. He attached MDF boards and framed around the perimeters, which would be the upper and lower borders of the wainscotting frame.  To cover up the seam between the back of the cabinet and the column, he used the white trim that would become part of the inset frame.  

DIY Kitchen Island Makeover - Classy Glam Living
DSCF0148-watermarked.jpg

He then added small frame trims around the "inner frame" to complete that wainscoting look (excuse the mess on the countertop - our dumping spot).

DIY Kitchen Island Makeover - Classy Glam Living
DSCF0164-watermarked.jpg
DIY Kitchen Island Makeover - Classy Glam Living

With such a long island, a higher baseboard would give it a more ornate look, so we chose a 7" high baseboard for that. 

DIY Kitchen Island Makeover - Classy Glam Living

Yup, that's our Miss. Nosy, running around restlessly with all the going-ons at the island!

Completed look of island with baseboard - my first TA-DA moment

Completed look of island with baseboard - my first TA-DA moment

We included an upper trim in our design to complete the custom look.  The Mr. had to account for an electrical outlet on the side of the island.  He removed the electrical outlet and used a jigsaw to cut out the opening in the MDF border.  

DIY Kitchen Island Makeover - Classy Glam Living

With all the fun in cutting and nailing done, here comes the dirty part...  filling in the nail holes with wood filler and also caulking the seams of the moldings.  Sand and repeat with filling as necessary...  I was the "supervisor" to this part, and of course I got to be as picky as I could be.  I lost count how many times I asked the Mr. to "sand and repeat"…  but he was all game, since he's as much a perfectionist as I am! 

DIY Kitchen Island Makeover - Classy Glam Living

And again, Miss. Nosy over on the right checking on the progress of her lover-boy's project.

Here's another fun part, and the next most stressful part other than getting the moldings done right - PAINT MATCHING.  If the paint didn't match the rest of our existing cabinets, it would make the whole island look like an eyesore.  Our cabinet colour is a creamy off-white, and even a little off would be VERY obvious.  Thank goodness, our local home improvement store was able to match the paint colour of a cabinet door, which Mr. removed to get it matched  (I told you he would do anything to get it perfect). 

Paint matched!  (Lighting in picture created the tone difference)

Paint matched!  (Lighting in picture created the tone difference)

Here we go again - paint, sand, and repeat as necessary...  and again, I searched and felt for imperfections around the built-out, just to have it re-sanded and re-painted.  The Mr. spent so much time on making-over this island, I didn't want a little imperfection to dent the look.  I was glad he had been patient through all this, and making it right the first time! 

DIY Kitchen Island Makeover - Classy Glam Living
Island turned out great!

Island turned out great!

So after lots of ups-and-downs (and that's literal, as his "workshop" is in the basement... carrying up his pieces of wood from the basement to the kitchen, build/ re-cut), I'm so proud of the Mr.'s masterpiece!  We hope you have enjoyed this lengthy tutorial.  The wordy parts don't do much justice to all the blood and sweat that went into the island's making.  

DIY Kitchen Island Makeover - Classy Glam Living

As I stand admiring his new masterpiece, glass of wine in hand, I would tell him how it completes the look of our kitchen.  It looks like it's always been there!  And with him looking so proud of himself, having proven his new-found capabilities, I'm sure he agrees that all his hard work was all worth it! 

We're shopping for some counter stools to make our breakfast bar more functional.  Found these at Target, but it's hard to collect all 3!  It would be nice to have a place to sit, as the Mr. and I chitchat, with one of us is working in the kitchen...  planning for our next home project...  maybe over a glass of wine. 

P.S.:  I guess the Mr. would have a can of Stella...  sorry for the unintentional product placement, but I didn't realize he enjoyed so many cans of Stella until I edited the pictures!