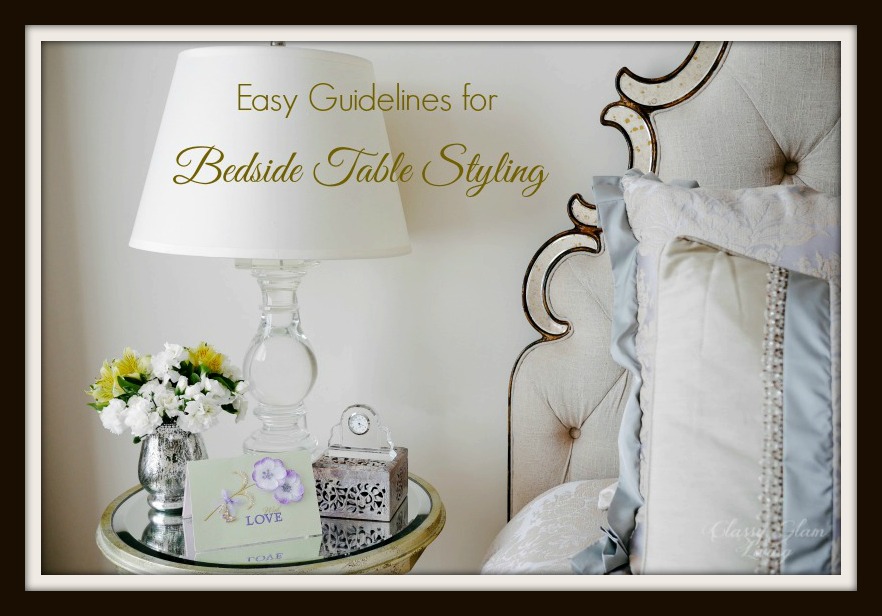
Easy Guidelines for Bedside Table Styling

We welcomed the first long weekend of the summer season a week ago.  The weather was nice, and the sun was shining through my bedroom window...  onto my messy bedside table.  Don't know about yours, but mine has turned into my home's "command centre".  I can occasionally find a pen and notepad on it...  Need a tissue?  I've some remnants of little man's booger/ snot tissue.  Need something to read so I can wind down before bedtime?  There's a stack of mags, no problem.  Time to pay the hydro bill?  It's ok, I have the bill RIGHT THERE.

Sounds like I have a large bedside table huh?  NOT!

Bedside Table Styling Guidelines | Classy Glam Living

How was I able to build a command centre on a small table?!  As I looked at my stash in amazement, I've decided that I would revamp my lovely bedside table from the state of nastiness.  I will make the Mr. proud!

Bedside Table Styling Guidelines | Classy Glam Living

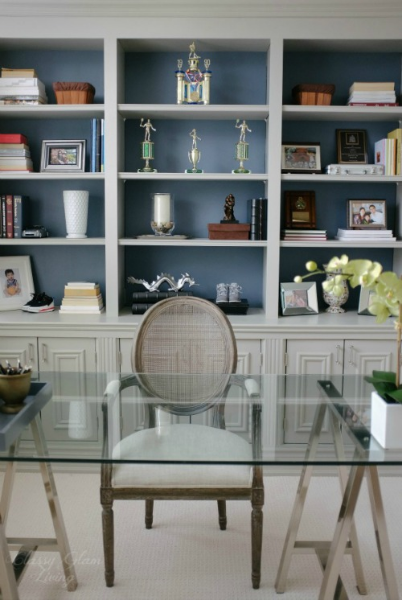
I wanted the headboard's intricate design to be focal point of the space, so I kept items on the beside table to a minimum.

Bedside Table Styling Guidelines | Classy Glam Living

These general guidelines would beautify any table vignettes:

1. Varying Heights - Curating items in varying heights is the constant guideline to achieving balance for any vignettes -  (remember my post on decorating the dining table?) 

2. Something green - Read plants.  What they say is true, any shade of green livens up a space. It compliments any colours in your decor...  is it any wonder that it's the middle colour in the rainbow?

3. Something sparkly - all vignettes should have something shiny to reflect light to attract your eyes, making them linger to appreciate the whole scenery.  

4. Objects with textures - offering contrasting details through different textures is just another way to add visual interest for any tablescape.

Of course the above 4 guidelines aren't the be-all and end-all to decorating your bedside table. Keeping the guidelines short would prevent your bedside table from turning into one with a muddled collection like mine!  So, with these guidelines in mind, here's how my essentials played out.

Bedside Table Styling Guidelines | Classy Glam Living

The lamp is usually the anchoring piece on the bedside table, with it most likely being the tallest item.  A general rule of thumb would be that the height/ size of the lamp should be proportional to the height of the headboard or size of the bed, in order to anchor the space beside the bed. Think lamp sizes at Target...  a king size bed should at least be paired with large lamps.  Anything smaller may be dwarfed by the large size of the bed.  Smaller beds can get away with smaller lamps, but keep in mind that a large shade may take away the presence of a small bed.  If you have small table lamps, then artwork can also be hung beside the bed to visually bridge the gap between the height of the headboard and the table.   

Bedside Table Styling Guidelines | Classy Glam Living

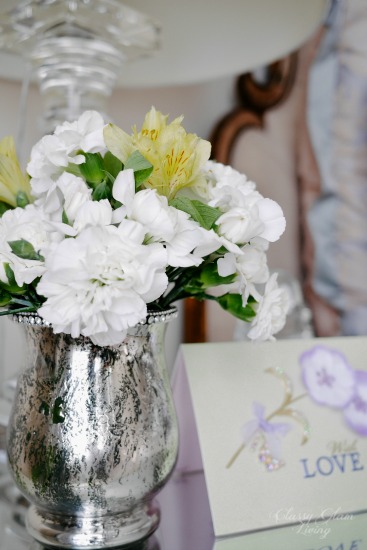
I went with some fresh flowers for "something green" to liven up my side of the bed, and kept them in a shorter vase for varying height.  I chose carnations as they just last forever with minimal care!  The vase mimics mercury glass, which together with its rhinestone edging, adds the "something sparkly" element on my table.  Our mirror top tables also reflect light from the nearby window...  more sparkly! 

Bedside Table Styling Guidelines | Classy Glam Living

The florals and my soap stone knick-knack box created some contrasting textures against the smooth and shiny lamp and vase.  I like having a lidded box on the table to keep my tube of hand cream and other lose items (you know, pens and paper pads).  Aside from its obvious purpose, the rectangular box was juxtaposed with the roundness of the baluster lamp and barrel shape vase to create a balancing effect with different shapes.  It was also the next layer in the height variance of the tablescape.

Bedside Table Styling Guidelines | Classy Glam Living

If our bedside tables were a bit larger, then maybe there would be room for some artwork .  For now though, I would add some colours with a special occasions card - birthdays, valentine's, Mother's Days, and Christmas (did I miss any?).  At the rate I clear my bedside table (not very often), each can stay on for several months for a good rotation!  Little man's masterpieces sometimes also make their way to my table - "Mommy, I drew something awesome for you!" They're FOR ME, so I feel obligated to showcase it by my bed.  ;-)

The Mr.'s side?  Bleh...  

Bedside Table Styling Guidelines | Classy Glam Living

He's utilitarian (and territorial) and doesn't like too many things on HIS table.  So I've only added a faux grass plant on his side, leaving his black notebook for home project ideas untouched.  =)

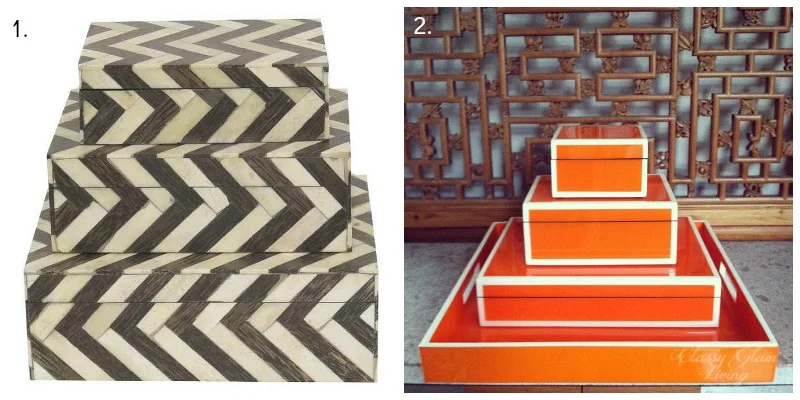
In the meantime, we're looking to upsize our bedside tables to something like these...  Anything with hidden storage to cover my mess, as the Mr. would say!

New Bedside Table | Classy Glam Living

Sources:  1. Pottery Barn / 2. One Kings Lane / 3. Bowring / 4. Joss & Main

So...  when was the last time you cleaned up and beautified your bedside table?  Time for a late spring cleaning!

Bedside Table Styling Guidelines | Classy Glam Living

Objets d'art for Our Office Built-in

I always knew it, but pretended to ignore it.  As I was looking through the photos of our office built-in for last week's post, I knew I had to face it.  The diagnosis - the shelves glaringly lacked some objet d'art.  We tried to be cost conscious and dared not venture into our favourite home accessories stores...  knowing us, we would go on a shopping rampage to fill up our book shelves!  To furnish the built-in shelves, we shopped around the house, and digged out from our office boxes packed from several years ago, for anything displayable.  But a picture is worth a thousand words, and our built-in is begging to be dressed up - it totally deserves it.   And so, here I go for some window and virtual shopping.

What I am on the look-out for...

1. BOOKENDS

I was the reader of the house (not anymore, been lazy) so I have a small collection of books.  The Mr., hmm...  I actually don't remember ever seeing him reading for more than 5 minutes, and if he did, that was most likely a picture-filled magazine of his hobbies.  Anywaysss...  Aside from their usefulness, bookends are the simplest way to add whimsical visual interest to balance the seriousness of a bunch of books on the shelves.  

Gold is all the rage these days.  This pair of gold aircraft and propeller bookends on chrome backing would bring some shininess to the shelves.  I really regretted not getting them!

Aircraft & Propeller bookends shelves styling | Classy Glam Living

I was at Target the other day and saw this pair of brass anchor bookends for their Coastal collection.  Again, why didn't I just grab them? (Click to view source)

Hubby loves anything with an equestrian theme.  He would be happy with this pair of brass horse bookends, and I love the marble base!

To keep with the equestrian theme, I've been seeing a lot of these vintage stone carved horse head bookeneds...  but have yet to find a pair in decent condition at a good (bargain) price.

Since we're on a natural stone path, how about a pair of agate geode bookends?  I love the variety of colours they're available in.  They add an instant colour pop on the shelves.  I think I used to have a pair of amethyst bookends.  Don't tell me I tossed them!

2. EARTHENWARE (vases)

If the boys can have their share of aircraft/ anchor/ equestrian  bookends, then I think we need something feminine to balance the masculinity.  I'm a vase hog and I know I have more than enough at home.  But they're easy to work with on shelves - either on a standalone basis or in groups.

I love anything girly, and the current trend of lace ceramic vases is just my cup of tea!  I saw similar lace vases at Homesense in irridescence...  again, you know what I'm gonna say...  WHY DIDN'T I JUST GRAB THEM??

This one from Target's Nake Berkus collection would be my touch of gold...  on clearance now!

This group of earth vases can be scattered in small groups through the shelves.  I like the toned down colours of the pieces against our dark neutral blue background.

3. BOXES

You can never have enough boxes in the office.  Knowing me, I'm bad with filing and can be messy with my mail, opened or unopened.  Large boxes would be great for hiding mail, while knick-knacks can reside in the smaller ones.  I love these stacks for a geometric design or a laquered color pop.

Stack of Boxes | Shelves Styling | Classy Glam Living

Sources:  1. / 2.

Just as the Mr. is a sucker for anything equestrian, I'm one for agate geodes (as I've introduced above).  These boxes would hold their own, looking all ready and dressed up!

Agate on Box Lids | Shelves Styling | Classy Glam Living

Sources:  1. / 2.

4. MORE OBJETS D'ART ACCENTS

The hubby has a nice replica of "The Thinker" sculpture on the shelf.  Here are some more fancy stuff that I have my eyes on...

We saw a similar spindizzy at Homesense and the little man couldn't get enough of it!

This pair of gold antlers look very luxe rustic.  Or maybe I should keep it in our dressing room for hanging bracelets?

And lastly, remember my love of natural geodes, need I say more?  This piece is absolutely stunning!  How can I not love it when it's even gold-dipped on the back?

The best objets d'art of our shelves right now?  They're undoubtedly the trophies that the Mr. had proudly displayed.  Those I will not (and cannot) touch =)

Personal momentos are by far the best objects to be displayed on shelves.  But all shelves need some focal interest to complement our personal collections.  Let's take a look at the results of my virtual shopping spree!

Before After Shelves Styling | Classy Glam Living

Hoping to gradually transform our built-in with these objet d'art!  What was your most recent purchase of objet d'art?  What's your favourite item on display at home right now?


DIY Built-in Office Cabinet

DIY Office Built-in Cabinet | Classy Glam Living

After we've moved into our current house for more than 2 years, the room that we had destined to be our home office was anything but!  

Before DIY Cabinet | Classy Glam Living

The Mr. was complaining about all the mail and junk that were piled on our kitchen island and the IKEA desk in the office, but where else can I store anything?  The closet of the "office" room was already filled up to the top with STUFF.  Not to mention, we still have tons of office-destined stuff still in boxes in the basement! 

And so I bombarded the Mr. with pins from my Pinterest office board.  Once he sees something inspiring, he would get to work =)  

I wanted the layout to have a storage unit similar to this at the long wall, with a desk in front. This is the layout I came up with for our office:  

Office Layout | Classy Glam Living

The storage unit measured about 8-feet, leaving enough room for the closet door on the adjacent wall to swing out fully.  The Mr. removed the baseboards at the built-in area, so that they can be re-used on the unit.  

DIY Built-in Office Cabinet Bottom Instructions | Classy Glam Living

1. This picture was of the Mr.'s original plan with 2-sectioned bottom cabinets.  But I fought for having 3 sections instead.  For one, the swing out doors would be smaller, which means we wouldn't need as much space between the desk chair and front of the unit.  Yes, several inches would make a huge difference in this room!   

2. He used plywood for the countertop and floor-bottom of the cabinet.  The cabinet's frames were made of 2"x4" at 20" deep.  We wanted the top of the counter to sit just below window trim at the far wall, so the Mr. made the bottom frames just high enough to account for the thickness of the plywood countertop (3/4") and the 2"x4" laid across the length of the cabinet frames to support the top.  

3. and 4. Next up, he screwed in 0.5" thick MDF boards on the sides of each section, and the front plates of each section frame.

5. He added the ornate trims on the front plates, and enough space on the sides for the doors to swing out fully.  The trims were only the same height as the doors, because he added an MDF board that would go across the bottom where he would attach the baseboard to.

DIY Built-in Office Cabinet Bottom Instructions | Classy Glam Living

6. The cabinet frame and countertop were painted, and the top screwed in... 

7. and chair rail trim added around the countertop.  The baseboards can finally be added back on!

8. The cabinet doors were made of MDF.  The Mr. added a decorative trim in the front to match the ornate design of the section trims.  He left around 1/8" of spacing between the doors to ensure they don't brush against each other when open-and-closing.  

DIY Built-in Office Cabinet Upper Shelves | Classy Glam Living

1. We wanted the shelves to come out to just beside the window trim at the far wall, which was 15" deep.  The Mr. took the easy way and got pre-drilled laminate boards as the shelf supports, and they were just shy of 15".  He painted them first before they were attached to the wall by 1"x4".  The shelf supports were also connected to each other by 1"x2" at the top for added sturdiness.

2. After the shelf supports were up, The Mr. nailed in 0.5"x1.5" plywood trim to hide the seam front of the shelf supports.  He also nailed in an MDF board across the top of the frame to add boldness to the crown moulding. 

3. And then, his favourite part ever - filling in the nail holes with wood fillers and sanded them down.

4. This is my favourite part, we added a contrasting backing to the upper shelves.  This creates more visual impact.  Even though we chose a blue, the colour is still neutral enough as a background.  See colour source below. 

5. For the height of the cabinet, the shelves would look more proportional with 4 tiers.  As you can see in the photo, one of the boxes of office items was already waiting to be unpacked after being in the box for 2+ years since we moved!

6. The shelves were finished with a tiny chair rail trim, glued and nailed to the front of each shelf. 

7.  All was not done until a coat of minwax was applied all over the surface of the unit.  We definitely didn't want to leave a tacky feeling on the painted shelves and countertop!

Grey and Blue combination | DIY Built-in Office Cabinet | Classy Glam Living

We love this colour contrast of the cabinet unit and the shelf backing.  The grey and blue combination takes on different depths as the natural light changes throughout the day from our window wall.

Again, here's our layout and outcome. 

Office Layout | DIY Built-in Office Cabinet | Classy Glam Living
Completed Office | DIY Built-in Office Cabinet | Classy Glam Living
Complete Side View | DIY Built-in Office Cabinet | Classy Glam Living
Front View | DIY Built-in Office Cabinet | Classy Glam Living
Side View | DIY Built-in Office Cabinet | Classy Glam Living
Front View | DIY Built-in Office Cabinet | Classy Glam Living

The Mr. really built this unit to last.  He was even showing me he could stand on the counter and it wouldn't even move an inch.  Uh, please get off before the little man sees you!  

The big kid had once again outdone himself.  I would say this was more labour intensive than our kitchen island and dressing room projects.  We finally have a functional office space, with a storage unit large enough for our office essentials  (and more importantly, to hide my mess behind those closed doors)!  

side view | DIY Built-in Office Cabinet | Classy Glam Living

Paint colours:

  • Grey colour of unit - Behr 730F-5 Nature Retreat
  • Blue backing of shelves - Para Paint P5201-52 Coastal Views
Completed View | DIY Built-in Office Cabinet | Classy Glam Living

How do you like the colour contrast of the cabinet?  Or would you prefer a traditional white built-in?