DIY Refinishing Vintage Bedside Tables

DIY Refinishing Vintage Bedside Tables | Classy Glam Living

When I was still under my parents' roof, I painted my bathroom's boring laminate grey vanity in a sky blue colour and changed out the ugly plastic knobs to brushed nickel ones from Umbra.  Quality of the paint job?  Questionable.  Changed for the better?  Absolutely.  It was a joy for my young self to walk into my bathroom with a cheerfully coloured vanity. I had it in me back then to beautify dull dinginess, and I've grown to love discovering potentials in pieces even more.  That was how I discovered these vintage night tables in the Henry Link Bali Hai collection, and the Mr. breathed new life into them. (I've now passed on the dirty work (-;)

Source list at the bottom of the post.

DIY Refinishing Vintage Bedside Tables | Classy Glam Living 2

The Mr. did some basic prepping a while ago, as mentioned in this previous post. He removed the backing and unscrewed the top, since we planned on replacing it.

DIY Refinishng Vintage Bedside Tables | Basic Prepping Steps | Classy Glam Living

Removing the drawer pulls made it easier for cleaning. Make sure you give the piece of furniture a thorough cleaning on all surfaces if you're planning to repaint it. The primer and paint need to stick to the surface, not on dirt!

We chose to go with two knobs on each drawer.  We first eyeballed the approximate positions for the two knobs, and the Mr. measured the distance from one side and replicated that on the other side.  

DIY Refinishing Vintage Bedside Tables | Drilling for Drawer Knobs | Classy Glam Living

He then filled out the holes left from the original hardwares and sanded them.  For a smoother finish, the holes were re-filled and re-sanded a second time.  

DIY Refinishing Vintage Bedside Tables | Classy Glam Living

The Mr. preferred to use a roller when applying the primer and painting the tables, and a brush for touching up the details.  The tables were in decent vintage condition, so he only applied one coat of the Zinsser primer.  His review on the primer was that it went on very well, and the paint adhered to the primer smoothly.

DIY Refinishing Vintage Bedside Tables | Primer Application | Classy Glam Living

He noticed brush strokes on the finished white table, which was most likely painted with a brush.  He had to lightly sand the surface before it could be re-painted.  

We chose a light grey colour in a glossy finish for a contemporary look. Two coats of paint were applied on the tables to get the evenly layered glossy look.  

DIY Refinishing Vintage Bedside Tables | Behr's Silver Bullet in Glossy Finish | Painted in Glossy Grey | Classy Glam Living

After the paint had cured (best to wait a day for the paint to fully dry), it was time to re-attach the backing of the bedside tables.  He also painted them with the same grey paint before re-attaching.  This project was a good excuse for the Mr. to get the one tool that he's been missing - a cordless staple gun.  

DIY Refinishing Vintage Bedside Tables | Re-attaching Backing with Staple Gun | Classy Glam Living

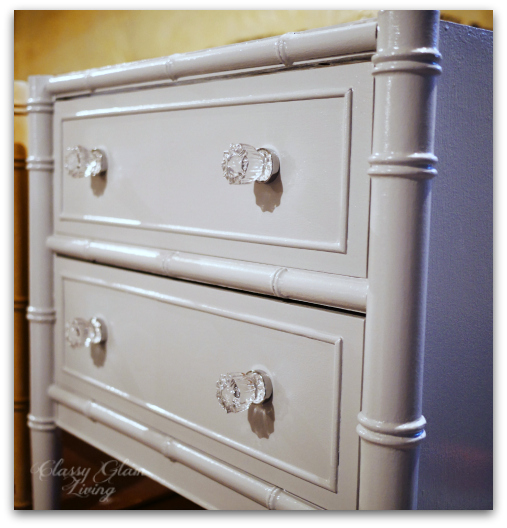
Next was adding some jewels to the tables.  We love the style of this glass knob; it gives a vintage vibe, while the chrome backing gives it a bit of modern touch.  

DIY Refinishing Vintage Bedside Tables | Lee Valley Tools | Classy Glam Living
DIY Refinishing Vintage Bedside Tables WITH Glass Knobs Installed | Classy Glam Living

Last but not least was the crowning of the bedside table with our beloved marble top.  Its lines and edge profile were fabricated from the original table top.  We love how the marble top adds sophistication to the simple elegance of the night tables.

DIY Refinishing Vintage Bedside Tables WITH Statuario Marble Top | Classy Glam Living

And with that, here's the completed look of the refinished bedside table!  I can't wait to move into our new house, so that we can finally install our mirror headboard and see how our "new" bedside tables match up against it!

DIY Refinishing Vintage Bedside Tables Finished Look with Statuario Marble Top | Classy Glam Living

Thanks to the Mr.'s elbow grease, the tables turned out exactly how I envisioned them!  They now look all grown up from their previous ugly duckling selves when I first laid eyes on them.

DIY Refinishing Vintage Bedside Tables Closeup with Statuario Marble Top | Classy Glam Living
DIY Refinishing Vintage Bedside Tables | Closeup with Statuario Marble Top | Classy Glam Living

I had initially wanted to install new brass pulls to mimic the original feel of the tables, but I'm glad the Mr. convinced me to use two glass knobs on either side of the drawers instead. They made the pieces look more elegant.

The grey paint on the tables is a nice neutral colour that helps to accentuate the grey veining in the statuario marble top. 

DIY Refinishing Vintage Bedside Tables | Closeup with Statuario Marble Top | Classy Glam Living

I'm so glad the Mr. agreed to refinish this set of vintage bedside tables.  They turned out gorgeous!  We finally have the storage we've always wanted in the night tables, and the marble top gives it all the more reason to clear off the surface to enjoy its natural beauty, 

Another DIY project in the queue done and done!  Stay tuned for the next one in queue!

Source List

DIY Projects in Queue

The Mr.'s favourite pastime is undoubtedly working on home projects.  This long hiatus from them while we're at the rental is making him anxiously restless,  Some nights, he would be watching DIY videos, to sharpen his skills and gather as many tips as he can for our new house's home projects.  

Seeing that his hands are itching for some projects, I put my shopping skills and eagle eyes to work!  I've been curating some small projects for the Mr. to work on, to keep him at top notch condition :-)  

DIY Sea Fan Artwork

We picked up this gold sea fan placemat during our recent visit to Elte Mkt.  It's a great size, and we knew it would look amazing as a framed piece of art.

Gold Sea Fan Placemet at Elte Mkt | Classy Glam Living

Framed sea fan pieces can get quite pricey.  With this inexpensive placemat (only $10!), we can DIY something similar at a fraction of the retail price!  This is an inspiration piece that we would often see:

And here is our take on the framed sea fan. 

DIY Floating Sea Fan in IKEA RIBBA Deep Frame | Classy Glam Living

This was one of the two projects he completed over the recent long weekend.  Of course it's the Mr.'s masterpiece...  it would've been an epic fail if I had attempted any part of it.  We'll share the details of this DIY soon!

Refinishing Bedside Tables

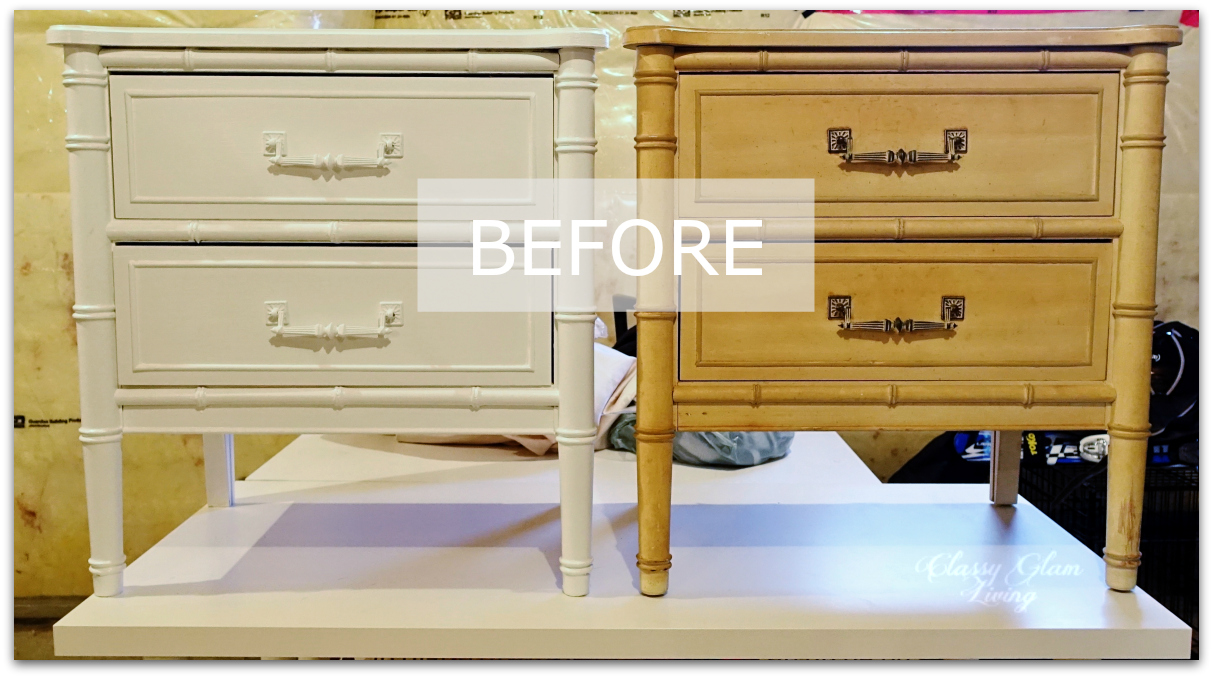
I knew that the sea fan project wouldn't keep the Mr. busy for too long.  As mentioned in a previous post, I came across this pair of vintage beside tables and just loved the bamboo detailing of the pieces.  

PAIR OF HENRY LINK BALI HAI BEDSIDE TABLES | CLASSY GLAM LIVING | DIY REFINISH

It's still a work in progress, but I'm happy to report that everything's ready to go!  The Mr. is in the process of painting the pieces in a glossy finish with Behr's Silver Bullet:

BEHR paint Silver Bullet | Classy Glam Living

After he's done with painting the bedside tables, he can install the hardwares that we've recently picked out for the drawers.  Instead of going with drawer pulls, we chose these glass knobs to go on either side of the drawer.   It's a more contemporary look and would transform the tables glamourously!

Glass Knobs for Beside Tables | Classy Glam Living

The 2 pieces of statuario marble have also been fabricated.  The edge profile of the marble mimics that of the original table top.  We can't wait to install them on the bedside tables!!!

Fabricated Statuario Marble Bedside Tables Top | Refinishing Night Tables | Classy Glam Living

Marble Coffee Table 

I had wanted an open bottom coffee table with glass top for the living room, as illustrated in the design board.  Instead, I found a traditional marble coffee table on kijiji at an amazing deal!  It has solid wood construction, with a carrara marble top, but the wood stain was too traditional to our liking.  At the price we paid, I don't think we can even get the coffee table legs of a new piece!  I love the curvy lines of the marble top and had originally planned to replace the legs with fabricated brass coffee table legs, but the Mr. loves the original ones.  The seller was nice to note there were some nicks on one of the legs, but it didn't matter to us, as we planned to repaint the wooden bottom to a glossy light grey.  That would be a better match for our living room's transitional and neutral style.

Refinishing Traditional Marble Coffee Table | Repainting | Classy Glam Living

Refinishing and Reupholstering a Set of 4 Louis Chairs

I never thought that Instagram would be my shopping source.  When I came across this set of 4 previously-loved Louis chairs posted for sale on Paint It Like New's Instagram account, I knew I just had to snatch them..  How can I pass on the great deal of $50 each for these maple chairs?  

We plan to eventually have a bar area built in our finished basement/ family room, with a small eating area.  These chairs would be perfect for the spot!  My plan is to have them repainted and reupholstered with tacks.  I'm so glad the Mr. is all game for our (HIS) first attempt in reupholstering!  This is the look we're going for:  

I think the Mr. has enough on his plate for now, and I seriously need to stop looking at kijiji or other vintage shops...  it's not easy to pass on a good deal!  He's a happy camper again, rushing down to the basement to continue with his project after we put little man to bed, not to mention the occasional runs to the home improvement "candystore" to get supplies for his DIY project.  

The Mr.'s goal is to complete the reupholstering of the chairs before we move in.  It's all about time management, and he knows he'll be busy with other projects after we're in the new house.  These small DIY projects not only help to keep the Mr. entertained, but his refinishing of the pieces will beautify our home, each piece with a story to tell.

Master Suite Series - Master Ensuite

I've come to realize that getting ready in the mornings with the Mr. is a luxury that I miss from our old house.  We were spoiled with double sinks in our previous master ensuite, making it a breeze to share the bathroom in the mornings.  Our current bathroom situation at the rental?  The master ensuite is a utilitarian space, with a single sink and vanity... do your business, in and out, not a place to linger.  The Mr. is letting me have the ensuite to myself, while he preps for his day at the main bathroom, before little man gets up.

The one space I'm lookng forward to most at our new house is, you guessed it, the master ensuite. The new house's master ensuite has a practical layout with features that I love.  

As mentioned before in the first master suite post, an alley separates the closet to the right and ensuite to the left.  That makes the ensuite a long rectangular room, and a bit longer than the closet.

I was actually able to find photos on Pinterest that look similar to our ensuite's layout and size.   The entrance to the ensuite faces the double vanity, which is flanked by a stand-alone tub on the right side, with a window facing the tub as such:

And a full length shower to the left end of the ensuite, with a window above the toilet.

Amazing what you can find on Pinterest!

Modern day master ensuite is not only a room for "personal business", but more so a relaxing spa-like space to enjoy.  That is my goal to turn this builder ensuite into our sanctuary at a reasonable budget. 

The one main change we did for the ensuite was replacing the double swing-in bathroom doors with a pair of pocket doors.  I struggled with this change for a while, because I have always envisioned changing out the pair of original solid doors to a pair of beautiful french doors.  The brass handles on this pair are simply divine:

Source unknown

Source unknown

But our house has an "open door policy", such that no doors should be left at less than wide opened, for fear of monsters hiding behind the door... (and let me tell you, it wasn't my request nor the little man's).  If I've to leave our ensuite doors open flat at all times, then I wouldn't be able to put anything at the walls behind them, losing out on valuable space.  After looking at the layout of the ensuite for the millionth time, I checked with the Mr. if he would be open to a set of pocket doors instead.

And he was!  Here's a photo of our ensuite taken from the closet across.  You can see the framed slots for the pocket doors on either side of the entrance.

POCKET DOORS FRAMING | NEW HOUSE MASTER ENSUITE | CLASSY GLAM LIVING

With the pocket doors in place, now I can turn the left nook behind the pocket door into a stylish usable space.  I can decorate the space with an etagere, or install a train rack on the wall and pair it with a stool.

With the vanity facing the entrance of the ensuite, I wanted it to be a beautiful piece.  Here are some of my favourite vanities of different styles:

Vanity Styles | Classy Glam Living | clockwise from top right:  Belle Vivir, Brian Gluckstein Design; home adore, Restoration Hardware.

Vanity Styles | Classy Glam Living | clockwise from top right:  Belle Vivir, Brian Gluckstein Design; home adoreRestoration Hardware.

As much as we love the open bottom style, we'll have to go with a vanity with storage, since we've made another change to the floor plan to delete the only linen closet in the house.  The Mr. doesn't quite like the floating style, so my compromise would be the furniture look.  It provides the storage we need, with a slightly open bottom on furniture legs to make the bathroom appear more spacious.

We're installing white glossy floor tiles, so we would go with a grey vanity for some contrast.  We asked the builder to install 3 light boxes for our sconces.  In place of the builder's large wall mirror, we'll have two individual beaded vanity mirrors.  I love a light crisp colour on the walls of the bathroom to add some contrast against all the whites and greys.  Last but not least, I think the Mr. would LOVE to add some wainscoting to our bathroom!

New House Master ensuite design board | vanity view | Classy Glam Living | Sources: Vanity Muti; mirror Home Depot; Single and Double Scounces Restoration Hardware; wall colour Benjamin Moore Marilyn's dress; crop of wainscoting Lowes

New House Master ensuite design board | vanity view | Classy Glam Living | Sources: Vanity Muti; mirror Home Depot; Single and Double Scounces Restoration Hardware; wall colour Benjamin Moore Marilyn's dress; crop of wainscoting Lowes

Another design feature in our master ensuite is the wall by the free-standing tub.  It's like a blank canvas that spans the length of the tub.  We can either take the modern route, with bookmatched marble wall as such...

Or a more classic approach, with a marble ledge that is supported by corbels, going across the length of the wall. 

New House Master Ensuite | Tub Feature Wall Design | Classy Glam Living | Marble ledge image (VIA); Tub Home Depot; Chandelier feiss; side table Joss & Main; Corbels home depot.

New House Master Ensuite | Tub Feature Wall Design | Classy Glam Living | Marble ledge image (VIA); Tub Home Depot; Chandelier feiss; side table Joss & Main; Corbels home depot.

The wainscoting that the Mr. will install would continue to the wall behind the tub as well.  A small side table for a drink to enjoy in the soaker tub, dimmed light from the mini crystal chandelier above the tub, would be the perfect ambiance at the end of a day.

I can't wait to plunge into the deep soaker tub in our new master ensuite, and I won't get up even after my skin turns wrinkly like a prune.  Afterall, I've waited long enough to enjoy this bathroom! While the Mr. hangs out at his workshop for the numerous projects at the new house, I'll be...  right here.